How to help your child with writing informative essays
Writing informative essays is a powerful way to share knowledge, express ideas, and explain complex topics in a structured and clear manner. Whether your child is writing for school or working on a research paper, learning how to write an informative essay can help them organise their thoughts and communicate effectively. In this guide, we’ll break down the steps to writing informative essays, providing tips, examples, and strategies to ensure success.
And, if you need a bit more help, a writing tutor for kids in New Jersey can help children overcome common challenges such as writer’s block, poor grammar, or difficulty with structure. Tutors can also empower kids to become more confident and competent writers, setting them up for success in their academic pursuits.
What is an informative essay?
An informative essay is a type of academic writing that aims to educate or inform the reader about a specific topic. Unlike persuasive essays, which attempt to convince readers to adopt a certain viewpoint, informative essays present facts and explanations without bias. The purpose of an informative essay is to present a well-rounded view of a topic using reliable data, research, and clear explanations.
Why do we write informative essays?
Writing an informative essay is essential for several reasons. It encourages kids to:
Develop critical thinking skills: Informative essays require kids to research and analyse information, improving their ability to think critically about a topic.
Enhance writing abilities: This type of writing teaches students how to structure their thoughts logically and present them clearly.
Increase knowledge: The research process helps kids learn about new topics, which promotes a deeper understanding of various subjects.
The structure of an informative essay
An informative essay typically follows a standard five-paragraph structure. This format allows for clear communication and easy readability, ensuring that each part of the essay serves a specific function.
1. Introduction
The introduction sets the stage for your essay. It introduces the topic and provides essential background information. A good introduction should:
Hook the reader’s attention: Start with a compelling fact, question, or statement to draw the reader in.
Include a clear thesis statement: The thesis statement is the main idea of your essay. It outlines what the essay will discuss and provides a roadmap for the reader. Example:
“While the history of the Eiffel Tower is fascinating, its architectural significance, design, and impact on Parisian culture are often overlooked.”
2. Body paragraphs
The body paragraphs form the core of the essay, where the bulk of the information is presented. Each body paragraph should:
Start with a topic sentence: This introduces the main idea of the paragraph and ties it back to the thesis.
Provide evidence: Use facts, data, or quotes to support the information presented.
Conclude the paragraph: End with a sentence that summarises the point and transitions to the next paragraph.
In an informative essay, you may have between three and five body paragraphs, depending on the length and complexity of the topic. Each paragraph should focus on a single key point that contributes to the overall thesis.
3. Conclusion
The conclusion summarises the key points made in the body paragraphs and restates the thesis in a fresh way. A strong conclusion should:
Reinforce the thesis: Remind the reader of the main idea of the essay.
Summarize the key points: Provide a brief overview of the arguments made in the body paragraphs.
Leave the reader with a thought: End with a final thought or call to action that encourages further exploration of the topic.
Steps to writing an informative essay
Writing an informative essay may seem challenging, but by breaking it down into manageable steps, your child can approach the task confidently.
Step 1: Choose a specific topic
One of the most important steps in writing an informative essay is selecting a topic that is both interesting and manageable. Ensure that the topic is specific enough to provide detailed information, but not so broad that it becomes overwhelming. For example, rather than writing about “history,” focus on a specific aspect, such as “the history of the Eiffel Tower.”
Step 2: Research the topic
Before starting to write, your child should gather information from credible sources, such as books, articles, academic papers, and websites. Researching thoroughly will help them gain a deeper understanding of the topic and provide the foundation for their essay.
While researching, students should take notes on key points, facts, and quotes that they can include in the body paragraphs. Encourage them to note the source of each piece of information, as citing sources properly is essential in academic writing.
Step 3: Create an essay outline
An outline is an essential tool for organizing the research and ideas before beginning to write. It helps structure the essay and ensures that each section is clear and focused. Here’s a basic structure for an informative essay outline:
Introduction
Hook
Thesis statement
Body Paragraph 1
Topic sentence
Supporting evidence
Concluding sentence
Body Paragraph 2
Topic sentence
Supporting evidence
Concluding sentence
Body Paragraph 3
Topic sentence
Supporting evidence
Concluding sentence
Conclusion
Restate thesis
Summarize key points
Final thought
Step 4: Write the introduction
Once the outline is complete, your child can begin writing the introduction. This is where they will set the tone of the essay and provide background information to the reader. They should aim to grab the reader’s attention right away, and ensure the thesis statement is clear and precise.
Step 5: Write the body paragraphs
The body paragraphs will form the bulk of the essay. Each paragraph should begin with a topic sentence that introduces the main idea, followed by supporting evidence, such as statistics, facts, or quotes from sources. Each paragraph should end with a sentence that wraps up the discussion and smoothly transitions into the next paragraph.
Step 6: Write the conclusion
In the conclusion, your child should summarise the key points made in the body paragraphs and restate the thesis in a fresh way. They should aim to leave the reader with a lasting impression or a thought-provoking idea.
Step 7: Revise and edit
Once the first draft is complete, your child should read through the essay to check for clarity, coherence, and grammatical accuracy. They should look for any areas where the writing can be improved, such as awkward phrasing or unclear arguments. Encourage them to check for spelling and punctuation errors as well.
Common challenges in writing informative essays
Students often face various obstacles when writing informative essays, especially if they are new to the process. Here are some common challenges and tips for overcoming them:
1. Writer’s block
Many students struggle to start writing, feeling overwhelmed by the task. To overcome writer’s block, encourage them to break the assignment into smaller tasks. They can start by writing a simple outline, jotting down key points, or even freewriting their thoughts without worrying about grammar or structure.
2. Organising ideas
Some students may have difficulty organising their ideas into a logical structure. Using graphic organisers or mind maps can help students visualise how their ideas relate to one another. Encourage them to group similar points together and to ensure that each paragraph focuses on a single main idea.
3. Grammar and sentence structure
Proper grammar and sentence structure are crucial for clarity. If your child struggles with these aspects, consider having them work with a tutor or using grammar-checking tools to identify mistakes.
4. Citing sources properly
Accurate citations are essential in academic writing. Make sure your child understands how to properly cite their sources in the required format (e.g., APA, MLA, Chicago). There are plenty of online tools that can help generate citations automatically.
How can writing tutors support kids struggling with essays?
Writing tutors play a crucial role in helping kids who struggle with writing essays. By providing personalised guidance, tutors can help children develop the skills they need to improve their writing and feel more confident in their abilities. Here’s how writing tutors can support students:
Breaking Down the Process: Tutors can break the essay-writing process into smaller steps, making it less overwhelming for students. They can guide kids through brainstorming, outlining, drafting, and revising.
Targeted Feedback: Writing tutors can provide constructive feedback on areas where the student may be struggling, such as organisation, clarity, or grammar.
Building Confidence: One-on-one tutoring helps kids build confidence in their writing abilities. Tutors can celebrate small successes and encourage students to keep improving.
Tailored Instruction: Tutors can identify specific weaknesses in a student’s writing and tailor their teaching methods to address those areas. For example, a tutor may focus on improving a student’s thesis statement or help them develop stronger topic sentences.
Tips for writing an informative essay
Start with a clear thesis statement: Your thesis is the foundation of your essay. Make sure it’s clear, specific, and directly related to the topic.
Use credible sources: Ensure that your information comes from reliable, authoritative sources.
Stay focused: Each paragraph should focus on a specific idea related to your thesis. Avoid straying off-topic.
Be clear and concise: Avoid unnecessary fluff. Stick to the point and use straightforward language.
Revise and edit: Don’t be afraid to make changes. Writing is a process, and revisions are essential for creating a polished essay.
Informative essay FAQs
What are the 5 elements of informative writing?
The five key elements of informative writing include:
A clear thesis statement
Organised body paragraphs
Clear topic sentences
Evidence and examples
A conclusion that reinforces the main idea
How do I write an informative essay on a book?
When writing an informative essay on a book, focus on summarising the main themes, characters, and events. Be sure to use specific examples from the book to support your points.
How do I start writing an informative essay?
Start by selecting a specific topic, conducting research, and creating an outline. Once you have your outline, you can begin writing your introduction, followed by the body paragraphs, and finally the conclusion.
What are some interesting topics for informative writing?
Some interesting topics for informative writing include:
What is the difference between an informative essay and an explanatory essay?
An informative essay provides factual information on a topic, while an explanatory essay explains how or why something works or happened.
Final thoughts
Writing informative essays is an essential skill for students, and by following the steps outlined in this guide, your child can develop strong writing abilities. With clear thesis statements, well-organised body paragraphs, and a supportive environment, children can master the art of informative writing. Whether they’re writing an essay for school or a research paper, these strategies will help them become more confident and competent writers.
*Collaborative feature post*
Cats and newborns: how to introduce your cat to your baby
Bringing a new baby home is an exciting but nerve-wracking experience for parents, especially if you already have a furry family member to consider. Cats and newborns can live together safely with proper preparation, patience, and a focus on positive associations. While cats are independent creatures, a new baby can disrupt their environment and routine. Here’s everything you need to know to help your cat adjust to life with a baby and ensure your family’s safety and happiness.
Preparing your cat for the arrival of a new baby
Before your baby arrives, prepare your cat for the changes that are about to happen. Cats thrive on routine, and sudden shifts in their environment can lead to stress or behavioural issues. Here’s how you can make the transition smoother for both your cat and your newborn:
Create a safe space for your cat
Set up a quiet, safe place where your cat can retreat if they feel overwhelmed. Use scratching posts, cat trees, and cosy bedding to make this space inviting. This “safe place” will help your cat feel secure and less likely to act out. It’s important to establish this area before the baby arrives so your cat becomes familiar with it.
Gradually introduce baby-related changes
Start making changes in your home before your baby’s arrival. Introduce baby gear like a crib, changing table, and baby toys so your cat can get used to the new environment. Play baby sounds at a low volume so your cat gets used to the noises of a newborn. This desensitisation process helps to reduce the shock when the baby arrives.
Use positive associations
Help your cat associate the baby’s presence with positive experiences. For example, give your cat treats or affection whenever they’re near baby-related items like the baby’s room or toys. This will build positive connections and reduce anxiety. If your cat learns that baby-related items bring rewards, they’re more likely to feel calm and comfortable around the new arrival.
Train your cat early
Teach your cat to stay away from the baby’s sleeping areas, like the crib or bassinet. You can use baby gates or cat deterrents to set these boundaries. Cats love to explore high places, so ensure the baby’s space is secure. If necessary, place cat-safe barriers around the baby’s sleep area to prevent unwanted exploration.
When the baby arrives
Once your baby arrives, your cat will notice the new sounds, smells, and movements. Here’s how to manage this important introduction:
Introduce your cat and baby slowly
Allow your cat to smell your baby’s blanket before introducing them in person. When you’re ready, supervise the first interaction. Let your cat observe the baby from a distance and reward calm behaviour. The more gradual the introduction, the less likely your cat is to feel threatened.
Supervise all interactions
Never leave your cat alone with a newborn. Cats are naturally curious, and while it’s unlikely that they’ll harm a baby, it’s always better to be safe. Supervised interactions build trust between your cat and baby. Cats are more likely to be curious than aggressive, but close monitoring will prevent any potential issues.
Maintain your cat’s routine
Cats love predictability. Keep feeding, playtime, and litter box cleaning schedules consistent. Maintaining your cat’s routine will reduce stress and help them adjust to the new family member. This consistency also prevents jealousy, as cats are less likely to feel neglected when their daily needs are met.
Provide mental stimulation
To prevent boredom and destructive behaviour, offer plenty of interactive custom cat toys, scratching posts, and playtime. Cats love feather wands, laser pointers, and puzzle feeders. Keeping your cat mentally engaged reduces the likelihood of stress-related behaviours, like scratching furniture or marking territory.
Can cats and newborns live together safely?
Yes, cats and newborns can live together safely if you follow proper precautions. It’s a myth that cats intentionally harm babies, but they can accidentally scratch or lie too close to a baby’s face. Here’s how to ensure safety for both your baby and your cat:
Keep Sleeping Areas Separate: Ensure that your cat does not have access to your baby’s crib or bassinet. You can use crib nets or covers if necessary.Pets
Keep the Litter Box Clean: Cats use litter boxes for hygiene, but ensure they’re cleaned frequently to avoid the risk of toxoplasmosis, which can affect pregnant women and infants.
Use Safe, Non-Toxic Cleaning Products: Babies have sensitive skin, so use safe cleaning products for baby toys, blankets, and surfaces. Avoid products that may irritate your cat’s skin or nose.
Myths vs. facts about cats and newborns
Myth 1: Cats smother babies
Fact: This is a persistent myth, but cats do not intentionally smother babies. Cats may be attracted to the warmth of a baby’s crib or bassinet, but they don’t seek to harm babies. You can prevent access by using crib nets or covers.
Myth 2: Cats are dangerous to babies
Fact: Cats are not inherently dangerous to babies. Proper supervision, hygiene, and training ensure safe interactions. Cats are usually curious and prefer to observe rather than interfere with a baby.
Myth 3: Cats will ignore the baby
Fact: Cats often show curiosity towards new family members. While some cats might stay away, others may become affectionate. Introducing your cat to the baby properly can encourage positive bonds.
Myth 4: Cats will get jealous of the baby
Fact: Cats thrive on routine and familiarity. If you maintain your cat’s feeding, playtime, and affection schedule, jealousy is unlikely. Cats are more likely to feel secure with a consistent routine.
“Cats can adapt well to changes in their environment if those changes are introduced gradually. A positive introduction between a cat and a baby is essential for their long-term relationship.”
Experts recommend setting up safe spaces for cats and using rewards-based training to establish positive associations.
FAQs about cats and newborns
1. Are cats OK with newborn babies? Yes, cats and newborns can live together safely with proper introductions and supervision.
2. Can my cat be next to my newborn? It’s best to supervise interactions and not leave your baby unattended with your cat.
3. Is it good to have a cat when you have a baby? Growing up with pets can benefit children’s social and emotional development.
4. Can I introduce my cat to my newborn? Yes, introduce your cat slowly and ensure positive associations with the baby’s presence.
5. Do cats and babies get along? Yes, cats and babies can have a strong bond with proper training and supervision.
6. Do cats smother newborns? It’s a myth that cats intentionally smother babies. However, always supervise your cat around a sleeping baby.
7. Can newborns be around cats? Yes, as long as there is supervision and proper hygiene practices.
8. How can you tell if your cat is adjusting well to a new baby in the household? If your cat eats, sleeps, and plays as usual, they adjust well. If they’re hiding or showing aggression, they may be stressed.
9. Can cats and babies live together? Yes, they can coexist peacefully with both supervision, preparation, and safe spaces.
10. How do I keep my baby safe from my cat? Keep the baby’s sleep space cat-free, use positive associations, and always supervise interactions.
Final thoughts
Cats and newborns can live together harmoniously, but it takes planning, patience, and awareness. By preparing your home, maintaining your cat’s routine, and supervising all interactions, you’ll create a safe, happy environment for everyone. Just like any family member, your cat’s needs should be considered alongside your baby’s. Take these steps to build a positive, long-lasting relationship between your cat and your little one.
*Collaborate feature post*
Safety features to consider when choosing a safe sleeper bed
Choosing a safe sleeper bed for your child can be an exciting opportunity to enhance comfort, maximise space, and create a fun sleeping environment. In this article, we will focus on the mid-sleeper bed when choosing a safe sleeper bed for your child, as these versatile beds sit at a medium height and offer storage or safe play areas underneath.
Why choose a mid-sleeper bed?
A mid-sleeper bed is more than just a place to sleep—it’s a versatile and practical solution for any child’s room. These beds offer comfort and they’re an ingenious way to save space and create a multifunctional environment tailored to your child’s needs.
For families working with smaller spaces, mid-sleeper beds are a game-changer. By elevating the sleeping area to a medium height, they free up valuable floor space underneath, transforming it into a usable area for storage, play, or study. Whether you’re dealing with a tiny bedroom or simply want to maximise the room’s functionality, a mid-sleeper bed is a smart choice.
Creative and functional designs
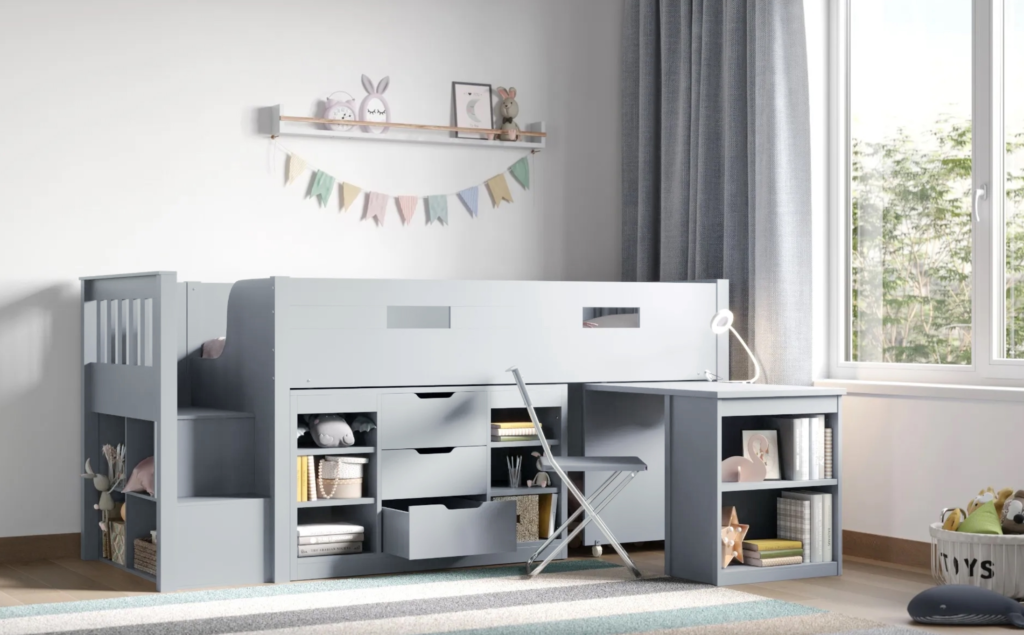
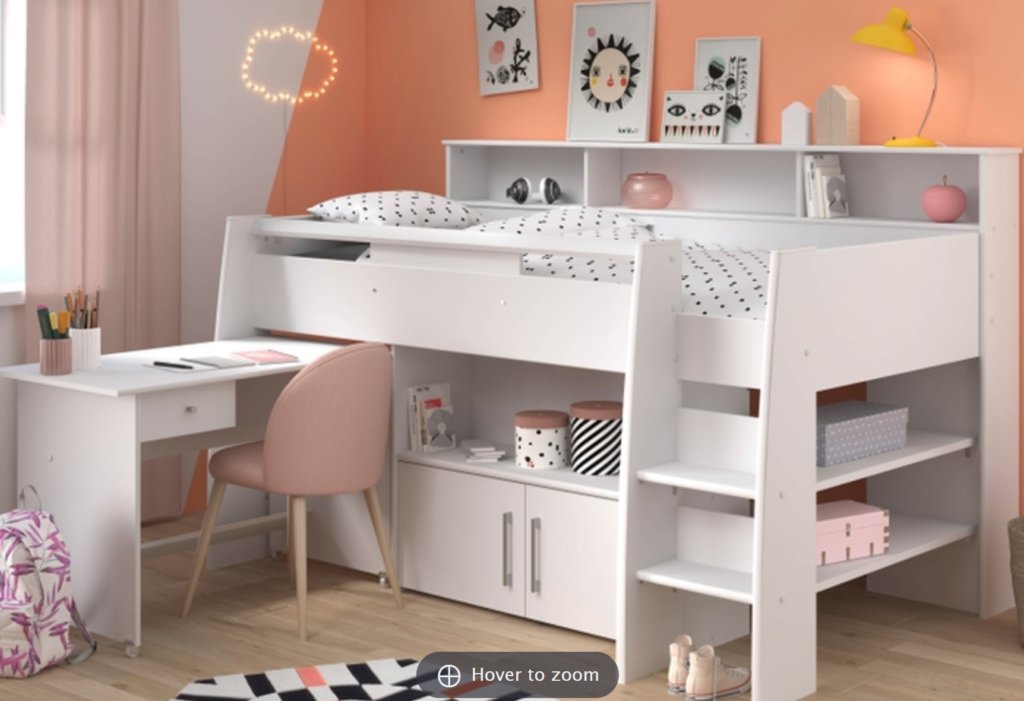
Mid-sleeper beds come in a variety of designs to suit your child’s personality and your family’s needs. Some models include built-in desks for homework, shelving units for books and toys, or even cosy play tents that turn the bed into a private little hideaway. This versatility makes mid-sleeper beds perfect for children of all ages, adapting as they grow and their interests change.
Encouraging growth and independence
When choosing a safe sleeper bed, think beyond the immediate need for a secure sleeping space. Consider your child’s age, interests, and room size when browsing a mid sleeper bed collection to find the perfect fit. Mid-sleeper beds encourage independence by allowing kids to organise their own play or study areas underneath. For younger children, the bed can be a creative space for imaginative play, while older kids can use it as a private nook for reading or studying.
A safe and comfortable choice
Safety is always a priority, and mid-sleeper beds are designed with this in mind. With secure guardrails, non-slip ladders, and robust materials, these beds offer a comfortable sleeping environment that parents can trust. They strike the perfect balance between fun and functionality, giving children a sense of adventure while keeping them safe during sleep.
Safety features to look for in a safe sleeper bed
Safety is non-negotiable when choosing a bed for your child. A mid-sleeper bed, while offering fun and functionality, must meet certain safety standards to ensure your little one is secure during sleep and play. Here’s a closer look at the key safety features you should prioritise:
1. Mattress fit and height
The mattress is a critical part of a safe sleeper bed. An improper fit or incorrect height can compromise the safety of the entire bed. UK and EU mattress sizes differ slightly:
EU single: 90 x 200 cm
UK single: 90 x 190 cm
Snug Fit: The mattress must fit tightly within the bed frame. Gaps larger than 30mm (1.2 inches) between the mattress and the bed’s edges are a hazard, as they can trap small limbs or objects.
Height Matters: The mattress should not exceed the recommended height for the bed’s safety rails. Most manufacturers recommend a mattress no thicker than 16cm (6.3 inches) to ensure the rails effectively prevent falls.
Follow Guidelines: Always check the bed manufacturer’s specifications to select a mattress that complements the frame design and maintains safety.
2. Sturdy construction
A bed is only as safe as its construction. The materials and craftsmanship must be able to withstand everyday use by energetic children.
Durable Materials: Look for mid-sleeper beds made from solid wood or robust metal. These materials ensure the frame can support your child’s weight and activity without bending or breaking.
Rounded Edges: Sharp corners and edges are a recipe for bumps and bruises. Opt for beds with smooth, rounded edges to minimise the risk of injuries during play or climbing.
Non-Toxic Finishes: Children are naturally curious and may touch or even chew on parts of their bed. Make sure the paint or finish is non-toxic, certified child-safe, and free from harmful chemicals.
Regular Maintenance: Even a well-built bed needs regular checks. Inspect the bed periodically for loose screws, worn joints, or other signs of wear and tear, and address any issues immediately.
3. Secure guardrails and ladders
Guardrails and ladders are essential components of a mid-sleeper bed’s safety features. Without them, the elevated design could pose unnecessary risks.
Age-Appropriate Design: Ladders and guardrails should match your child’s developmental stage. For younger children, make sure they can climb the ladder easily and that the guardrails are high enough to provide extra security.
Guardrails: The rails should surround the sleeping area and rise at least 16cm (6.3 inches) above the mattress surface. This height is sufficient to prevent rolling off the bed while still allowing easy access for older children. Ensure the rails are securely fastened to the frame and have no gaps large enough for a child’s head or limbs to get stuck.
Ladders: A sturdy, well-designed ladder is crucial for safe access to the bed. Look for ladders with wide, non-slip steps and strong attachments to the frame. Ensure the ladder’s placement suits the room’s layout, allowing your child to climb comfortably without obstruction.
To help you make the best choice, here are answers to common questions:
What is a safety sleeper bed?
A safety sleeper bed is a secure, enclosed bed designed to provide a safe sleeping environment for children, adults, or individuals with special needs. These beds often feature enclosed sides, durable materials, and protective rails to minimise risks.
What is an autistic safety bed?
An autistic safety bed is specifically designed for individuals with autism to ensure a secure sleeping space. Features often include enclosed sides, soft materials, and customisable options to meet sensory or safety needs.
Are mid-sleeper beds safe?
Yes! Mid-sleeper beds are safe when designed with sturdy frames, guardrails, and snug-fitting mattresses. They are ideal for children who can safely climb a ladder and enjoy the extra space underneath for storage or play.
Can adults use a safe sleeper bed?
Absolutely. Safe sleeper beds for adults are available, particularly for those with special needs or mobility concerns. These beds often include enclosed sides and adjustable features for added safety.
What is the cost of a safety sleeper bed?
The safety sleeper cost depends on the bed’s features, size, and customisation. Prices start from a few hundred pounds, and beds purchased for medical necessity may be covered by insurance.
Are bed side sleepers safe?
Bedside sleepers can be safe if they meet current safety guidelines. Ensure the sleeper attaches securely to the main bed, has a sturdy frame, and includes breathable materials to reduce risks.
What is a letter of medical necessity for a safety sleeper?
A letter of medical necessity is a document written by a healthcare provider explaining why a safe sleeper bed is required for an individual’s medical needs. This letter is often used to secure insurance coverage for the bed.
What is the safest mattress to sleep on?
The safest mattress is one that fits snugly within the bed frame and meets safety standards. For a mid-sleeper bed, ensure the mattress height does not exceed the guardrail’s height.
Is The Safety Sleeper covered by insurance?
Many insurance plans cover The Safety Sleeper, provided it’s deemed a medical necessity. Check with your provider to confirm eligibility.
How safe are bunk beds or high sleepers for children?
Bunk beds and high sleepers can be safe if they have sturdy guardrails, a secure ladder, and are used by children old enough to climb safely. Mid-sleeper beds, with their lower height, are often a safer alternative for younger kids.
Benefits of mid-sleeper beds as safe sleeper beds
Mid-sleeper beds are much more than just a sleeping solution—they’re a versatile, practical, and stylish addition to your child’s bedroom. Let’s dive into what makes these beds so fantastic:
Space-saving designs
For families working with limited space, mid-sleeper beds are a dream come true. By elevating the sleeping platform, they free up valuable floor space for other uses, ensuring every inch of the room is utilised effectively.
Storage Solutions: Many mid-sleeper beds are designed with built-in storage, such as drawers, shelves, or cubbies beneath the bed. These features help keep your child’s room tidy and organised, reducing the need for additional furniture like dressers or toy boxes.
Play Areas: Some models go beyond storage and transform the space underneath into a fun play area. Features like play tents, tunnels, or slides turn the bed into an exciting adventure zone, encouraging imaginative play. For younger children, this makes bedtime something to look forward to rather than a chore.
Multifunctionality
Mid-sleeper beds are designed to adapt to your child’s evolving needs, offering features that grow with them.
Study Stations: Built-in desks tucked beneath the bed create a compact and practical workspace. These desks are perfect for homework, arts and crafts, or reading. They save space and provide a dedicated area for focus and creativity, especially as your child enters school-age years.
Adaptable Features: Many mid-sleeper beds can be reconfigured over time to suit your child’s changing needs. For example, a play area beneath the bed can later be converted into additional storage or a more mature study zone. This adaptability ensures the bed remains a functional piece of furniture for years to come, saving you money in the long run.
Practical for smaller rooms
Not every home has the luxury of large bedrooms, and that’s where mid-sleeper beds shine. They’re specifically designed to maximise functionality in compact spaces.
Maximising Space: By utilising vertical space, mid-sleeper beds leave the floor open for other activities. This is especially valuable in smaller rooms where every bit of space counts. The design encourages a more open and airy feel, preventing the room from feeling cramped.
Easy Access: Unlike high-sleeper beds or bunk beds, mid-sleeper beds have a moderate height that’s perfect for children. They’re easy to climb into, and the reduced height makes parents feel more at ease about safety. This is particularly useful for younger children who might struggle with higher beds but are ready to transition from a standard low bed.
Why choose a mid-sleeper bed?
In addition to their safety and practicality, mid-sleeper beds offer a touch of creativity and fun that transforms a child’s bedroom into their own little world. They combine three critical benefits:
Functionality: Whether it’s storage, play, or study, these beds are designed to fit into busy family lives seamlessly.
Safety: With guardrails, sturdy ladders, and durable materials, mid-sleeper beds prioritise your child’s well-being.
Longevity: These beds grow with your child, adapting to their needs and providing value over time.
For parents looking to create a space that balances fun, safety, and practicality, a mid-sleeper bed is the perfect choice. It’s not just a bed—it’s an investment in your child’s comfort and happiness.
Final thoughts
Choosing a safe sleeper bed, particularly a mid-sleeper bed, offers a wonderful way to create a safe, practical, and fun sleeping environment for your child. With features like secure guardrails, sturdy construction, and multifunctional designs, these beds are perfect for maximising space while ensuring your child’s safety. Don’t forget to check for compliance with safety standards and choose a bed that suits your family’s unique needs.
*Collaborative feature post – images taken from Bedkingdom.co.uk
How to pick the best winter shoes for kids
Winter is the season of snow-filled fun and lots of outdoor adventures. But keeping your child’s feet warm, dry, and comfortable can be a challenge if you don’t start with the best winter shoes for kids that account for all terrain. Whether it’s splashing through puddles or trudging through deep snow, finding the perfect pair can feel like a daunting task. But, we’re here to help! In this guide, we’ll explore top tips, different styles, and frequently asked questions to help you confidently choose the right winter shoes for your little one.
A guide to the best winter shoes for kids
High quality boots for winter are vital for protecting kids’ feet from the cold, wet weather. You need to think about whether the right pair has a balance of warmth, durability, and fit. Here are some other things to think about when considering the right pair of winter girls and boys shoes for your child:
Durability
Kids are notoriously tough on their shoes, whether they’re running, jumping, or trudging through mud and snow. Winter shoes must be able to handle:
Rough Outdoor Play: Materials like high-grade leather, synthetic uppers, and reinforced stitching ensure that boots don’t easily tear or wear out.
Extreme Conditions: Cold climates, heavy snowfall, and muddy terrain can quickly degrade low-quality shoes. Opt for sturdy designs with solid construction to withstand these challenges.
Daily Use: Kids often wear the same shoes to school and outdoor activities. Shoes that hold up to frequent use save parents from having to replace them mid-season.
Look for brands that emphasise quality construction and use durable materials like a rubber sole and reinforced toe caps, which prevent scuffs and extend the life of the boots.
Comfort
Kids need to feel comfortable in their winter shoes, especially during long hours of outdoor play or school days. Key aspects of comfort include:
Insulated Materials: Linings made from fleece, wool, or Thinsulate trap heat, keeping little feet warm even in freezing temperatures.
Lightweight Design: Bulky, heavy boots can make walking difficult and uncomfortable. Choose lightweight options that balance insulation with freedom of movement.
Room for Growth: Shoes that are too tight can cause discomfort and restrict circulation. Look for a snug fit that allows enough room for thick socks while ensuring stability.
Comfortable boots reduce the likelihood of kids complaining about cold feet or refusing to wear their shoes. They also allow for extended outdoor fun without discomfort or irritation.
Weather resistance
Wet feet can quickly ruin a winter outing, so weather-resistant features are non-negotiable. Here’s what to prioritise:
Water resistant Membranes: These act as a barrier to prevent water from entering the shoe while allowing moisture from sweat to escape, keeping feet dry and comfortable.
Rubber Soles: Durable, non-slip rubber soles provide traction on icy or wet surfaces, ensuring safety and stability.
Sealed Seams: Look for snow or rain boots with sealed or taped seams to prevent water from seeping through stitching during rainy or snowy conditions.
In regions with heavy snowfall or constant rain, weather-resistant boots are a game-changer. They keep kids’ feet dry, warm, and protected, reducing the risk of discomfort or even frostbite in severe conditions.
How to dress kids and babies for winter
It’s not just about dressing your child in the right shoe during winter – think about their whole dress. Layering and protecting extremities like hands and feet are also important for maintaining body heat and preventing cold-related discomfort or illnesses.
Be mindful of layers
Layering isn’t just about piling on clothes—it’s about using the right materials in the right order to trap heat and keep kids dry. Here’s a breakdown:
Base layer (moisture-wicking)
Start with a moisture-wicking base layer made from materials like merino wool or synthetic fabrics.
This layer keeps sweat away from the skin, preventing chills as moisture evaporates.
Avoid cotton, as it absorbs moisture and loses its insulating properties when wet.
Middle layer (insulation)
Add a middle layer like a fleece or a lightweight down jacket to trap heat.
This layer acts as insulation, keeping the warmth generated by the body close to the skin.
Outer layer (Wweatherproofing)
Finish with a waterproof and wind-resistant jacket to protect against snow, rain, and wind.
Make sure it has a hood and adjustable cuffs to block drafts and seal in warmth.
For babies, layering is even more critical since they can’t regulate their body temperature as effectively as older kids. Opt for onesies, warm bodysuits, and padded snowsuits with easy snap closures for quick nappy changes.
Keep hands and feet toasty
Extremities like hands and feet lose heat quickly, so extra care is needed to keep them warm.
Feet
Wool Socks: Wool is a natural insulator that wicks away moisture and retains warmth even when damp. In a cold climate, consider thermal wool socks with extra cushioning.
Winter Boots: Pair wool socks with insulated winter boots. Choose boots with fleece or wool linings, a snug fit, and enough room for movement to ensure proper circulation and prevent cold toes.
Fit Matters: Boots that are too tight can restrict circulation and make feet colder, while overly loose boots can let in cold air.
Hands
Mittens vs. Gloves: Mittens are warmer than gloves because fingers are in contact with each other, sharing heat.
Insulated Mittens: Choose mittens with waterproof exteriors and insulated linings to keep little hands dry and warm in snow or rain.
Straps and Clips: Use mittens with adjustable straps or clips to prevent them from slipping off during play.
For babies, consider mittens attached to their snowsuit to avoid losing them. Booties with a snug fit and soft insulation are perfect for keeping their tiny feet warm without constraining movement.
The best winter boots for kids
Finding the perfect winter boots for kids can feel overwhelming, but with the right information, you can make a choice that keeps their feet warm, comfortable, and ready for any adventure. Here’s an in-depth look at the best types of winter boots for kids and what makes them indispensable for cold-weather activities.
Thick Insulation: Snow boots often feature advanced insulation materials like fleece lining, wool, or Thinsulate, which trap heat and ensure toes stay warm even in sub-zero temperatures.
Waterproof Exteriors: The outer material, such as synthetic leather or treated nylon, prevents snow and moisture from seeping in.
High Shafts: Snow boots typically have taller shafts to protect against deep snow, keeping ankles and lower legs warm and dry.
Durable Rubber Soles: The soles are made of thick, non-slip rubber, providing excellent grip and stability on icy or snowy surfaces.
Room for Socks: Snow boots are designed to accommodate thick socks, allowing for an additional layer of warmth without feeling tight or restrictive.
Benefits
Ideal for Harsh Climates: Snow boots are perfect for families living in regions with heavy snowfall or freezing temperatures.
Long-Lasting Warmth: Insulation and waterproofing make these boots ideal for long hours of play in cold climates, such as building snowmen or sledding.
Safety and Stability: Their non-slip soles ensure kids can walk and run confidently on icy or wet surfaces, minimizing the risk of falls.
Tips for choosing snow boots
Opt for boots with sealed seams to maximise waterproofing.
Check for easy fastenings like Velcro or bungee laces, especially for younger children.
Look for brands that test boots in extreme weather conditions to ensure reliability.
Warm boots
Features
While not as heavy-duty as snow boots, warm boots are a versatile choice for everyday winter wear. These boots are perfect for school days, running errands, or light outdoor activities. Key features include:
Fleece or Wool Lining: This inner layer keeps feet cosy during mild to moderate cold weather.
Lightweight Materials: Warm boots are made with lightweight designs, making them easy for kids to wear throughout the day without feeling bulky.
Flexible Soles: Unlike rigid snow boots, these have more flexible soles, which support natural foot movement and make walking more comfortable.
Stylish Designs: Warm boots often come in various colours and patterns, appealing to both kids and parents.
Benefits
Versatile Use: Ideal for school runs, short walks, and light outdoor play on mild winter days.
All-Day Comfort: The lightweight design and flexibility make them suitable for extended wear, even indoors.
Fashionable Options: Warm boots are available in designs that match winter outfits, making them a great option for both practicality and style.
Tips for choosing warm boots
Pick boots with adjustable fastenings to ensure a snug fit.
Look for designs that combine weather resistance with breathability, preventing feet from getting too sweaty.
Prioritise boots with durable soles to handle light rain or slush.
Recycled boots
For eco-conscious families, recycled boots are an excellent option. These boots combine functionality with sustainability, using materials that are repurposed or eco-friendly.
Features
Recycled Materials: Made from recycled plastics, rubber, or other sustainable materials, these boots reduce environmental impact.
Durable and Weather-Resistant: Despite being eco-friendly, recycled boots are designed to handle cold weather and wet conditions effectively.
Breathable and Comfortable: Many recycled boots feature advanced technology to ensure comfort without compromising on warmth or water resistance.
High Performance: These boots often match or exceed the durability and warmth of traditional materials.
Stylish and Unique Designs: Many brands that focus on sustainability offer modern, trendy designs for kids.
The best winter boots for babies and toddlers
Babies and toddlers have unique needs when it comes to winter footwear. Their boots must not only keep them warm but also support their growing feet and early walking stages.
Features
Soft and Flexible Soles: Boots with soft soles are ideal for babies and new walkers, allowing natural foot movement while providing grip.
Wide Toe Boxes: This design gives little toes enough room to grow and move comfortably, preventing discomfort and promoting healthy foot development.
Waterproof Membranes: Babies and toddlers are prone to stepping in puddles or snow, so waterproof boots are essential for keeping their feet dry.
Lightweight Construction: Heavy boots can be cumbersome for toddlers learning to walk. Lightweight designs ensure ease of movement and reduce fatigue.
Benefits
Healthy Foot Development: Soft, flexible soles and supportive shoes encourage proper walking posture and growth.
Warm and Dry Feet: Features like a fleece inner lining and waterproof exteriors keep tiny feet cosy and protected from the elements.
Ease of Use: Many toddler boots come with Velcro straps or pull-on designs, making them easy to put on and take off.
Tips for Parents
Measure your child’s feet regularly to ensure the boots fit properly.
Opt for boots with non-slip soles to prevent falls.
Look for breathable materials to prevent overheating during indoor wear.
FAQ: The best winter shoes for kids
Parents often have questions when it comes to choosing the right winter shoes for their kids. Here are answers to some of the most common concerns:
Snow and cold weather
What shoes should kids wear in the snow? Snow boots with waterproof exteriors, thick insulation, and durable soles are the best option.
What shoes to wear in very cold weather? Boots with fleece linings, waterproof membranes, and a snug fit work best for extreme cold.
Babies and toddlers
What shoes should baby wear in winter? Soft, insulated booties with wool lining and flexible soles are ideal for infants.
What are the best winter boots for toddlers with wide feet? Look for boots with wide toe boxes, adjustable straps, and flexible designs.
General tips
How to choose winter shoes? Prioritise insulation, water resistance, and a proper fit. Make sure there’s enough room for thick socks but not so much that feet slide inside the shoe.
Where to buy winter shoes? Explore trusted brands like Start-Rite Shoes for high-quality options that combine style, durability, and comfort. They have great girls and boys shoes for all sizes and interests.
Care tips for winter boots
To ensure your kids’ winter boots last the entire cold season (and beyond), follow these simple care tips:
Clean Regularly: Remove mud, salt, and debris with a damp cloth to prevent stains and material degradation.
Dry Thoroughly: Allow boots to air dry after each use to avoid dampness, which can lead to odours or mould.
Reapply Waterproofing: Use a waterproofing spray periodically to maintain the boots’ water resistance and keep them in top condition.
Choosing the best winter shoes for kids doesn’t have to be challenging. With the right information, you can find boots that keep your child warm, dry, and comfortable while standing up to all the fun (and mess) that the cold winter brings. Whether you’re preparing for deep snow adventures with sturdy snow boots, lightweight warm boots for everyday use, or eco-conscious recycled options, there’s a perfect fit for every child.
For babies and toddlers, the focus is on flexible soles, wide toe boxes, and waterproof protection, to promote healthy foot development and ultimate comfort. Don’t forget the importance of care and maintenance—proper cleaning, drying, and waterproofing can extend the life of your child’s boots through the entire winter season.
With trusted brands like Start-Rite Shoes offering durable and stylish options, you can confidently equip your little ones for winter.
So, gear up and let your little kids (and big kids!) embrace the magic of winter, knowing their feet are well protected and ready for every snowball fight, puddle jump, and icy adventure!
*Collaborative feature post*
Essential car seat safety tips during school runs with Graco
I have four drop-offs and pick-ups during the dreaded school run, which can last around two hours each way. So, it’s safe to say I’ve seen my fair share of driving mishaps, which have either caused me to emergency brake or swerve towards the curb. Each time there has been a jolt at the back of the car, I’m thankful my kids’ car seats were secure enough to handle the near-misses.
However, I haven’t always been on top of car seat safety in the last 14 years. Safety on the road has always been a huge concern for parents, especially during the hectic school runs where the risk of accidents increases significantly.
So, in the run-up to Road Safety Week (17th to 23rd November) and in collaboration with Graco and their ‘Safety Within’ campaign, we thought it would be a great time to revisit car seat safety measures, especially during the school runs, so we can feel safe and secure even when the roads can get quite hectic.
In this guide, we will deep dive into car seat safety and shed light on the often-overlooked dangers of school commutes. We will also go through appropriate safety measures for older children, as often parents believe our kids are too big for car seats, which isn’t always the case. We will also explore Graco’s dedication to enhance daily travel safety for families, so your most precious passengers are protected at all times.
Why Road Safety Week?
Road Safety Week is more than just a campaign and annual observance; it’s a crucial intervention designed to make our roads safer for everyone, especially our children. Road Safety Week serves as a potent reminder of the risks present every time we buckle our children into their car seats and start the engine. The point is to educate about safe practices and advocate for policies that protect all road users.
Why are we focusing on the school runs though?
School runs tend to be the times when children are most at risk on the roads. As evidenced by alarming statistics from the Department of Transport, nearly one in six-weekday car accidents occur when children are being dropped off (8-9 am) or picked up (3-4 pm) from school.
This period of high traffic and increased activity can also lead to rushed decisions and not paying attention, with the Department of Transport reporting that distractions inside the vehicle have been a contributory factor in 85 deaths and 4,103 injuries, ranging from mobile phone usage to activities involving other passengers, particularly children. These activities include managing children, such as attending to their needs or settling disputes, which can divert the driver’s attention from the road.
Furthermore, Allianz reported that insurance claims peak around 3pm, coinciding with the end of the school day when people are collecting kids and highlighting the afternoon rush hour as a critical time for heightened vigilance – people seem less alert during these times than the morning drop.
Driving on autopilot in familiar settings—often the case during regular school runs—means drivers are not as alert to unusual situations. This lack of alertness is a critical factor in why many accidents occur within a 10-mile radius of the home. In response to these risks, drivers are urged to exercise extra caution during school run rush hours and adhere to a recommended speed limit of 20mph in these community areas. This lower speed limit is intended to enhance safety for all road users, especially the young pedestrians who may unpredictably enter the roadway.
Graco has been a proud supporter of Brake for two years, the road safety charity behind this significant week, to promote safety and actively make road travel safer, especially during the school runs. Graco is enhancing its involvement by aligning its ‘Safety Within’ campaign with Brake’s Road Safety Week and this campaign will be featured on Graco’s Instagram account from November 17th to 23rd, providing daily child car safety tips aimed at educating parents and improving road safety awareness.
“Graco has been trusted by families to keep children safe in car seats for over 60 years, and supporting Brake helps us to extend that trust to the wider community.”
Luisa Rollins-Svensson, Consumer and Trade Marketing Manager at Graco UK
Graco wants to educate parents about these statistics and the real risks they represent, so we can all adopt a more safety-conscious approach to school runs. This focus is not only about preventing accidents but also about instilling lifelong safe driving habits that ensure our children’s safety every day.
Brake’s comprehensive safety guidelines for families
Brake provides invaluable guidance (you can find more information here) to protect children in and around vehicles, so that every journey is as safe as possible. Here are some important tips on how to be safe on the road:
Select the right vehicle for family safety
Choosing a safe car is the first step in safeguarding your family on the road. The EuroNCAP safety ratings are an invaluable resource for assessing a vehicle’s protective capabilities in crash scenarios and offer detailed insights into how well a car safeguards its occupants, including children, and pedestrians outside the vehicle.
These ratings evaluate everything from the effectiveness of seat belts and airbags to the structural integrity of the car in frontal, side, and rear collisions. Furthermore, opting for vehicles equipped with advanced safety technologies—such as autonomous emergency braking systems—can significantly enhance safety. These systems help prevent accidents by automatically applying the brakes if a collision is imminent, potentially saving lives. Additionally, cars designed with features that minimise injuries to pedestrians, such as softer bonnet materials and external airbags around the windscreen, represent a thoughtful choice for families concerned with both in-car and external road safety.
Make sure your child is properly restrained
Always use a child seat that is appropriate for your child’s height, age and development, certified with the United Nations E mark or BS Kitemark, and preferably new to avoid risks associated with wear or unknown history. For optimal safety:
Use rear-facing seats for as long as possible (Graco recommends up to at least 4 years if possible).
Make sure the car seat fits the child’s current size and switch to the next size only when necessary.
Continue using a child seat until the child reaches 150cm, so they continue to be safe in the car.
Adopt these driving behaviours to minimise accidents
Speed control and minimising distractions are paramount. Encourage safe driving behaviours by setting a personal example, i.e.:
Adhere to speed limits, especially in residential and school areas, and drive at 20mph where possible
Never use your phone while driving. If necessary, store it in the glove box to avoid temptation.
Engage your children in maintaining safety by asking them to remind you about safe driving practices. We will discuss this in more detail below.
Rethink the School Run
If feasible, reduce the reliance on driving for school commutes:
Encourage walking or cycling to school to promote safety, health, and environmental benefits.
If driving is necessary, consider parking a short distance from the school and walking the rest of the way to alleviate congestion at school gates and minimise the risk of accidents.
Never leave children unattended in a vehicle
We cannot overstate the dangers of leaving children alone in a vehicle, especially in warm conditions. Always ensure your children are never left in a car unattended, as this can lead to tragic consequences.
A deeper dive into car seat safety guidelines
Your child’s safety during every car journey is paramount and with Graco’s expert advice and innovative car seats, you can be confident that your little ones are securely and comfortably buckled up. We will go through some of Graco’s tools and resources to ensure you are as safe as possible on the road.
Legal and safety requirements for car seats
Airbag deactivation: When using a car seat in the front passenger seat, it’s a legal requirement to deactivate the front airbags, to prevent injury in the event of an accident. Always consult your vehicle’s manual and the car seat’s instruction manual to ensure correct installation and airbag deactivation.
Appropriate sizing: Children should use car seats that are appropriate for their size until they reach 150cm. Do not rush the transition from one stage of child seat to another. Safety first!
Extended rear-facing use: Keep your child in a rear-facing seat until they reach a minimum of 75cm and 15 months of age. Extensive research has shown that rear-facing seats offer better protection for your child’s head, neck, and spine.
Regular fit checks: Regularly check that the car seat fits your child’s current height. i-Size and R129 standards use height as the primary indicator for seat suitability. Graco’s car seat buying guide can help you make sure your seat is the right fit.
Travelling with children requires not only the right equipment but also the knowledge of how to use it effectively to ensure maximum safety. Here are some expert tips to make sure every journey with your little ones are as safe as possible:
Remove your child’s coat during the colder months
During colder months, remove your child’s coat before securing them in their car seat, so the harness fits snugly against their chest and shoulders. You can place the coat or a blanket over the secured harness for additional warmth without compromising on safety.
Harness security – try the pinch test
To check if the 5-point harness is tight enough, perform the pinch test. Try to pinch the strap at your child’s shoulder; if you can pinch a fold in the fabric, the harness is too loose and needs adjusting. Make sure the harness straps are level and equally tight on both sides to provide balanced support and restraint.
Optimal seating position – SHH! (seat, headrest, handlebars)
When considering the optimal seating position, think SHH! (which is what I use to remind myself that I’ve checked everything). Always position the youngest child or the child in the rear-facing seat behind the passenger seat. This positioning is safer during an accident, breakdown, or even when you’re parked, as it allows you to access your child safely from the pavement side without exposing them to road traffic.
Adjust the headrest so the bottom aligns with your child’s chin and sits 2-3 cm above their shoulders. This ensures the headrest can protect the head efficiently without causing discomfort or restricting movement.
For Group 0+/i-Size infant carriers, keep the handlebar upright as it acts as a secondary safety feature during collisions, helping to protect your baby further.
The Graco Affix i-Size R129 ISOFIX Highback Booster grows with your child
Age and Size Adaptability: Suitable for children approximately aged 3.5 to 12 years, accommodating heights from 100 to 150cm.
Safety Certifications: The seat is i-Size and R129 certified, meeting the latest safety standards, which include advanced side impact protection to safeguard your child in the event of a side collision.
Installation Ease: Colour-coded ISOFIX connectors make the installation process straightforward, minimising errors and enhancing overall safety.
Lightweight and Portable: Weighing just 4.2kg, this booster is easy to transfer between vehicles, making it ideal for families on the move.
Comfort Features: Includes breathable fabrics for side ventilation, a 10-position adjustable headrest, premium padded seat and armrests for comfort on long journeys. Dual retractable cupholders keep necessities within easy reach too.
One of Brake’s innovative strategies is to recommend involving children actively in their own safety. One of these strategies includes encouraging children to role-play as ‘police(wo)men’, overseeing the safety practices within the car. This role-playing activity does more than entertain; it empowers children to actively participate in maintaining safety. It’s a fun and interactive way to monitor and remind about safety protocols such as seatbelt usage and proper seating, but it also instils a sense of responsibility and awareness about road safety from a young age. Children can develop a deeper understanding of safe driving practices, making them more likely to grow up with a conscientious approach to driving and road use.
You can support these initiatives by reinforcing the message that road safety is crucial and everyone has a role to play in ensuring a safe journey.
FAQs on car seat safety during school runs
1. What is the proper car seat safety during school runs?
Proper car seat safety involves using a car seat appropriate for your child’s height, age, and weight. Make sure the seat is installed according to the manufacturer’s instructions and secured tightly in your vehicle. Always use the harness and buckle system as directed to keep your child safely restrained during each journey.
2. At what age do you stop using a car seat?
You should continue using a car seat until your child reaches the height or weight limit specified by the seat’s manufacturer. After they outgrow the car seat, transition to a booster seat until they are tall enough to properly fit your vehicle’s seat belts, which is typically when they are about 150cm tall or 12 years old.
3. How can I ensure my child’s car seat is installed correctly?
To ensure correct installation, follow the car seat manual and your vehicle’s instruction manual carefully. Use either the seat belt or LATCH system to secure the seat. After installation, the seat should not move more than an inch side-to-side or front-to-back. If unsure, visit a local car seat inspection station for professional assistance.
4. What are the CDC recommendations for car seats?
The Center for Disease Control and Prevention (CDC), America’s leading science-based, data-driven, service organisation that protects public’s health recommends keeping children in rear-facing car seats for as long as possible, moving to a forward-facing car seat with a harness until they reach the maximum weight or height limit, and then switching to a booster seat. They should remain in a booster seat until adult seat belts fit properly.
5. How do I check car seat safety ratings?
Car seat safety ratings can be checked through consumer reports or safety organisations that conduct and publish crash testing and safety evaluations, such as the National Highway Traffic Safety Administration (NHTSA) or the Insurance Institute for Highway Safety (IIHS).
6. Are booster seats safe?
Yes, booster seats (highback or backless) are safe and necessary for children who have outgrown their forward-facing harnessed seats but are not yet large enough for adult seat belts. Boosters elevate children to a height where the seat belt fits them properly over the sternum and the centre of the collarbone, not the neck, and low across the upper thighs, not the abdomen.
7. Why is car seat safety important?
Car seat safety is crucial as it significantly reduces the risk of injury or death in the event of an accident by properly securing the child and ensuring that impact forces are distributed over the strongest parts of the body.
8. How often should I check my child’s car seat for issues?
Check your child’s car seat regularly, at least once a month, to ensure there are no loose parts, and that straps and harnesses are not twisted or frayed. Always replace the car seat after any incident.
Final thoughts
Throughout this article, we have emphasised the pivotal role of car seat safety, particularly during school runs—a time when our children are frequently on the move and most vulnerable. Graco, in collaboration with Brake, has taken significant steps through its ‘Safety Within’ campaign to enhance awareness and instil rigorous safety measures, especially about the critical nature of properly fitted and utilised car seats. You must regularly check your child’s car seat meets current safety standards, such as the i-Size and R129 certifications, and ensure that these seats are correctly installed and maintained.
The statistics speak for themselves: accidents during school runs are not just possible but prevalent, with a disturbing number of these incidents attributed to preventable causes such as distraction and improper seat usage. So adhering to the guidelines provided, such as ensuring the correct seat for your child’s size and age and engaging children in safety practices, means you can drastically reduce these risks.
Every journey matters, and every precaution taken is a step toward safeguarding our children’s futures. Graco’s longstanding commitment to safety and their active involvement in Road Safety Week serves as a model for how companies and parents alike can contribute to creating safer travel environments for everyone.
For more detailed information on the latest in car seat safety technology and tips for secure travel, visit Graco’s website. Additionally, to stay engaged with ongoing safety campaigns and to find daily tips on protecting your little ones on the road, follow Graco’s Instagram. Join the ‘Safety Within’ campaign and become part of a growing community dedicated to ensuring that every child is protected, every journey, every day.
*This post is sponsored by Graco, but all thoughts are 100% my own – Some images are taken from Graco’s website*
At what age should a child sleep in their own bed?
We converted our fourth room from an office to the girls’ room, with a gorgeous bunk bed and not much else because the room is tiny. They slept in that room once, favouring our ginormous super king-sized bed and Mummy the radiator instead of sleeping super far away and alone, as my three and five-year-old constantly moan.
The truth is, I’m not in a rush to kick them out, however, I do worry about their independence and ability to self-soothe. However, what happens when you want your bed back, but your child refuses to go? What age should a child sleep in their own bed? And, how do you transition them eventually into their own room?
In this article we will deep dive into the typical ages and stages for transitioning kids to their beds, practical tips for making it smoother, and how to handle any hurdles along the way.
What age should a child sleep in their own bed?
Dr. Mickey Mehta, a pioneer in holistic wellness and over 40 years of professional experience states that until the age of seven, a child’s mirror neurons are like sponges, soaking up every signal around them. And when a child cries out through fear or other bodily need, especially in the middle of the night, the mother’s instant soothing is a comforting presence around the child and the child’s erratic heartbeat comes back to a normal rhythm much quicker than when they are in another room. You can view the clip here where he said this.
And, while studies1 show co-sleeping in the first year has a detrimental effect on sleep patterns later in preschoolers, such as disrupted sleep, more frequent night awakenings and dependency on new parents, as well as of course, safety concerns such as sudden infant death syndrome (SIDS), they did recommend room-sharing but on separate surfaces. They also found a link to more emotional closeness and wellbeing, especially during breastfeeding.
Eventually, we reach a point where it’s time to encourage a bit of independence (for them and us!). But the answer as to when that will be will lie in your child’s indsimbividual development, family dynamics and the culture you grew up in.
Generally, many children move from a cot to a big kid bed between 18 months and 3 years of age and the NHS advises that toddlers aged 1 to 2 years should have a consistent bedtime routine to support healthy sleep habits and get 11 to 14 hours of a good night’s sleep – this includes naps.
Additionally, the Newcastle Hospitals NHS Foundation Trust notes that while co-sleeping is common in many cultures, it’s very important to keep the sleeping environment safe and that your child is safe, ready and comfortable for the transition to their own bed.
Understanding the importance of independent sleeping
Encouraging your child to eventually sleep on their own is a huge milestone which also builds their emotional growth and self-reliance. Independent sleeping helps your child develop self-soothing skills which are responsible for managing stress and anxiety and it also helps them gain confidence to navigate the bedtime routines on their own. And, for parents, this means better quality sleep too and an opportunity to reestablish personal space, which could help with overall family well-being.2
Kids are normally ready to to sleep in their beds around the ages of two to four years, and the bed can be in the parents’ room to help facilitate the transition, although this age can vary on the child and family circumstances. Approach this transition with patience and consider that your child has been nestled comfortably with you, not only in the womb but outside too, so this is a huge learning curve for them as well as for you.
When should a child sleep in their own room?
Determining the right time for your child to transition to their own room is a huge decision. The NHS advises that babies should sleep in the same room as their parents for the first six months to reduce the risk of Sudden Infant Death Syndrome (SIDS).
After this period, many children may be ready to move to their own room between 6 to 12 months, though some parents (like me) may choose to wait until their child is older.3
Some points worth considering when transitioning your child to their own room
Room setup and safety: Make sure the child’s room is safe and conducive to sleep. This includes a comfortable temperature, appropriate lighting, and a crib or bed that meets safety standards.4
Address separation anxiety: It’s common for children to experience separation anxiety during this transition. Gradual steps, such as starting with naps in their own room or spending playtime there, can help ease the process.5
Consider the impact of co-sleeping on sleep habits: While co-sleeping can promote closeness, it may lead to sleep associations that make independent sleeping challenging. So, while transitioning to separate sleeping spaces can promote better sleep habits for both you and your child, be mindful that this may take time.
What are the benefits of your child sleeping in their own room?
Improved sleep quality: Children often sleep more soundly in their own space, leading to better rest for both them and their parents.6
Development of independence and self-soothing skills: Sleeping alone encourages your child to develop self-soothing techniques and promote independence and confidence.
Signs that your child is ready for their own room
Expressing a desire for independence: If your child shows interest in having their own space or exhibits a desire for privacy, this may mean they are ready for their own room.7
Ability to self-soothe: Children who can calm themselves when upset or fall back asleep without parental intervention are often prepared for independent sleeping.
Consistent sleep patterns: A regular sleep schedule and the ability to sleep through the night suggest that your child is ready to transition to their own room.
But, again, remember that every child is unique, so it’s important to consider your child’s individual readiness and family circumstances when making this transition.
Transitioning from a cot to a bed
Moving your child from a cot to a bed is a big step and one that can bring excitement and anxiety at the same time! You can make it a smoother transition by doing up the room to their liking, choosing the right firm mattress and bed, and creating a cosy and welcoming space. Here’s how:
Choosing the right mattress for your child’s bed
A quality mattress is so important to support your child’s growth, comfort, and overall health. The Simba Hybrid Kids Mattress* is a great example, designed to provide a medium-firm feel that supports healthy bone development and proper spinal alignment. This mattress combines Aerocoil® microsprings and high-definition foam, ensuring both comfort and durability, while a breathable, hypoallergenic cover helps create a clean and safe sleep environment8.
In collaboration with Simba, we reviewed the Simba Hybrid Kids Mattress* for our kids’ new bunk bed and so far we have had mixed results with them staying in their room, although it has been a huge improvement. But the girls did mention how comfy their bed was so it’s only a matter of time before I get to sleep like a starfish again and not curled up in the foetal position at the very corner of our bed!
Making the move exciting with the right setup
Involving your child in setting up their new bed can make the transition easier and more fun. They can pick out new sheets (my girls went for Monster High and Unicorns, naturally) and arrange their favourite toys around the room to promote a familiar and cosy atmosphere. Let them explore the comfort of the new mattress and give them some control over their sleep space, so it builds excitement and ownership.
How to encourage your toddler to sleep in their own bed
Transitioning your toddler to sleep in their own bedroom is a significant milestone that requires patience and consistency. Here are some strategies that can help the process:
Don’t rush the process
Allow your child ample time to adjust to sleeping independently. Speak with them about how much of a grown up they are and how exciting it is to have their own space. But listen to their concerns and don’t try to brush them away. They are very real concerns and they deserve acknowledgement.
Make the transition exciting
Involve your child in selecting new bedding or decorations for their bed. Emphasise the ‘big kid’ nature of this big change to make it more appealing and create a positive association with their new sleeping environment, to help them embrace the transition.9
Reward them when they succeed
Implement a reward system to celebrate nights they stay in their own bed. This could include stickers, a small prize, or an extra bedtime story. Positive reinforcement can motivate them to continue sleeping in their own room.
Stay consistent
Establish and maintain a regular bedtime routine, following the same steps each night. Consistency helps your child understand expectations and creates a sense of security.
Teach them to go back to sleep on their own
Encourage self-soothing techniques to help your child feel secure and fall back asleep independently if they wake during the night. This might include having a favourite stuffed animal, blanket or using night lights. You can also use the staggered anxiety ladder approach which I explain more about in this article here.
How do you create a sleep/bedtime routine that works?
Creating a consistent bedtime routine will help your child adjust to sleeping in their own room. The routine includes a predictable sequence of calming activities, which signals it’s time to wind down for sleep.
Tips for creating a bedtime routine:
Set a consistent bedtime: Aim to start the routine at the same time each evening to regulate your child’s internal clock.10
Engage in calming activities: Incorporate soothing tasks such as a warm bath, reading a story, or gentle music to help your child relax.11
Limit screen time: Avoid screens at least an hour before bed, as the blue light can interfere with melatonin production and disrupt sleep.12
Create a comfortable sleep environment: Make sure the bedroom is quiet, dark, and at a comfortable temperature to encourage restful sleep.
Be consistent: Follow the same steps in the same order each night to establish a sense of security and predictability.
FAQs
Q: When should a child sleep in their own room?
In the UK, the NHS advises that babies should sleep in the same room as their parents for the first six months to reduce the risk of sudden infant death syndrome (SIDS).
After this period, many children are ready to sleep independently. However, some experts suggest that between the ages of 2 and 3 is a suitable time to introduce solo sleeping, as children develop greater independence and may be more willing to explore their own space.
Ultimately, the decision should consider your child’s readiness, temperament, and the family’s unique circumstances.
Q: What are the benefits of a child sleeping in their own room?
Sleeping in their own room can help children develop self-soothing skills, leading to better sleep quality. It also fosters independence and confidence, as they learn to manage bedtime routines without parental presence. For parents, this transition often results in improved sleep and personal space, contributing to overall family well-being.
Q: How can I tell if my child is ready for their own room?
Signs that your child may be ready to sleep in their own room include:
Expressing a desire for independence: Showing interest in having their own space or demonstrating a desire for privacy.
Ability to self-soothe: Calming themselves when upset or falling back asleep without parental intervention.
Consistent sleep patterns: Maintaining a regular sleep schedule and sleeping through the night.
Q: What tips can help transition my child to their own room successfully?
Create a positive environment: Involve your child in decorating their room to make it inviting.
Establish a consistent bedtime routine: Follow the same calming activities each night to signal it’s time for sleep.
Gradual transition: Start with nap time in their own room before moving to nighttime sleep.
Provide comfort items: Introduce a favourite stuffed animal or blanket to offer security.
Q: How do I establish a sleep routine for my child in their own room?
Set a consistent bedtime: Aim to start the routine at the same time each evening to regulate your child’s internal clock.
Engage in calming activities: Incorporate soothing tasks such as a warm bath, reading a story, or gentle music to help your child relax.
Limit screen time: Avoid screens at least an hour before bed, as the blue light can interfere with melatonin production and disrupt sleep.
Create a comfortable sleep environment: Ensure the bedroom is quiet, dark, and at a comfortable temperature to facilitate restful sleep. The
Be consistent: Follow the same steps in the same order each night to establish a sense of security and predictability.
Q: How can I transition my child from co-sleeping to independent sleeping?
Communicate the change: Discuss the upcoming transition with your child to prepare them mentally.
Gradual steps: Start by having your child nap in their own toddler bed before moving to nighttime sleep.
Stay close initially: Sit with your child as they fall asleep in their new bed, gradually reducing your presence over time.
Offer comfort items: Provide a favourite toy or blanket to help them feel secure.
Final thoughts
Transitioning your child to their own bed and eventually to their own room is such a major milestone that can positively impact their development. But it requires patience, consistency, and encouragement as your child adapts to change at their own pace. Start with establishing a regular sleep routine, creating a comforting sleep environment, and reinforcing self-soothing skills, so your child feels supported at all times.
The NHS recommends keeping your baby in your room for the first six months to reduce the risk of SIDS, but beyond this stage, the timing of moving them to their own room is flexible, based on their individual readiness and family needs. With benefits like improved sleep quality, increased independence, and the development of healthy sleep habits, independent sleeping can be a rewarding transition for both children and parents.
While this process might come with challenges, approaching it with empathy and flexibility can help your child feel confident in their new routine and set the foundation for lifelong healthy sleep habits.
*We were gifted the Simba Hybrid Bunk Bed Mattress but all thoughts are 100% our own. Links marked with a ‘*’ are affiliate links, which means we may earn a small commission if you click through to buy at no extra cost to you.*
The benefits of play therapy autism activities in kids
Play therapy is a wonderful way to encourage kids to open up on topics they may not feel comfortable expressing verbally. For children with autism, where communication can be especially challenging, these therapeutic activities can make a world of difference.
Both play and speech therapy offer children the chance to learn, grow and connect in ways that feel natural and enjoyable. Therapy isn’t just about addressing communication challenges-it’s also about nurturing social skills, building emotional resilience, and creating a space where children can truly be themselves. Let’s explore this guide to autism speech therapy and how storytelling and other methods in play therapy autism activities can support children on the autism spectrum in meaningful, holistic ways.
Why play therapy autism activities are crucial
Play therapy and speech therapy provide unique benefits for children with autism, especially when therapists adapt these approaches to suit meet a child’s individual needs. While speech therapy often focuses on improving communication skills, play therapy engages children in creative and sensory activities that improve fine motor skills, support sensory processing, and strengthen social interactions.
Together, these therapies provide a safe and structured environment where children can practice essential skills-like turn-taking, managing emotions and interpreting social cues—all while having fun. Through engaging storytelling games, pretend play, and interactive activities, children with autism can explore and practice these skills in ways that feel natural and fulfilling.
The importance of a supportive environment
Children with autism face unique challenges in daily life, from interpreting social cues to managing sensory sensitivities. A structured, supportive environment allows them to explore these areas with greater confidence. In play and speech therapy,, the environment provides a safe space for the child to express themselves, interact with others, and experience sensory activities in ways that are not overwhelming.
Therapists play a key role in setting up this environment. They plan activities that feel playful but are thoughtfully designed to support specific developmental goals. For example, storytelling games allow children to use language creatively, practice listening, and engage in social interactions—all without feeling pressured. This type of environment is essential for making progress that feels both natural and meaningful.
Play therapy ideas for autism
Play therapy for autistic children includes structured activities that support emotional and social growth. Here are some play therapy techniques that can be especially effective:
1. Storytelling through sensory bins and sensory swings
Sensory bins and swings are popular tools in occupational therapy and provide calming sensory input, helping children regulate sensory sensitivities. But beyond their sensory benefits, these can also be great tools for storytelling.
For example, a sensory bin filled with rice or sand allows children to explore objects by uncovering small toys or figurines. Therapists can prompt children to create a story with the items they find, which helps them connect objects to language and narrative. Sensory swings, meanwhile, offer a fun, safe environment where a child might tell a story or listen to a therapist tell one, further reinforcing relaxation with language skills.
2. Pretend play and role-playing games with a storytelling focus
Pretend play is essential for social development. It allows children to act out familiar scenarios, explore emotions, and even practice empathy. For instance, playing “house” lets children act out routines like preparing meals or getting ready for bed, which helps them process daily experiences in a safe, imaginative way.
In these scenarios, storytelling often emerges naturally as children create dialogue and situations for their characters. Role-playing games, adapted for group play, allow children to take on different roles, encouraging turn-taking and active listening. For children who struggle with social cues, pretend play and storytelling create a low-stakes environment for practicing language and social skills without fear of judgment.
3. Interactive group games with storytelling elements
Group activities, like board games or scavenger hunts, can be adapted to include storytelling. Board games that involve dice or drawing cards allow children to create stories as they play, adding another layer of engagement and imagination.
For example, therapists might modify a board game so each turn involves describing what a character in the game is doing or feeling, incorporating storytelling while focusing on language and social skills. Group storytelling activities encourage children to work together, listen to one another, and develop narrative skills in a fun and supportive setting.
The role of speech-language pathologists in storytelling-based interventions
Speech-language pathologists (SLPs) play a crucial role in implementing storytelling games as therapeutic tools. They select and adapt games to target specific speech and language goals for each child, guiding gameplay, modeling language use, and providing feedback to reinforce learning.
SLPs can make therapy sessions more engaging and motivating for children with autism, helping them practice essential communication skills in enjoyable, low-pressure settings.
SLPs may use picture-based storytelling for minimally verbal children, where they present a series of images and encourage the child to describe the scenes. This technique not only supports vocabulary and sentence structure but also provides an opportunity for children to practice sequencing, a critical component of storytelling that helps improve narrative skills and logical thinking.
The benefits of storytelling in speech therapy for autism
Storytelling is a powerful tool within speech therapy, especially for children on the autism spectrum, because it combines language development, social engagement, and emotional expression in one activity. Here’s how storytelling-based speech therapy can support children in building vital communication skills.
1. Enhancing language and communication skills through storytelling
Storytelling games are one of the most effective ways to enhance language skills in speech therapy. These games allow children to create and share stories, which promotes expressive language and vocabulary building. For children who are minimally verbal, picture-based storytelling provides visual cues, helping bridge the gap between thoughts and spoken words.
For example, a speech therapist might guide a child through a series of images and ask them to describe what’s happening in each one. This activity helps children practice sentence structure, vocabulary, and narrative skills, fostering comfort with language and making it easier to communicate needs and feelings.
2. Practicing social communication through storytelling scenarios
Social communication is another area where storytelling makes a big impact. Through storytelling games, children can practice conversation skills like initiating topics, maintaining dialogue, and responding to others.
Therapists might use a simple story and prompt the child to continue it, allowing them to add details or respond to questions about the characters’ actions or feelings. These interactive storytelling sessions give children a chance to practice the back-and-forth of real-life conversations in a supportive, structured environment.
3. Building Emotional Expression through storytelling characters
Storytelling is also effective for helping children explore and express emotions. By interacting with different characters and scenarios, children learn to identify and understand various emotions, as well as how to manage them.
For instance, therapists might introduce a story with characters experiencing a range of emotions, such as happiness, frustration, or sadness. They can then ask the child how each character feels and why, allowing the child to reflect on and discuss emotions in a safe space. This type of storytelling builds emotional recognition skills, which are often challenging for children with ASD.
Practical tips for parents and caregivers
Storytelling and play-based techniques can be extended beyond the therapist’s office. Here are some practical tips to bring these techniques into your everyday life:
1. Encourage pretend play and storytelling at home
Simple games like “restaurant” or “doctor’s office” give children a chance to create stories around familiar scenarios. Allow your child to take the lead in creating a story, and follow their cues. Letting the story evolve naturally can be a fantastic way for them to express thoughts and feelings.
2. Use visual supports and story schedules
Visual supports like picture charts, storyboards, and “first-then” boards can be helpful for children who feel anxious in new situations. Using visual aids to map out a simple story or a schedule of the day’s events can help children understand sequencing and develop a sense of narrative structure.
3. Practice storytelling with everyday events
Storytelling doesn’t need to involve elaborate plots. Use everyday events as storytelling prompts. For instance, after a family outing, ask your child to describe what happened, guiding them to recount the day in order. This simple practice helps them develop narrative skills while reinforcing memories of positive experiences.
Working with qualified therapists
Occupational therapists, speech-language pathologists (SLPs), and play therapists have specific training to support children with autism. Therapists adapt activities to each child’s strengths and growth areas. For example, an SLP might incorporate storytelling games to enhance language skills, while an occupational therapist might use sensory-based storytelling activities. Qualified therapists also guide family members on how to reinforce these skills at home, creating a well-rounded approach to therapy.
FAQs on storytelling in play therapy and speech therapy for autism
What are the main benefits of storytelling games in autism therapy?
Storytelling games enhance language, social, and emotional skills by letting children practice these skills in a structured setting. Storytelling offers a unique way for children to build social connections, understand emotions, and express themselves.
How does storytelling in play therapy help with social skills?
Storytelling within play therapy encourages cooperation, empathy, and emotional regulation. These skills are essential for children with autism as they learn to navigate social situations.
What is the role of storytelling for minimally verbal children?
For minimally verbal children, storytelling through picture-based activities provides visual cues that support language development, helping them communicate thoughts and ideas in a way that feels comfortable.
Long-term benefits of storytelling in play and speech therapy
The benefits of storytelling in play and speech therapy extend far beyond individual sessions. As children develop communication and emotional skills in a safe,
Play therapy ideas for autism
Play therapy for autistic children uses structured activities to nurture emotional and social growth. Here are some play therapy techniques that work wonders:
1. Sensory swings and sensory bins
Sensory swings are a popular tool in occupational therapy. They provide calming sensory input and help children regulate sensory sensitivities. Swings can also be a fun way to practice social engagement in a safe environment. Sensory bins, on the other hand, offer hands-on activities where children can play with textures, colors, and objects, stimulating their senses and encouraging exploration.
For instance, a bin filled with rice or sand allows children to bury and uncover toys, which can help improve fine motor skills. These activities create a great way to help children feel centered and calm, making them ideal starting points for play therapy.
2. Pretend play and role-playing games
Pretend play is essential for social development, and it provides children with a platform to explore emotions, practice empathy, and understand social roles. For example, playing “house” allows children to act out familiar routines, like preparing meals or getting ready for bed, which helps them process daily experiences in a safe, imaginative way.
Role-playing games can be adapted for group play too, promoting turn-taking, active listening, and creative thinking. For children who may struggle with social cues, pretend play offers a low-stakes environment to practice without fear of judgment.
3. Interactive group games
Group activities, such as board games and scavenger hunts, encourage cooperative play and social interaction. These activities teach children the basics of turn-taking, listening, and responding, which are crucial for social success.
Board games that involve dice or drawing cards are perfect for promoting social skills and patience. Plus, these games are highly adaptable; for example, therapists can modify rules to focus on specific skills, like following directions or expressing emotions.
The role of speech-language pathologists in game-based interventions
Speech-language pathologists (SLPs) play a crucial role in implementing storytelling games as therapeutic tools. They select and adapt games to target specific speech and language goals for each child. SLPs guide gameplay, model appropriate language use, and provide feedback to reinforce learning objectives.
These professionals create structured environments that encourage turn-taking and social exchanges. They may use visual supports or modify game rules to accommodate individual needs. SLPs also involve parents and caregivers, teaching them to use game-based strategies at home.
By incorporating storytelling games, SLPs can make therapy sessions more engaging and motivating for children with autism spectrum disorder (ASD).
The benefits of speech therapy for autism
Speech therapy is incredibly beneficial for children with ASD, especially when it includes storytelling games and structured language activities. Here’s how speech therapy supports children in building vital communication skills.
1. Enhancing language and communication skills
Speech therapy is known for enhancing language skills, and storytelling games are one of the most effective tools for this purpose. These games allow children to build expressive language skills as they create and share stories. Picture-based storytelling games are especially useful for children who are minimally verbal, providing visual supports that help bridge the gap between thought and speech.
For example, a speech therapist might use a game where children describe a series of images, helping them practice sentence structure, vocabulary, and narrative skills. As they become more comfortable with language, children may find it easier to communicate their needs and feelings.
2. Practicing social communication
Social communication is another area where speech therapy can make a big impact. Through role-playing and storytelling games, children practice conversation skills like initiating topics, maintaining dialogue, and responding to others. These activities give children a chance to navigate the back-and-forth of real-life conversations in a supportive environment.
Therapists often create scenarios that mirror everyday interactions, such as ordering food or asking for directions. By practicing these “scripts,” children build confidence in their communication abilities, which can make a significant difference in their daily lives.
3. Building emotional expression
Storytelling and role-playing games also help children explore and express emotions. By interacting with different characters and scenarios, children learn to identify various emotions and understand how to manage them.
For example, therapists might use puppets or picture cards to help children discuss how a character feels and why. These discussions provide a safe space to explore complex emotions, from joy and surprise to frustration and sadness. For many children with ASD, understanding emotions is challenging, so this form of therapy is particularly valuable.
Practical tips for parents and caregivers
For families, therapy doesn’t have to stop at the therapist’s office. Here are some practical tips to bring the benefits of play and speech therapy into everyday life.
1. Encourage pretend play at home
Simple games like “restaurant” or “doctor’s office” provide children with opportunities to practice communication, turn-taking, and emotional expression. Start by creating a scenario together, then allow your child to take the lead. Follow their cues and let the play evolve naturally—this can be a fantastic way for them to express their thoughts and feelings.
2. Use visual supports and schedules
Visual supports like picture charts, schedules, and “first-then” boards can help children understand and anticipate what’s coming next. These aids are particularly helpful for children who feel anxious in new situations. For example, a visual schedule showing the day’s routine can help children transition smoothly from one activity to the next.
3. Practice storytelling with everyday events
Storytelling doesn’t need to involve elaborate plots or fantasy. Use everyday events as storytelling prompts. For instance, ask your child to recount what happened after a family outing, prompting them to describe the details. This helps them build narrative skills while reinforcing memories of positive experiences.
Working with qualified therapists
A strong therapeutic partnership is vital for making progress. Occupational therapists, speech-language pathologists (SLPs), and play therapists have specific training to support children with autism.
Therapists adapt activities to suit each child’s strengths and areas for growth. For instance, an SLP might use storytelling games to boost language skills, while an occupational therapist could focus on sensory play to improve motor skills. A qualified therapist also involves family members, teaching them how to reinforce these skills at home.
Key qualities to look for in a therapist
When selecting a therapist, look for qualifications, experience with autism spectrum disorder, and a collaborative approach. A good therapist should make both the child and family feel comfortable, valued, and engaged in the therapy process. Also, consider therapists who are open to using a variety of techniques, such as sensory integration, visual supports, and play-based interventions, to target specific goals.
FAQs on play therapy and speech therapy for Autism
What are the main benefits of storytelling games in autism therapy?
Storytelling games enhance language, communication, and emotional skills by allowing children to practice these skills in a structured yet engaging setting. They provide a unique way for children to develop social skills, understand emotions, and express themselves.
How does play therapy help with social skills in autistic children?
Play therapy activities like pretend play, group games, and role-playing encourage cooperation, empathy, and emotional regulation. These skills are essential for children with autism as they learn to navigate social situations.
What is the role of occupational therapists in autism therapy?
Occupational therapists focus on fine motor skills, sensory integration, and self-regulation. They often use sensory activities, visual supports, and play-based techniques to help children feel more comfortable in their environment.
How can play therapy be adapted for children with sensory sensitivities?
Play therapists may use sensory bins, swings, and visual aids to tailor activities to a child’s specific sensory profile. This allows children to experience sensory input in a controlled and supportive way.
What types of activities are used in play and speech therapy?
Common activities include storytelling games, sensory play, pretend play, board games, and cooperative group activities. Each activity addresses different goals, like building language skills, improving motor coordination, or fostering social interactions.
Long-term benefits of play and speech therapy
The benefits of play and speech therapy extend well beyond therapy sessions. As children build skills in a supportive environment, they experience improvements in many areas:
Increased Communication Skills: As children gain confidence in language use, they can express themselves more clearly and understand others better.
Enhanced Social Abilities: Play therapy provides practical experience with social rules, helping children build friendships and navigate social situations.
Improved Emotional Regulation: Learning to recognize and manage emotions in therapy can help children feel more in control in daily life.
Better Motor Skills and Sensory Integration: Sensory activities in play therapy help with both fine and gross motor skills, making physical activities more enjoyable.
With a strong foundation in these skills, children with autism can grow more independent and capable, enjoying a higher quality of life and more meaningful connections with others.
By combining play and speech therapy, children with autism receive a holistic support system that nurtures communication, social, and emotional skills. These therapies provide a safe, enjoyable environment where children can develop in ways that feel natural and empowering. With the right guidance, autistic children can unlock new skills and gain the confidence to navigate the world around them, building a brighter future.
*Collaborative feature post*
Top tips on how to be more productive with ADHD
I am more productive if I chunk similar activities together so I’ll set time aside specifically for social media, schedule writing for a different time etc.
I think a really great way to be productive is to have your to -do list written out and on your clear and clean desk the night before. It means you start the day with absolute clarity of purpose.
Working from home can be distracting when you have a mountain of washing or other household tasks. I often take myself off to a nice cafe with free WiFi so I’m then totally focused on work. A good coffee and slice of cake is a good reward.
I make a list the night before my day off so I don’t procrastinate/waste time in the morning deciding what to do. I feel that way I get up knowing exactly what I’ve got to get done!
Don’t go for the false economy of not buying some of the productivity tools out there. The money you save not doing so is far outweighed by the increase in time you have if you use them. Tools like Tailwind, Buffer, Missing Letter are a godsend for me. And – have a set time to check your emails. Absolutely DON’T have it open all day distracting you.
Try and set certain tasks up the night before, such as the washing machine or dishwasher! By the time you then come downstairs in the morning, some of your tasks will already be done – resulting in more time for other tasks or a 5 minute sit down.
Starting something is probably the hardest thing to do, so the only way to start is, well, to start! Use the above tips to be productive at home, grab yourself a productivity pack like I did and start recording your habits.
Plan your goals and write out your monthly, weekly, and daily goals. Set yourself a target of 30 days to complete your habit and focus on tracking that habit every single day. After a few weeks, you will form your habit naturally as you have focussed on fulfilling that habit. I always feel amazing when I’ve had a particularly productive day.
You just need to find the motivation to start and what better time than to start implementing the ways to be productive now!
FAQs on how to be more productive with ADHD
How to be productive at home with ADHD?
Staying productive with ADHD at home requires creating routines, breaking down big tasks into small goals, and using productivity planners to stay on track.
How can ADHD people be more productive?
By using techniques like the Pomodoro method, prioritising important tasks, and limiting distractions, you can improve your productivity.
Can ADHD contribute to increased productivity and creativity in individuals who do not take medication for the condition?
Yes, many people with ADHD find they have bursts of creativity and productivity, especially during periods of hyperfocus. Medication isn’t always necessary for everyone.
How do I create a routine that sticks for someone with ADHD?
Start by setting small, achievable goals and using tools like task lists, timers, and accountability partners to build habits over time.
What strategies can a person with ADHD use to stay organised and remember tasks in their daily life?
Using visual cues like sticky notes, brain dumps, and productivity apps like Trello or Todoist can help you stay organised and on top of tasks.
How can people with ADHD use digital tools to create a more productive daily routine?
Apps like Trello and Notion offer visual task management, while timers like the Pomodoro technique help break the day into manageable chunks, making it easier to stay focused.
Are adults with ADHD more intelligent or creative?
Some research suggests that people with ADHD can be more creative and thrive in environments that reward innovative thinking. Hyperfocus can lead to impressive productivity in certain areas.
What are some ADHD productivity hacks for staying on task?
Using the Pomodoro method, limiting distractions, and working during peak productivity hours are all excellent ADHD productivity hacks.
*Collaborative feature post*
I feel more productive if I put my phone down… I get so easily sucked into irrelevant things on social media that I lose track of what I’m doing and feel like I have to start again. That goes for both work and at home. Once I sit down and just have 5 minutes, I don’t want to get up again.
I am definitely more productive if I stop working for regular breaks. I either do some housework, walk the dog, go for a run or swim or simply play the piano or read a book for 5 minutes. I’m much more able to properly focus on what I should be doing afterwards.
I am more productive if I chunk similar activities together so I’ll set time aside specifically for social media, schedule writing for a different time etc.
I think a really great way to be productive is to have your to -do list written out and on your clear and clean desk the night before. It means you start the day with absolute clarity of purpose.
Working from home can be distracting when you have a mountain of washing or other household tasks. I often take myself off to a nice cafe with free WiFi so I’m then totally focused on work. A good coffee and slice of cake is a good reward.
I make a list the night before my day off so I don’t procrastinate/waste time in the morning deciding what to do. I feel that way I get up knowing exactly what I’ve got to get done!
Don’t go for the false economy of not buying some of the productivity tools out there. The money you save not doing so is far outweighed by the increase in time you have if you use them. Tools like Tailwind, Buffer, Missing Letter are a godsend for me. And – have a set time to check your emails. Absolutely DON’T have it open all day distracting you.
Try and set certain tasks up the night before, such as the washing machine or dishwasher! By the time you then come downstairs in the morning, some of your tasks will already be done – resulting in more time for other tasks or a 5 minute sit down.
Starting something is probably the hardest thing to do, so the only way to start is, well, to start! Use the above tips to be productive at home, grab yourself a productivity pack like I did and start recording your habits.
Plan your goals and write out your monthly, weekly, and daily goals. Set yourself a target of 30 days to complete your habit and focus on tracking that habit every single day. After a few weeks, you will form your habit naturally as you have focussed on fulfilling that habit. I always feel amazing when I’ve had a particularly productive day.
You just need to find the motivation to start and what better time than to start implementing the ways to be productive now!
FAQs on how to be more productive with ADHD
How to be productive at home with ADHD?
Staying productive with ADHD at home requires creating routines, breaking down big tasks into small goals, and using productivity planners to stay on track.
How can ADHD people be more productive?
By using techniques like the Pomodoro method, prioritising important tasks, and limiting distractions, you can improve your productivity.
Can ADHD contribute to increased productivity and creativity in individuals who do not take medication for the condition?
Yes, many people with ADHD find they have bursts of creativity and productivity, especially during periods of hyperfocus. Medication isn’t always necessary for everyone.
How do I create a routine that sticks for someone with ADHD?
Start by setting small, achievable goals and using tools like task lists, timers, and accountability partners to build habits over time.
What strategies can a person with ADHD use to stay organised and remember tasks in their daily life?
Using visual cues like sticky notes, brain dumps, and productivity apps like Trello or Todoist can help you stay organised and on top of tasks.
How can people with ADHD use digital tools to create a more productive daily routine?
Apps like Trello and Notion offer visual task management, while timers like the Pomodoro technique help break the day into manageable chunks, making it easier to stay focused.
Are adults with ADHD more intelligent or creative?
Some research suggests that people with ADHD can be more creative and thrive in environments that reward innovative thinking. Hyperfocus can lead to impressive productivity in certain areas.
What are some ADHD productivity hacks for staying on task?
Using the Pomodoro method, limiting distractions, and working during peak productivity hours are all excellent ADHD productivity hacks.
*Collaborative feature post*
I realised quite late in life that I could have ADHD, even though all the signs were there from as early as I could remember. During my childhood, I was told I’d either distract people or get distracted. The teachers couldn’t handle me. I had bundles of energy and I never slept, so my parents struggled with me, too. It was only when I channelled my energy into music and sport that I realised I needed extra tools to manage daily life.
As a fully-fledged adult, I procrastinate when I should finish a deadline, complete a household chore, or even when I read to the kids before bedtime. Tackling household clutter can feel overwhelming, but starting with practical steps can make a huge difference. For instance, if you’re managing a major decluttering project, you might consider looking into how to rent a home cleanout dumpster that allows you to efficiently clear large amounts of waste and regain control of your space. Procrastination has become the biggest bane of my life, so staying productive can be challenging, especially when I have several distractions around me.
It’s safe to say we all experience procrastination in varying degrees when trying to manage everything. The Internet and social media have made it that much easier to waste time rather than get things done. Now I am a busy mum of four with (undiagnosed) ADHD and, at the best of times, it can feel like juggling plates while walking on a tightrope.
Whether it’s managing the house, the kids, or even your own business, staying productive while ADHD symptoms demand your attention is tough. So, this article is mostly geared towards those, like me, who work from home and juggle parenting and work duties, often at the same time, but with the added nuance of ADHD. From breaking down tasks to using accountability partners, here are 60 top tips on how to be more productive with ADHD. Let’s get stuck in!
What is productivity?
To be productive, we need to know what productivity means. Businessdictionary.com defines productivity as:
“The measure of the efficiency of a person… in converting inputs into useful outputs. Productivity is computed by dividing the average output per period by the total costs incurred or resources (capital, energy, material, personnel) consumed in that period. Productive is a critical determinant of cost efficiency.”
So, in essence, productivity basically means how efficient you are at what you are producing and what you receive economically as a result, i.e.output per unit of input. So, the more productive you are, the more chances you have of increasing your value.
What about productivity at home? Being busy vs productive
In simpler terms, productivity means using your time and energy effectively to achieve your goals. So, if the tasks you are working on are low-value or at the expense of high-value tasks, then doing something doesn’t always mean you are productive. The primary aim of being productive is to know exactly what you should spend your time, energy and attention on to improve yourself and your family around you.
Why does being productive matter?
Consider what it would be like if you could achieve all the high-value tasks you needed to complete in a shorter period, so you have more time to spend with your family. Perhaps productivity will allow you to use your energy on the things that make you happier or even work on tasks that will help you improve your work and home life.
Having something productive to do at home means that you can manage your daily tasks effectively and still increase your health and wellbeing. And at work, being productive means that you can improve your way of living and earn more income to spend on the things that make you happier.
So let’s dig into the tips on how to be more productive. Even if you don’t have ADHD, these tips will work for you too:
Tip 1: Break down big tasks into small goals
We’ve all been there – staring at a massive to-do list and feeling completely overwhelmed. For me, that feeling of being paralysed by the size of a task used to be my biggest barrier to getting things done. What I’ve learned is that breaking down big tasks into smaller, manageable goals is a game-changer. If you’re staring at a mountain of laundry or an overwhelming work project, don’t think about the whole thing. Just tackle the first small step. Before you know it, those little steps will add up, and you’ll be making progress without feeling buried under the weight of it all.
Tip 2: Use a timer (Pomodoro Method)
Let me tell you, the Pomodoro technique is like a secret weapon for ADHD productivity. The idea is simple, but so effective. Set a timer for 25 minutes and focus on one task during that time. Once the timer goes off, take a 5-minute break to reset. I use that little break to grab a coffee, stretch, or just give my brain a breather. After the break, I jump back in for another 25-minute sprint. It’s amazing how much you can get done with this method. Plus, those little breaks are perfect for recharging without losing momentum.
Tip 3: Find your peak productivity hours
Are you more productive in the morning or late at night? For me, it depends on the day, but I’ve learned that knowing my peak hours makes all the difference. If I didn’t have to do the school runs, I could work into the early hours of the morning. But, now I have to be up at 6am, so I find the period just after drop is off my most productive time to check off the most challenging tasks.
The idea is to work with your natural energy levels instead of fighting against them. If you know you’re sharper in the morning, use that time to tackle your most important tasks. If you’re a night owl, save the big stuff for the evening. Understanding when you’re at your best can help you make the most of those bursts of energy.
Tip 4: Keep a task list
I live by my task list. Without it, I’d probably forget half of the things I need to do. Whether you use a simple to-do list or something more structured like a Productivity Planner, having your tasks written down is a lifesaver. Not only does it help you stay on top of things, but there’s also something incredibly satisfying about crossing off completed tasks. It reduces stress and keeps everything manageable.
Tip 5: Use a brain dump
Sometimes, my brain feels like it’s running a million miles a minute, especially when I have a lot on my plate. That’s where a brain dump comes in handy. I just grab a piece of paper or open a productivity app and jot down everything that’s swirling in my mind. Getting it all out helps me focus on what’s most important without constantly being distracted by random thoughts or worries. It’s one of the best ways to clear mental clutter and stay productive.
Tip 6: Use an accountability partner
If you struggle to stay on track, an accountability partner can work wonders. It could be a friend, a family member, or even a colleague. The idea is that someone checks in on your progress, keeping you accountable. Knowing that someone will ask how you’re doing can give you that extra push to stay motivated. I’ve found it especially helpful when I’m working on long-term projects or tasks that feel overwhelming.
Tip 7: Limit distractions
Let’s face it: distractions are everywhere, especially when you have kids at home. For me, the key is creating a work zone where I can limit distractions as much as possible. Whether it’s using noise-cancelling headphones or setting up a quiet workspace, reducing external interruptions helps me stay focused. It doesn’t eliminate the chaos completely, but it certainly makes things a bit easier.
Tip 8: Use ADHD-friendly tools
There are so many tools out there designed to help with productivity, and some of them are particularly helpful for ADHD brains. Apps like Trello and Todoist, as well as my trustee Microsoft Outlook and To-Do help me stay organised, while a Productivity Planner keeps me on track with habits and goals, as I like to write things down. You can also use a LiveChat conversational platform with ChatGPT at its core for almost human-like interaction. I can’t live without it now!
The important thing is to find tools that suit your style and stick with them. These tools are like scaffolding for your productivity—they provide the structure you need to stay on task.
Tip 9: Create routines but stay flexible
Routine is essential for productivity, especially with ADHD. But life happens, and sometimes sticking rigidly to a schedule just isn’t possible. That’s why it’s important to stay flexible. I try to keep a basic routine, but if something throws off my day, I don’t beat myself up about it. The key is to stick to the most important tasks and give yourself a little grace when things don’t go as planned.
Tip 10: Start with one task
When there’s too much to do, it’s easy to get stuck in indecision. My advice? Just pick one task and start. It doesn’t have to be the biggest or most important thing—just start with something small. The act of getting started builds momentum, and before you know it, you’re ticking things off your list. Action leads to motivation, so don’t wait for that burst of energy. Just begin.
Tip 11: Take short breaks
We’ve talked about the Pomodoro Technique, but short breaks can make all the difference, especially when your brain feels overloaded. I try to work in 25 to 30-minute bursts and then take a 5-minute break to move around, grab a snack, or just relax. But, the important takeaway here is breaks are needed as they’re a great way to recharge without losing focus. And those little breaks prevent burnout, helping you stay productive for longer stretches of time.
Tip 12: Keep things fun and interesting
Let’s be honest—boring tasks are the worst. But I’ve found that adding a bit of fun can make even the most mundane chores more bearable. I’ll often put on a playlist or listen to an audiobook while I’m cleaning or working. Music can really shift your mood and make repetitive tasks feel less like a chore.
Tip 13: Celebrate small wins
One of the best ways to keep yourself motivated is to celebrate the little victories along the way. Finished a task? Take a moment to acknowledge it! Whether it’s treating yourself to a cup of tea or taking a quick break, these small rewards help build momentum and keep you moving forward.
Tip 14: Try body doubling
Body doubling is a brilliant productivity hack for people with ADHD. Simply having someone else around, even if they’re working on something completely different, can help you stay focused. I’ve even found virtual body doubling helpful—just having someone on a video call while we both work keeps me on task.
Tip 15: Don’t wait for motivation
If you’re waiting for motivation to strike, you might be waiting a long time! The truth is, ADHD brains often struggle with finding motivation. But here’s the secret: action creates motivation, as we mentioned before. Don’t wait for the spark—just start. Once you’re in motion, the motivation will usually follow.
Tip 16: Avoid multitasking
Multitasking is tempting, especially when you have a lot on your plate. But I’ve found that it rarely works, especially with ADHD. It’s better to focus on one task at a time and see it through to completion. You’ll be more efficient and less stressed when you’re not trying to juggle multiple things at once.
Tip 17: Use visual cues
I’m a huge fan of sticky notes and other visual reminders. If you’re the type of person who forgets what you were doing just two minutes ago, like me, having visible cues can be a lifesaver. Whether it’s a note on your desk or a reminder on your phone, keeping important tasks front and centre can help you stay focused.
Tip 18: Find an ADHD coach or expert
Sometimes, you need a little extra help. An ADHD coach or expert can provide personalised strategies that fit your unique challenges. They can help you find what works for your specific situation and even help you develop a plan for your business or guide you through any rough patches. It’s worth considering if you’re struggling to manage on your own.
Tip 19: Be kind to yourself
Productivity will vary day by day, especially when you’re managing ADHD. Some days, everything flows smoothly, and you feel like a superhero. Other days, it’s a struggle just to get out of bed. And that’s okay. Be kind to yourself and recognise that not every day will be perfect. Give yourself the same grace you’d offer a friend.
Tip 20: Plan your day the night before
One of the best habits I’ve developed is planning my day the night before. Before I go to bed, I write out my top tasks for the next day. This way, I wake up knowing exactly what I need to focus on. It takes the guesswork out of the morning and helps me hit the ground running.
Tip 21: Get some sleep
Sleep is key to being productive at home during the day and being at your very best work performance. Set a bedtime and wake time every day, even during the weekends, and stick to them so your body clock automatically shifts to these times.
To have an effective good night’s sleep, try to sleep in complete darkness. I use an eye mask which helps me sleep in pitch black because the slightest bit of light will wake me up. If you can, invest in blackout blinds, as they help to block out any light coming from the window. Avoid drinking alcohol and caffeine before bed, as they will keep you up and decrease your productivity the next day.
Tip 22: Fit in regular exercise
Exercise is literally my number one therapy! It helps to keep the heart pumping and will keep your mind and body happy and relaxed. I work out from home 30 minutes a day, and this works for me as I also work from home. But if you need extra motivation, perhaps classes are a good way to keep you motivated.
Exercising outside when the weather is nice is a great way to take your mind off your daily tasks and get in some much-needed fresh air, which will help to clear the cobwebs in your head. Studies have shown that if you step outside at the very start of your day, your productivity increases by up to 70%! When and where I can, I will take myself for a walk.
Diet is also just as important as exercise. Make sure you’re eating well and getting your 7-a-day. Try to avoid sugary food and drinks as they spike your sugar levels and will cause an energy crash, which is not good for productivity.
Tip 23: Practice mindfulness and meditation
Mindfulness and meditation are all about keeping your mind in the present moment, and not wandering off when you need it to focus on your work. It’s a great way to train your brain muscles and help you be more productive in your daily tasks.
This is a slow process, so take your time and keep going – you will reap the rewards later. Headspace is a great way to practice meditation, and I have written more about mindfulness and meditation to reduce anxiety, which you can find here.
Tip 24: Set up a home command centre
Set up a home office that limits distraction and makes your office space the hub of productivity. For more information on how to set up your home office, check out Forbes’ article here.
Tip 25: Embrace procrastination and use it as a tool
As I’ve mentioned before, I am a huge procrastinator and spend a lot of my time wasting time! So, as mentioned above, I incorporated a technique which works for me, and that is to work on my tasks in 30-minute bursts and then allow myself 5 – 10 minutes to procrastinate.
You will not beat procrastination, the temptation will always be there. So use your time effectively to get all your procrastinating done and then focus your time and energy on getting your projects done in periods which you can manage. Try the 30-minute burst and see if that works for you.
I wear a fitness tracker, so I set 30 minutes on my timer, and my wrist will buzz when I have finished those 30 minutes. Then I get off my seat, and I take a walk around, scroll on my phone, eat some food or schedule in my exercise.
Take your mind off work for those short few minutes, so you are ready to set another 30-minute timer and tackle your tasks.
Also, if you have deadlines and you set them a few weeks in advance, but you sit on that deadline until the last minute, then change your deadline to a shorter period in advance. If I have a deadline coming in a few days, then I make sure I get it sorted in those few days. If I had 3 weeks, I wouldn’t do anything until the last minute!
Tip 26: Use a productivity journal to reach your goals
Start recording your habits and tasks so you know what you’re working on every day. You can set goals, manage your time, and plan your tasks, so you can see what you need to do every day.
At the start of each month, specify what you will work on each month. Then within each week, set goals that will contribute to that monthly goal, and each day work on the goals that will contribute to your weekly goals.
I found since using a productivity planner that I am so much more productive with my work and house duties because I know what my good and bad habits are and I know what I need to do every day, week and month.
Tip 27: Work out what your goals are and create habits to achieve those goals
What is it you would like to achieve? Are you trying to lose weight? Do you want to clean less and spend more time working on your business? Do you want to spend more time with your family? Be clear with what you want to achieve and note the point at which you want to get to, so you can create habits to achieve your goal.
For example, if you want to lose weight, set times to get to the gym or fit in your workout. If you want to spend more time with your family, then schedule a few hours in the day to purely spend time with the family – make sure you do nothing else in that time.
If you want to clean less and spend more time working on your business, then use my ‘short work-burst’ method and work on your business for 30 minutes and spend 10 minutes cleaning up a certain area of the house. You can use The Organised Mum’s Method where she talks about cleaning an area in your house for just 30 minutes a day, and this works just as well. I use a method similar to this, otherwise I would just end up cleaning all day and spending little time on work.
Use a habit tracker to track the habits you have identified. Each time you have fulfilled a habit, tick it off. Include your bad habits too like I did and cross-check them off when you have successfully not fallen into those bad habits that day.
If you’re stuck for ideas on how to be productive, here are some productive things to do when you are bored at home:
Tip 28: Improve yourself
As mentioned above, knowing your bad habits are just as important as creating good ones. Know where you need to work on and spend time improving yourself.
Tip 29: Try something new
Stepping outside your comfort zone is the only way you’ll grow. I try to do that regularly by learning a new skill or trying my hand at something new. I took a leap of faith and started publishing on Amazon and I’m so glad I did! I’ve learned a new skill and I feel like I’ve accomplished something huge.
Tip 30: Invest in your future
The best investment you can make is on yourself. So carve out some time to learn a new skill. Take some home learning courses and work towards building your portfolio, which will eventually help you to build on your income too.
Tip 31: Have fun
We’ve touched on this before, but give yourself a break now and again to wind down and forget about tasks and to-dos. Having fun is actually a very productive past-time because it clears the stress and it helps you step away from a task and have a birdseye view of the problem if you’re not thinking about it all the time. Plus, it’s healthy. Balance is key to being productive so have some downtime too. Go out with friends, go to the cinema or go shopping. Whatever it takes to get in those feel good hormones.
Tip 32: Better your health
I’ve noticed that when I eat junk, I am less productive because I feel lazy and I don’t have the energy to get up and get things done. Exercise has given my brain a natural energy boost, but so has fuelling my body with good food. Improving your health improves your productivity, so put health at the very top of your to-do list.
Tip 33: Get organised
I run a tight ship – I have to because I have four kids, triple school runs and a business from which I work at home. So household tasks, work day tasks and work time itself all have their own pockets in which they can’t overlap or be allowed to fall by the wayside. Project management and organisation is the only way I survive the multitude of tasks but it also keeps me ticking. So make sure you get organised, but be prepared to wing it if certain things prop up you haven’t accounted for. It’s also important to think on your feet too.
Tip 34: Hone your talent
Do you have a particular skill that you could potentially monetise? Then work on honing that talent and becoming an authority in that field. Knowledge is power, especially if it’s your ADHD superpower and you can teach your potential customers something that will help better their own lives.
Tip 35: Visit the library
If I get writer’s block or lose my mojo because I’ve had a particularly challenging day, then I put my work down and I head to the library. While I’m there I browse the shelves until I find a particular book that reaches out to me. I sit down for a few minutes and I read for a bit. The act of sitting down and tucking into a good book makes me forget about my day and once I’ve put the book down, I’m ready to tackle my tasks again.
Tip 36: Make a playlist
On Spotify I have a number of playlists that help me get into the mood for whatever I’m doing. I have a playlist all about bettering yourself and a playlist for winning in business. I also have a playlist of workout music to get me into the groove for working out. Playlists are effective at picking you up when you need an extra boost to get started.
Tip 37: Learn from mistakes
Mistakes aren’t failures, they’re perfect opportunities to learn and do better at succeeding. But if you repeat your mistakes, you learn nothing. Always take your mistakes as experiences and learn from them so you don’t repeat. Remember, without mistakes you won’t know the path to success, so keep trying, even if you fail.
Tip 38: Create an evening routine
We have touched on this before, but one thing I do to make sure I’m prepared for the next day is to set out clothes for the kids’ school, pack any lunches and basically do anything that doesn’t impinge on the morning routine. Then I get ready for bed by washing my face, applying my skincare and finishing any tasks that can’t spill onto the next day. Only then do I go to bed knowing I’ve done what I need to do.
Tip 39: Create a morning routine too
First thing I do when I wake up is review my 5 main productive tasks of the day in priority order. My to-do list also has other home tasks like making sure to fit exercise in and other child-related activities that are important. I consult my to-do list every hour on the hour because it keeps me on task and I make sure I’m not deviating from what I need to do that day. Then I forget the rest for the next day. As long as I’ve completed my five tasks for the day (and even if I don’t) that’s all i’m focussing on, and nothing more.
Tip 40: Go camping
There is nothing like leaving the materialistic stuff behind and getting back to nature to make you feel you can accomplish anything. Making a fire out of wood or frying an egg on a makeshift tinfoil pan can provide you with the animalistic tools to go out and get what you want. It also helps you shift your focus on what really matters, something we often forget to do when we’re knee deep in our to-dos.
Tip 41: Watch tutorials
Learn new skills in webinars if you want productive downtime because tutorials can help you become better in the business of what you’re doing. Perhaps you want to learn to become a better chef so you watch tutorials on how to hold a knife. Or you want to write a book so you watch a step by step process on how to write and publish a book. These are all skills you’re learning so make sure your downtime is filled with lots of productive watching.
Tip 42: Start a bullet journal
A bullet journal is much like a productivity planner in that it helps you set out the goals you want to achieve in the year ahead. First you lay out your index of plans you want to achieve and then you dissect them into monthly, weekly and daily goals. Define your purpose, review your goals and keep it simple and achievable.
Tip 43: Again set some goals
If you have some free time, set some goals, this time on things you’d like to achieve as a person. It could be a bucket list of things you want to do that’s not related to work.
Tip 44: Test out new time management strategies
Sometimes what you’re doing isn’t working, so it’s important to keep testing until you hit the magic formula. Keep testing new time management strategies to see what works for you. This also includes the time in the day you’re at your most productive and whether you prefer to work in longer stints than 30 minutes a day. Whatever works for you will be different to the next person, so try to focus on what you’re doing rather than what other people are doing.
Tip 45: Create a list of travel destinations
You may wonder why creating a travel list is a productive thing to do, but it helps you set goals for where you’d like to travel and allows you to work for them. Plus it’s something fun to look forward to!
Tip 46: Start planning your days
It’s really important to know what your daily schedule looks like in advance. So plan what you’re going to do in advance so you can focus on the tasks that offer the biggest reward and leave the less urgent, less important things for later.
Tip 47: Share your knowledge
It’s always nice to pay it forward and the act of sharing your knowledge with people will make you an authority in your field, which is great for business!
Tip 48: Build a blanket fort
You may think that building a blanket fort sounds like a waste of time but it’s actually a pretty effective way to shut the outside world out and focus on you in the here and now. Either build a blanket fort on your own and use it as a form of me time or build with friends and family and use it as a bonding exercise. It is a great way to forget about the mountain of tasks you have waiting for you and just enjoy yourself.
Tip 49: Make a new dish
I’ve mentioned before that change is good for the soul and making a new dish is a great way to build confidence in your culinary skills. Make a new dish, add it to your recipe arsenal and use the accomplishment to boost your productivity at work
Tip 50: Become a better decision maker
The famous saying, ‘indecision is the number one reason for failure’ could never ring more true because it halts productivity and stops you from getting things done. Become a better decision maker and the best way to start doing this is by making a decision and sticking to it. Go with your gut and decide – your decision is final.
Tip 51: Go for a swim
Swimming is such a fantastic sport to melt your troubles away. I find that a vigorous front crawl that gets the heart pumping makes me feel alive and strong, so much so that I want to run back to my desk and bash work out. Use the swim to feel strong mentally and physically and then bring that force back to your productivity.
Tip 52: Go airplane mode
Sometimes going offline means you can focus on the tasks ahead of you because you’re not messing about on the internet or scrolling through social media. It has taken me a long time to force myself to work on my tasks for the dedicated 30 minutes without caving and clicking on a notification that comes up. So I disabled notifications and went airplane mode. Now I don’t get distractions anymore to entice me to stop working.
Tip 53: Go for a hike
Another productive sport is hiking because it’s get you out into the fresh air which boosts productivity and it gets your heart pumping which boosts your mental health. Hiking helps you forget about your insular world for a moment and enjoy nature and the bigger picture. A good hike should leave you feeling refreshed and ready to tackle your tasks when you get home.
Tip 54: Envision your ideal body
One of my biggest goals is to get back to my pre-pregnancy athletic fit weight, but I have been lazy and often resorted to junk food because I haven’t got a goal or I haven’t envisioned how I want to look. I started looking through old photos of me and now I can envision my ideal body which helps me to push through the workout when I haven’t got the mental energy to start. Envisioning your goal helps you map out the steps to success, so that’s what I always do when I’m feeling like i don’t want to exercise. It helps so much.
Tip 55: Clear out your clutter
If you’re constantly asking yourself, ‘How can I be more productive in life?’ Perhaps your mental and visual load is a bit overwhelming and you need to declutter and compartmentalise your to-dos. Start by organising your space around you or venting to someone if you have anxiety. And don’t take on other people’s worries, you have enough to deal with!
Tip 56: Clean out your junk drawer
If you have junk everywhere, then you will not be very productive at home. Cleaning junk from your space is one of the most vital tips on how to be more productive.
Tip 57: Organise the spices
Another strange one to add to the productivity to do list but the act of organising your spices helps you organise your mind and it boosts you to organise other parts of your life too. If you do’t have spices, then organise your clothes or your books. Try it and see for yourself.
Tip 58: Prep your meals for the week
One of my favourite tips to be productive is to prep your tasks in advance, and one of them is definitely meal prepping. It helps me not to waste time on figuring out what to cook every day. I now subscribe to Hellofresh which means I don’t need to waste time figuring out what to cook or go to the shops and waste time figuring out what to buy. I just pick out the recipe card and the exact ingredients and I cook!
Tip 59: Make backups of everything
I now back all my work to a cloud which means no more hard drives and no more figuring out where everything is. Backups help you access your work easier and if something goes wrong, it doesn’t matter, because you have a copy in the cloud.
Tip 60: Know your why!
The infamous Simon Sinek penned this, but knowing your why means knowing why you do what you do. What is your biggest reason for what you are doing right now? Maybe you want a forever home or you want a bigger family. Figure out what it is and work backwards. It’s easier to forge a path ahead of you than fumble in the dark and get nowhere.
Best productivity tips for working from home from parents
I asked multitasking parents what their top tips are on productive things to do moving forward:
I feel more productive if I put my phone down… I get so easily sucked into irrelevant things on social media that I lose track of what I’m doing and feel like I have to start again. That goes for both work and at home. Once I sit down and just have 5 minutes, I don’t want to get up again.
I am definitely more productive if I stop working for regular breaks. I either do some housework, walk the dog, go for a run or swim or simply play the piano or read a book for 5 minutes. I’m much more able to properly focus on what I should be doing afterwards.
I am more productive if I chunk similar activities together so I’ll set time aside specifically for social media, schedule writing for a different time etc.
I think a really great way to be productive is to have your to -do list written out and on your clear and clean desk the night before. It means you start the day with absolute clarity of purpose.
Working from home can be distracting when you have a mountain of washing or other household tasks. I often take myself off to a nice cafe with free WiFi so I’m then totally focused on work. A good coffee and slice of cake is a good reward.
I make a list the night before my day off so I don’t procrastinate/waste time in the morning deciding what to do. I feel that way I get up knowing exactly what I’ve got to get done!
Don’t go for the false economy of not buying some of the productivity tools out there. The money you save not doing so is far outweighed by the increase in time you have if you use them. Tools like Tailwind, Buffer, Missing Letter are a godsend for me. And – have a set time to check your emails. Absolutely DON’T have it open all day distracting you.
Try and set certain tasks up the night before, such as the washing machine or dishwasher! By the time you then come downstairs in the morning, some of your tasks will already be done – resulting in more time for other tasks or a 5 minute sit down.
Starting something is probably the hardest thing to do, so the only way to start is, well, to start! Use the above tips to be productive at home, grab yourself a productivity pack like I did and start recording your habits.
Plan your goals and write out your monthly, weekly, and daily goals. Set yourself a target of 30 days to complete your habit and focus on tracking that habit every single day. After a few weeks, you will form your habit naturally as you have focussed on fulfilling that habit. I always feel amazing when I’ve had a particularly productive day.
You just need to find the motivation to start and what better time than to start implementing the ways to be productive now!
FAQs on how to be more productive with ADHD
How to be productive at home with ADHD?
Staying productive with ADHD at home requires creating routines, breaking down big tasks into small goals, and using productivity planners to stay on track.
How can ADHD people be more productive?
By using techniques like the Pomodoro method, prioritising important tasks, and limiting distractions, you can improve your productivity.
Can ADHD contribute to increased productivity and creativity in individuals who do not take medication for the condition?
Yes, many people with ADHD find they have bursts of creativity and productivity, especially during periods of hyperfocus. Medication isn’t always necessary for everyone.
How do I create a routine that sticks for someone with ADHD?
Start by setting small, achievable goals and using tools like task lists, timers, and accountability partners to build habits over time.
What strategies can a person with ADHD use to stay organised and remember tasks in their daily life?
Using visual cues like sticky notes, brain dumps, and productivity apps like Trello or Todoist can help you stay organised and on top of tasks.
How can people with ADHD use digital tools to create a more productive daily routine?
Apps like Trello and Notion offer visual task management, while timers like the Pomodoro technique help break the day into manageable chunks, making it easier to stay focused.
Are adults with ADHD more intelligent or creative?
Some research suggests that people with ADHD can be more creative and thrive in environments that reward innovative thinking. Hyperfocus can lead to impressive productivity in certain areas.
What are some ADHD productivity hacks for staying on task?
Using the Pomodoro method, limiting distractions, and working during peak productivity hours are all excellent ADHD productivity hacks.
*Collaborative feature post*
11 examples of how to build emotional strengths of a child
I’m a huge advocate of placing children’s mental health on the same level playing field as physical health and as a mum of four very different children with varying levels of mental health needs, emotional intelligence is something I strive for everyday.
We all want our children to grow into confident, resilient, and emotionally aware individuals, but how exactly do we nurture these emotional strengths? It can feel overwhelming, especially when we’re trying to nurture our emotional strength too, but after ‘winging it’ for 14 years with a preschooler, primary school child, teen and tween I’ve come up with 11 practical examples of how to build emotional strengths of a child. Whether you’re navigating toddler tantrums or helping an older child with tricky social situations, let’s dive in on what you can do to ensure your child’s emotional strength doesn’t falter throughout and that they have the tools they need to thrive and achieve future success.
Emotional strengths of a child
You may have heard the term emotional intelligence, and as a parent, it’s a skill you definitely want to foster in your child. Emotional strengths, like resilience, empathy, and self-control, allow your child to handle life’s challenges, connect with others, and eventually grow into a well-balanced adult. These strengths also help shape how a child understands their feelings and the emotions of others. For many children, building emotional awareness starts early through hands-on activities and daily life experiences.
Why is it important to know a child’s strengths?
Understanding your child’s emotional strengths is key because it shapes how they respond to difficult situations and bounce back from setbacks. Emotional intelligence is more than just understanding emotions; it’s about learning to manage them healthily, a vital skill that leads to long-term success in life—emotionally, socially, and even academically.
Emotional strengths also go hand in hand with developing personal strengths, such as communication skills, cognitive strengths, and soft skills, which are critical in both daily life and school environments.
What are examples of the emotional strengths of a child?
So, when we say emotional strengths, what do we mean? Here are some of the key traits to look out for and encourage in your child:
1. Having a cheerful outlook
Having a cheerful outlook means your child can navigate challenges with a positive growth mindset. This type of mindset encourages them to view obstacles as opportunities to learn and grow, rather than as setbacks.
When your child is cheerful, they can approach difficulties with optimism, believing they can overcome them through effort and perseverance. So, encouraging open discussions about their feelings and creating a safe space for them to express themselves will help build on this cheerful attitude.
Positivity is closely tied to a good sense of humour, which not only lightens the mood but also enhances social interactions. Children with a cheerful outlook and humour are more likely to attract friends, making it easier for them to form strong, positive relationships and become a good friend to others.
2. Showing courage
Courage is an important emotional strength that comes into play when your child faces new or difficult situations, whether it’s starting school, learning new things, or meeting new friends. Courage allows them to step out of their comfort zone and tackle challenges head-on, even when they feel uncertain or afraid.
Encouraging your child to display courage by celebrating small wins is key—these small achievements build their confidence and reinforce their ability to face fears. Support them through these challenges, so they can develop good common sense and improve their decision-making skills. Over time, facing fears and taking calculated risks will help your child grow into a more resilient and confident individual.
3. Having determination
Determination is the inner drive that pushes your child to keep trying, even when things get tough. When your child faces obstacles, determination teaches them that failure is not the end, but a chance to try again and learn. One way to build determination is by setting age-appropriate challenges they can work towards independently. As they learn to tackle tasks on their own, it also strengthens their good organisational skills and ability to complete tasks.
With determination comes a growth mindset, which allows your child to view challenges as opportunities to grow. This mindset will also help them manage any negative emotions effectively, as they learn that persistence and effort lead to success.
4. Showing empathy
Empathy is one of the most crucial emotional strengths your child can develop, as it helps them connect with and understand other people’s feelings. When your child can relate to others’ emotions, it strengthens their ability to form meaningful relationships and develop good character. Try to discuss social situations and emotions with your child, for example, ask them how they think someone else might feel in a specific situation or guide them through reflecting on how they’ve felt in similar circumstances. Building empathy also enhances their interpersonal skills, which helps them navigate friendships, resolve conflicts, and understand the diverse emotions of those around them.
5. Practising patience
Patience is a key emotional strength because it helps your child manage frustration and stay calm when things don’t go as expected. It’s a skill that’s often tested daily, from waiting their turn in a game to handling disappointments at school.
Teaching patience through mindful activities like deep breathing or setting up small scenarios where they must wait helps your child to learn self-control and this ability to wait without becoming frustrated plays a significant role in their overall emotional regulation. Patience also contributes to the development of soft skills—the personal attributes that help your child interact with others—by helping them manage their specific emotions in challenging situations, making them better equipped to handle life’s ups and downs.
6. Showing resilience
Resilience is the ability to recover quickly from difficulties and continue moving forward, and it’s a skill that can significantly impact your child’s emotional and cognitive development. When your child is resilient, they learn to view setbacks as temporary and see failures as opportunities to improve.
Whether it’s handling a difficult day at school or bouncing back from disappointment, resilience is critical for emotional growth. It also helps your child build emotional awareness by encouraging them to reflect on what went wrong and how they can cope better next time.
7. Keeping calm
Teaching your child to stay calm during stressful situations is vital for helping them regulate their emotions. When your child is calm, they’re better able to think clearly and respond to challenges without becoming overwhelmed.
Use calming strategies like deep breathing, mindfulness exercises, or taking a moment to pause so they can manage their stress and deal with overwhelming feelings. This way, your child can approach difficult situations with a balanced mindset and a healthy way of processing negative emotions, which is especially important as they grow, as it allows them to maintain emotional stability throughout their lives.
Calming strategies for the classroom
Sometimes, children need help managing their emotions in school environments. Teachers can use techniques such as feelings list for kids, deep breathing, quiet corners, or mindfulness exercises to help your child stay grounded. These strategies—including going through facial expressions with them and discussing what they mean—can make a big difference in your child’s emotional regulation.
Incorporating study skills and hands-on activities like playing musical instruments or physical exercises can also help your child express themselves and deal with different strengths and challenges they may face in the classroom.
8. Being friendly
Encouraging friendliness in your child is a great way to help them build strong, lasting social relationships. When your child is friendly, they naturally attract others, making it easier for them to form positive connections.
Friendliness also fosters cooperation and kindness, which are key in both play and school environments. Whether your child is sharing toys on the playground or working on a group project at school, these qualities make a big difference. Social strengths like being a good storyteller or showing good manners go hand-in-hand with friendliness, and they help your child engage with their peers on a deeper level. These traits aren’t just nice-to-haves; they’re essential social-emotional skills that set the foundation for healthy interactions throughout life.
9. Being flexible
Flexibility is one of those skills that makes all the difference when life throws curveballs—something your child will encounter frequently. Teaching your child to be flexible allows them to adapt to change and handle unexpected situations with ease, whether it’s adjusting to a new school year, shifting family routines, or even something as simple as a change in plans.
Flexibility also strengthens their cognitive skills by encouraging them to think outside the box and approach problems from different angles. When your child learns to be flexible, they understand there are often various ways to deal with challenges. This ability to cope with transitions and unexpected events is a vital life skill that builds resilience and prepares them to handle whatever comes their way.
10. Being Independent
Developing independence is such an important emotional strength for kids, and it will benefit them in so many aspects of life. Allow your child to make decisions and complete small tasks independently, so they can build confidence in their abilities.
Independence is closely linked to understanding one’s own strengths, and it fosters a sense of positive psychology—an optimistic outlook where one feels capable of taking on new challenges. This doesn’t just boost their emotional growth, but it also enhances their physical strengths and problem-solving skills. When your child engages in independent activities like organising their own room or helping with household chores, they learn to rely on themselves, contributing to their overall wellbeing and sense of achievement.
11. Being confident
Confidence is one of the most powerful tools your child can have. It allows them to face new challenges with a positive attitude and belief in their own abilities. When your child feels supported and encouraged, their confidence naturally grows, making them more likely to take on new experiences.
Whether it’s learning a musical instrument or improving their maths skills, confidence helps them persist through challenges and stay motivated. When they’re confident in their student’s strengths, it positively impacts both their academic and social success. Confidence gives them the courage to try new things, overcome setbacks, and engage more fully in school and social life, laying the groundwork for long-term success.
Emotional strengths of a child with autism
Children with autism can also develop emotional strengths, although they may need additional support. Tools like visual support, structured communication, and ABA therapy can help children with autism understand and manage their emotions effectively. Focus on their specific strengths and create a supportive environment, so they can thrive emotionally and socially.
Benefits of helping of a child develop emotional strengths
Helping your child build emotional strengths doesn’t just benefit their childhood—it sets them up for success in life. From better academic performance to healthier social interactions, emotional strengths are the foundation for a well-rounded individual. These strengths also contribute to building high self-esteem and a sense of balance in life, helping them achieve their full potential.
How to build upon these emotional strengths in the classroom?
Teachers play a huge role in nurturing a child’s emotional strengths. Creating a supportive and collaborative classroom environment encourages emotional learning and incorporating learning-based programs and focusing on communication skills, problem-solving, and positive reinforcement helps build good role models in class. Teachers can also help students manage their emotions by providing structured opportunities for empathy and cooperation.
How can you build upon the emotional strengths of a child at home?
At home, you can build emotional strength by providing a nurturing environment where your child feels safe to express their emotions. Open conversations, modelling good behaviour, and establishing routines all play a part in supporting emotional growth. Encouraging your child to explore their personal strengths, such as creativity or physical skills, and exposing them to activities like video games, sports, and card games can enhance their emotional and physical abilities.
Seeing emotions in others
Just as important as being able to recognise one’s own emotions is being able to read the emotions that other people are having. This is vital as a part of emotional intelligence, and actually it turns out that this kind of empathy is one of the most important skills that your child can develop on the whole.
As such, it is never too early to start helping them see and interpret the emotions in other people’s faces. This can be as simple as going through facial expressions with them and discussing what they mean. You might find that your child can take to this quite naturally, or that they need a little help. It doesn’t matter – what matters is that you are helping them move in the right direction, and you are encouraging them to do this as well as you can. Being able to see the emotions in others is a hugely important and valuable skill and one that will do very well for them throughout their entire life.
Talking about reactions
Once your child has started to develop strong emotional intelligence, you can then start talking about the reactions you have noticed them having in the past. This is a great way to help them reflect on their behaviour and understand why they react in the way they do. Knowledge is power, but so is patience, which brings me to my final point.
Give it time
Remember, your child is at the very beginning of their emotional journey and they may not always be able to express how they feel, simply because they don’t know what they are feeling. All of this can take time, and it’s an education like anything else. Feelings don’t lie, so never gaslight your child, but be patient and explain that feelings are normal and it’s ok to let them out, as long as they are not hurting themselves or others.
If your child lashes out when they are angry (like my third), then use the time when they have calmed down to reflect on why the way they reacted may not have been the best way to deal with the situation. Come up with easy ways to remind them to use their words and not their hands. We talk about squeezing hands when they’re angry or letting it out with a massive sigh or even a yell.
You will eventually learn how your child works and so you should embrace who they are and build on their strengths and weaknesses. Emotional strength is the foundation of success, so make it an easy process for both of you by showcasing one of yours – patience.
FAQ
1. How can parents best support their children’s social and emotional development alongside academic achievement?
Parents can support both social and emotional development by creating a balanced environment where your child feels safe to express their emotions and have the tools to excel academically. Encourage open communication, promote empathy, and model positive behaviour at home while also reinforcing a structured learning routine. Schools should work in tandem with parents by incorporating social-emotional learning (SEL) alongside academic subjects.
2. How do positive emotions impact a child’s academic success, and what strategies can parents and educators employ to cultivate these emotions?
Positive emotions, such as happiness and confidence, improve focus, memory retention, and problem-solving skills, all of which are crucial for academic success. Parents and educators can cultivate these emotions by fostering a supportive environment, using positive reinforcement, celebrating small wins, and encouraging self-expression through arts, play, and storytelling.
3. How to encourage your child’s emotional strengths?
You can encourage your child’s emotional strengths by modelling healthy emotional expression, teaching empathy through role-playing, practising patience, and providing opportunities for them to handle challenges independently.
4. How do you know that your child is well emotionally?
Signs that your child is emotionally well include the ability to express emotions appropriately, recover quickly from setbacks, maintain healthy relationships, and exhibit a positive outlook on life. If they’re open to discussing their feelings and generally handle stress well, this indicates emotional well-being.
5. How to foster your child’s emotional intelligence pillars?
The pillars of emotional intelligence—self-awareness, self-regulation, empathy, social skills, and motivation—can be fostered through regular emotional check-ins, teaching problem-solving, promoting empathy, and encouraging healthy communication.
Behavioural and emotional strengths in children
6. What are behavioural and emotional strengths in children?
Behavioural strengths include patience, flexibility, and responsibility, while emotional strengths refer to resilience, empathy, and self-control. These qualities help your child manage their emotions and interact positively with others.
7. What are some emotional strengths of a child?
Some common emotional strengths include empathy, resilience, optimism, patience, and self-regulation. These traits help your child navigate social situations and cope with challenges.
8. What are social-emotional behavioural strengths?
Social-emotional behavioural strengths include the ability to form positive relationships, show empathy, communicate effectively, manage emotions, and work well in groups. These strengths help your child succeed both socially and academically.
9. What are the behavioural and emotional strengths of your child?
Each child has unique strengths, but common ones include independence, determination, emotional regulation, and problem-solving abilities. These traits allow them to handle difficult situations with resilience and grace.
Emotional strengths of special needs and autistic children
10. What are the behavioural and emotional strengths of a child with autism?
Children with autism may have strong problem-solving skills, a heightened focus on specific interests, and the ability to empathise deeply in certain situations. Visual support and structured environments can help further develop these emotional strengths.
11. What are the strengths and weaknesses of having attention deficit hyperactivity disorder (ADHD) as a child?
Children with ADHD often excel in creativity, enthusiasm, and out-of-the-box thinking. However, they may struggle with focus, impulse control, and emotional regulation. At home and school, they benefit from structured routines, positive reinforcement, and extra support for managing attention challenges.
Identifying and encouraging child strengths
12. How do you identify your child’s strengths?
You can identify your child’s strengths by observing their behaviour in various settings, noting where they show confidence, passion, or resilience. Seek input from teachers, coaches, and other caregivers to gain a broader perspective.
13. How can you build upon these strengths?
Once you’ve identified your child’s strengths, reinforce them by providing opportunities to practise these skills. Offer praise for their efforts and create a nurturing environment that fosters further development of these strengths.
14. What are your child’s strengths?
Your child’s strengths could include personal traits like kindness, empathy, leadership, problem-solving, or independence. These are often highlighted in how they approach challenges and interact with others.
15. What are the emotional strengths of a child with special needs?
Children with special needs may have unique emotional strengths, such as the ability to focus deeply on a task or show intense dedication to a personal interest. Emotional regulation and empathy may be enhanced through tailored support and consistent routines.
Strength-based parenting and child development
16. What is strength-based parenting?
Strength-based parenting focuses on identifying and nurturing a child’s inherent strengths rather than correcting weaknesses. It encourages parents to foster positive traits such as resilience, creativity, and empathy to help their children thrive emotionally and socially.
17. What is the strength switch?
The “strength switch” is a concept in strength-based parenting that encourages parents to flip their focus from a child’s weaknesses to their strengths. By highlighting and praising strengths, parents can build a child’s confidence and emotional resilience.
18. How can children’s strengths be learned?
While some strengths may come naturally, others can be learned and developed through practice, such as empathy, patience, and perseverance. Your child can build these strengths with guidance, encouragement, and real-world experiences.
Developing specific emotional strengths and skills
19. How can leadership skills be developed in children?
You can help develop leadership skills in your child by encouraging teamwork, problem-solving, and responsibility. Provide opportunities for them to lead small group activities or make decisions at home.
20. What are the three pillars of emotional intelligence?
The three pillars of emotional intelligence are self-awareness, self-regulation, and empathy. Teaching your child to identify their own emotions, regulate their reactions, and understand the feelings of others builds a strong foundation for emotional intelligence.
21. How can parents support interpersonal skills in children?
Parents can support interpersonal skills by encouraging open communication, practising empathy, and promoting healthy social interactions. Role-playing social situations and discussing non-verbal cues can also be helpful.
Cultural and social expectations in strength development
22. What are the strengths of a child from different cultural expectations?
Different cultures may emphasise various strengths in children. For example, some cultures prioritise independence and problem-solving, while others may value cooperation and respect for authority. It’s essential to recognise and support your child’s strengths within the context of their cultural background.
23. What are the social strengths of a child?
Social strengths in your child include being a good listener, forming strong friendships, and demonstrating cooperation. These qualities are vital for building positive relationships with peers, family members, and teachers.
Helping children with emotional and behavioural support
24. How to get emotional or behavioural support for your child?
If you believe your child needs emotional or behavioural support, start by talking to their teacher, school counsellor, or paediatrician. You can also seek professional help from a therapist specialising in child development or behaviour management.