The perfect postpartum babylights for low maintenance
Hair trends come and go, but some techniques stand the test of time, especially for mums navigating postpartum hair changes. One of these is postpartum babylights, a subtle highlighting method that has taken salons by storm among mums dealing with hair loss and regrowth. Known for their natural, sun-kissed effect, babylights are a favourite for those who want brightness and dimension without dramatic contrast or high maintenance.
Just like parents rely on calming tools, such as a sound machine or clock, to create a soothing environment for their babies, postpartum babylights bring a soft and gentle effect to hair, offering enhancement without overpowering your natural beauty during this hormonal time.
If you’ve been wondering whether babylights are right for you during pregnancy or postpartum, then this guide will break down what you need to know about babylights, as well as how they differ from traditional highlights and how you can maintain your hair while caring for your little one.
Why babylights are perfect for new mums experiencing hair changes
After pregnancy, it’s quite common to experience drastic hair changes. Those thick, lustrous locks during pregnancy often give way to postpartum shedding around 3-6 months after delivery. This is where postpartum babylights shine, as they help disguise thinning areas and awkward regrowth while requiring minimal upkeep.
The difference between babylights and traditional highlights
To understand why mum-safe hair colours, such as babylights, work so well postpartum, we can compare them with classic highlighting techniques.
Traditional Highlights: These use larger sections of hair, creating bold streaks that contrast with your natural colour. They’re noticeable and often require more upkeep—something new moms rarely have time for.
Babylights: Much finer, they mimic the way children’s hair naturally lightens in the sun. The result is softer, more blended, and effortlessly natural, which is perfect for camouflaging postpartum baby hairs and regrowth.
Babylights are essentially highlights on a micro-level. While traditional highlights stand out, babylights whisper. They’re ideal for new mums who want dimension without apparent colour separation or frequent salon visits.
Why postpartum babylights are a low-maintenance option
One of the biggest appeals of babylights for new mothers is how easy they are to maintain compared to other colouring methods, which is crucial when you’re juggling feedings, nappy changes, and sleepless nights. Here are some reasons why postpartum babylights are the right option after birth:
Minimal root regrowth
Because babylights are so fine, regrowth is less noticeable. This means you can stretch out salon visits longer than with chunky highlights, which is essential when finding childcare for salon appointments is challenging.
Natural blending with postpartum regrowth
Babylights blend seamlessly with your natural base and those wispy postpartum baby hairs, reducing the harsh grow-out line and disguising new growth around your hairline.
Long-lasting freshness
Even months after your appointment, your hair will still look sun-kissed rather than overgrown or outdated, which is perfect for the months when leaving the house feels like a major accomplishment.
For busy new parents, this makes postpartum babylights a practical choice because they require less maintenance and offer more payoff.
Who are babylights best suited for during and after pregnancy?
Not every technique works for every person, but babylights are surprisingly versatile for mums at any stage:
For Postpartum Hair Loss: They create the illusion of fuller hair and disguise thinning areas
For Fine Hair: They add dimension and the illusion of thickness – helpful when experiencing postpartum shedding
For Dark Hair: They create soft contrast without the starkness of traditional highlights
For Blonde Hair: They enhance brightness without looking overly processed
For Breastfeeding Mums: When done with ammonia-free products, they’re a safer option
For First-Time Mums: If you’re new to hair colouring or want something low-commitment, babylights are a gentle introduction.
No matter your base colour, texture, or where you are in your motherhood journey, babylights can be customised to your hair goals.
Is It safe? Babylights during pregnancy and breastfeeding
According to the American College of Obstetricians and Gynaecologists (ACOG), most experts believe hair dye is not toxic for your baby when used properly. However, for mum-safe hair colour, consider these precautions:
Wait until the second trimester if you’re pregnant
Choose ammonia-free formulas to minimise chemical exposure and protect fragile postpartum hair
Ensure proper ventilation in the salon
Consider a patch test if you have sensitive skin (common during pregnancy)
Opt for glosses over bleach when possible to minimise damage to delicate postpartum hair
The process: what to expect at the salon
Getting postpartum babylights at the salon is slightly different from traditional highlights, but the results are worth the time.
Consultation: Your stylist will discuss the look you’re aiming for and choose tones that suit your complexion and lifestyle as a new mom
Sectioning: Very fine sections of hair are separated, often more than with regular highlights
Foiling: Each tiny section is wrapped in foil, ensuring even lightening
Processing: The lightener is left on until the hair reaches the desired brightness
Toning: A toner may be applied to refine the colour and achieve a natural finish
Styling: After rinsing, conditioning, and blow-drying, you’ll see your fresh, mom-friendly look
The process takes longer than traditional highlights since more foils are used, but the result is subtle sophistication that grows out beautifully – essential for busy mums.
Caring for your postpartum babylights: tips for longevity
To keep babylights looking fresh while managing new mum life, proper aftercare is essential.
1. Use colour-safe shampoo and conditioner
Opt for sulfate-free products to preserve colour and prevent fading. Many are also safe for breastfeeding mums.
2. Deep condition regularly
Postpartum hair can be dry and fragile, so hydration is key.
3. Limit heat styling
Too much heat weakens colour-treated hair. Embrace air-drying when possible (new mums rarely have time for blow-drying anyway!).
4. Protect from the sun
UV rays can fade colour. Wearing hats during stroller walks helps protect your investment.
5. Schedule toner touch-ups
A quick gloss or toner refresh every 6-8 weeks helps keep the tones vibrant without requiring a full appointment.
Babylights and balayage: can they be combined for new mums?
Yes. Babylights and balayage can be combined for the ultimate low-maintenance hair colour for new moms.
Babylights: Provide an all-over soft brightness that disguises regrowth
Balayage: Hand-painted highlights that add sweeping dimension
When used together, you get a dynamic, multi-tonal result that requires minimal upkeep – bright at the roots from babylights, with seamless gradient effects from balayage.
Babylights vs. other techniques for busy mums
With so many colouring methods available, it can be hard to decide which one fits your lifestyle. Below is a breakdown of how postpartum babylights compare to other popular techniques:
Seasonal Versatility: Works for brightening winter moods or enhancing summer glow
Confidence Boost: Helps new mums feel put-together during a time of major life changes
Final thoughts
So, what exactly are postpartum babylights? They are ultra-fine, natural-looking highlights designed to work with your changing hair after pregnancy, mimicking the sun-kissed strands of childhood while disguising postpartum hair challenges. Unlike traditional highlights, they are low-maintenance, versatile, and flattering for nearly every new mum.
By choosing babylights during your postpartum journey, you’re opting for elegance over excess, softness over starkness, and timeless appeal over fleeting trends, all while accommodating the realities of new motherhood.
So, whether you’re dealing with postpartum shedding, awkward regrowth, or you want to feel more like yourself again, babylights offer a beautiful, low-maintenance solution that works with your new mum lifestyle, not against it.
*Collaborative feature post*
How choosing the right high school shapes university success
As parents, we’re always thinking ahead, from those first prenatal vitamins to researching the best nurseries. But what might not be on your radar yet (and trust me, it comes faster than you think) is when your little one goes to high school and how important it is to find the right school to set them up for university success.
I know, I know. You’re probably thinking, “My baby isn’t even walking yet!” But as someone who’s been through this journey, I can tell you that understanding these pathways early gives you peace of mind and it helps inform those early educational decisions we all agonise over.
The transition from high school to university is a crucial milestone in your child’s educational journey. As academic expectations shift and routines become more self-directed and autonomous, your child needs to adapt to the increased independence that comes with growing into a young adult. While university may seem impossibly distant when you’re dealing with nappies and night feeds, the foundation for future success should often be laid long before graduation.
For international school students in particular, choosing the right high school experience is crucial. Whether you’re aiming for a competitive university or simply seeking the best personal fit, the choices made during these years, ranging from subject selection to cultivating learning habits, have a lasting influence. High school is not just about fulfilling graduation requirements. It’s also about building the skills, mindset, and resilience needed for the next stage of education.
This article explores how secondary education provides the skills necessary for university success, with a focus on globally recognised pathways that prepare our children to meet the challenges of higher education.
Why high school matters more than we think
High school is where our children begin to shape their habits, perspectives, and intellectual curiosity that form their academic identities. It’s about so much more than passing exams or meeting curriculum standards – it’s about developing essential skills such as clear thinking, independent information management, and persistent problem-solving.
And these skills develop gradually, often through unexpected challenges. For example, a student struggling to write a persuasive essay may come to understand that they need to focus on research, context, and structure. Another student conducting a scientific investigation might realise that collecting data alone isn’t enough without the skill to interpret it clearly. These experiences mirror the learning curve students face at university, where ambiguity is common and taking initiative is often more important than direct instruction.
At an international high school in Singapore, students participate in rigorous academic programs designed to foster global-mindedness. The learning environment emphasises enquiry-based approaches, self-reflection, and subject mastery, especially in the senior years. Exposure to internationally recognised curricula such as the IB, AP, and BTEC further accelerates this development. Through these programs, students progressively take greater ownership of their academic journey, laying a strong foundation for university readiness.
The IB Diploma Programme
For students aiming to thrive at university, academic ability is only part of the equation. Equally vital is the capacity to maintain focus under pressure and approach unfamiliar challenges with initiative. The International Baccalaureate (IB) Diploma Programme excels in developing these qualities, nurturing students into independent, adaptable learners prepared for the demands of higher education.
At the heart of the IB is a framework that emphasises balance and purposeful learning. Students choose subjects across multiple disciplines while completing three core components designed to sharpen higher-order thinking. The Extended Essay, for example, guides students through a sustained research project that requires them to develop arguments, engage critically with credible sources, and present their findings in a formal academic format. Theory of Knowledge encourages continuous reflection on how knowledge is constructed, equipping students to navigate diverse perspectives in real-world discussions. Meanwhile, the Creativity, Activity, and Service (CAS) component challenges students to push personal boundaries and reflect on their growth over time.
What makes the IB especially effective as preparation for university is not just its content, but the habits it fosters. Students learn to plan, question assumptions, take intellectual risks, and consistently reflect on their learning. These experiences cultivate academic resilience that becomes invaluable once the structured support of high school is no longer available.
Alternative pathways: BTEC and Advanced Placement
Academic readiness does not follow a one-size-fits-all path, particularly for children with diverse learning styles and goals. Some thrive through conceptual thinking, while others excel when ideas are connected to practical, real-world applications. Programs like BTEC and Advanced Placement (AP) offer distinct pathways that cater to these differences.
BTEC, for example, is well-suited to students who learn best through hands-on experience. Its focus on coursework, practical tasks, industry-relevant content, and skill application makes it especially valuable for those interested in applied fields such as business, IT, or design-related disciplines. Rather than relying solely on final exams, BTEC students demonstrate their competence through continuous assessment and real-world scenarios.
In contrast, the AP program enables students to explore specific subjects in depth, often at a college-level pace. For students with well-defined academic interests, AP courses provide an early opportunity to engage deeply with their chosen disciplines. Additionally, strong performance on AP exams can earn students advanced standing or university credit, giving them a valuable head start.
Both BTEC and AP cultivate university readiness, but they do so in distinct ways. Knowing these options exist helps us support our children in finding the path that best suits their learning style.
Beyond academics: the skills that really matter
As mums, we know that success isn’t just about grades. It’s about confidence, resilience, and learning how to work with others. A student’s academic transcript rarely captures the full scope of their potential at the university. Success in higher education often hinges on qualities developed beyond traditional coursework.
These attributes are often cultivated through sustained involvement in co-curricular activities. Whether participating in a school play, organising a student-led fundraiser, leading the debate team, or contributing to a robotics club, students encounter situations that require creative problem-solving and personal accountability.
Soft skills also emerge through everyday school routines. The ability to manage time, seek feedback, adapt to change, and maintain focus amid setbacks is a habit cultivated gradually as expectations increase throughout high school. By the time students enter university, those who have developed this internal discipline tend to adjust more quickly and feel more confident.
The takeaway for us parents
I know it feels like you’re years away from these decisions, but understanding these pathways now helps you make more informed choices along the way. High school plays a crucial role in shaping our children’s success at university. Whether through rigorous academic programs like the IB Diploma, BTEC, or AP, or through the development of soft skills and self-direction, the high school experience lays the foundation for their future.
For those of us who plan ahead, selecting the right high school environment can make all the difference in preparing our children for a successful university journey. And knowing these options exist? Well, that’s one less thing to stress about at 3 AM.
What educational pathways are you considering for your little ones? I’d love to hear your thoughts in the comments below!
*Collaborative feature post*
The best portable laptop monitors for busy parents
As a parent entrepreneur, your work doesn’t stop when the kids come home from school. Between managing your business, helping with homework, and keeping the household running, the right tools can supercharge efficiency and productivity, which means you’ll get more done with the little time you have. I am a mum of four with multiple businesses, and my latest venture is taking up what spare time I have left. So when I’m either working at home, in the office, or in my second home office, I want to limit falling into the trap of buying laptop equipment that promises the world but delivers more frustration instead.
Today, I want to share what really works when it comes to portable laptop monitors for busy parents, and more importantly, what doesn’t, because when you’re juggling client calls during nap time or finishing proposals after bedtime, the last thing you need is unreliable tech that adds stress to your already packed day.
The reality of long work hours as a parent entrepreneur
Many parent entrepreneurs today work longer hours than they ever did in traditional employment. You start the day with coffee and school runs. As the hours pass, the tabs on the screen begin to pile up and you’ve had to respond to emails, get the mail, load the dishwasher, and attend a last-minute meeting. Notes crowd over research, and you’ve resorted to dividing the screen by four to reduce the amount of flipping between programs. You experience mind fog and attention slips away by mid-afternoon. You look at the clock, and it’s time for school pickup.
But what makes it even more challenging for us parents is that we don’t always have the luxury of working in a quiet office either. One minute you’re analysing quarterly reports, the next you’re mediating a sibling argument. Then, back to your laptop, only to find that you’ve lost track of which window had that important document.
This is where laptop screen extenders come in! They may not do your laundry for you, but they will increase productivity by 42%. And the time you save simply by being efficient is priceless!
Laptop screen extenders can optimise your workspace and help you focus during your long work stretches, especially when those hours are constantly interrupted by family life. In this article, we will explore what to look for in laptop screen extenders, as well as what to avoid when shopping for one.
Time and focus are the currency for parent entrepreneurs
We have so little of it, and when we do have it, we have to use it wisely. So much easier said than done when you are consistently fatigued, both mentally and physically.
For parent entrepreneurs, focus isn’t just about productivity; it’s about making the most of the limited time we have. When you finally get those precious few hours while the kids are at school or asleep, every minute counts. You can’t afford to waste time shuffling between windows or losing track of important information.
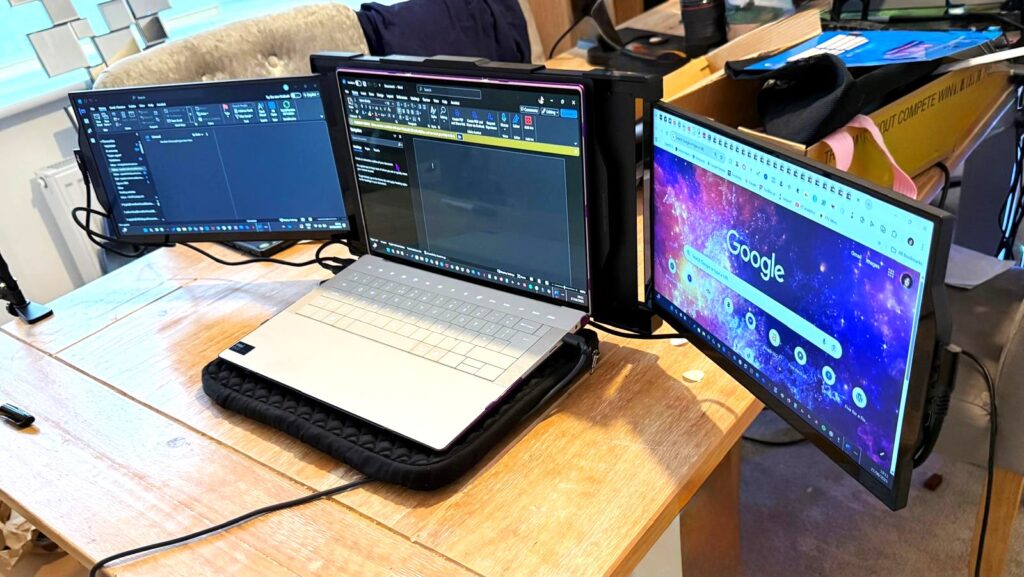
A product like the Mobile Pixels Trio laptop screen extender can save you from this chaos, but only if you choose the right one. Unfortunately, the market is flooded with poorly designed options that promise the world but deliver disappointment.
With a reliable extender, you get space for every task. So, you don’t need to keep shuffling the tabs. Imagine it this way:
One screen can hold the numbers for your quarterly budget
Another can display the client proposal you’re drafting
A third can carry the references and research materials
And with everything in sight, the brain can stay in flow without interruption. Undoubtedly, this flow is priceless for busy parents. It is the difference between “working ten hours and feeling crushed” or “working ten hours and still having clarity at the end”.
What issues to look out for with popular screen extenders
Before we dive into what works, let me share some feedback about a popular (and expensive) dual-screen extender that many parent entrepreneurs have wasted money on. This particular model costs around £400, a significant investment for any parent running a business.
The port placement disaster
One of the most frustrating issues with this expensive model is the poor port placement design. When you connect the cables, you end up blocking the control buttons. This means you literally cannot use the device’s functions without unplugging and reconnecting cables in an awkward, unnatural position.
Imagine you’re in the middle of an important client presentation, and you need to adjust your screen setup. Instead of a quick button press, you’re fumbling with cables while your client waits. As one reviewer noted:
“The ports, if you connect the cable, the HDMI cable, and the Type C cable in a certain way that are more natural to connect, you will block the buttons so people won’t be actually be able to press the buttons without unplugging the HDMI.”
The cable chaos problem
Another major issue that particularly affects parent entrepreneurs who need to work from different locations, like the kitchen table, bedroom, or living room, during kids’ activities is that some extenders require two separate cables: an HDMI cable and a Type-C cable.
This creates multiple problems:
Port shortage: You’re using up two valuable USB-C ports on your laptop, leaving no room for your charger or other essential devices
Portability nightmare: Carrying around two cables increases the chance of forgetting one
Setup complexity: Every time you set up, you need to connect two cables correctly
As the reviewer explained:
“They use up very important real estate space on your laptop because you’re now occupying two Type Cs. And if you’re connecting your charger with a normal work laptop, you run out of plugs.”
The weight and balance crisis
This is perhaps the most concerning issue for parent entrepreneurs, who often work on their laptops in various positions, i.e. on the bed while kids sleep nearby, at the kitchen counter while dinner cooks, or on the couch during family time.
The weight of this particular extender actually broke the laptop stands and put dangerous stress on the laptop hinges. As the reviewer discovered:
“It’s also very heavy that it’s actually broken the stands of my laptop… My dad said that it’s very bad on the hinges of the laptop as well.”
The magnetic attachment system makes the problem worse by lifting the entire laptop base, putting all the weight stress on the hinges rather than distributing it properly.
“The whole load from the base of your laptop is working on your hinges,” the reviewer explained.
The build quality disappointment
For £400, you’d expect premium build quality. Instead, this model uses cheap plastic that scratches easily and feels flimsy.
“The plastic is just going to break very easily. One of the screens has been scratched because of how they engineered the whole construction of it.”
The attachment mechanism is particularly problematic:
“It’s very flimsy to take in and out as well. That’s a big one. I really struggle to.”
More space brings calm and leads to better focus
Today, everyone talks about multitasking. However, the truth is that our brains can’t cope with it daily, especially when you’re already mentally juggling work tasks with family responsibilities. A reliable extender offers that space, as it allows the work to spread easily across the screen in an uninterrupted flow.
And, the point is not only about being faster. It is also about staying calm while working. With a clear space, your shoulders drop, your eyes stop darting back and forth, and the work feels steadier. You can also focus better, even when you are working late into the night after the kids are asleep.
What to look for in a reliable portable laptop monitor
Based on real user experiences and the needs of parent entrepreneurs, here’s what actually matters:
Single cable solution
Avoid any extender that requires multiple cables. Look for models that use a single USB-C cable for both power and video. This simplifies setup, reduces cable management, and preserves your laptop’s precious ports for other devices.
Lightweight design with proper support
The extender should be light enough not to stress your laptop hinges, but if it does add significant weight, it should include a proper stand or support system that doesn’t rely entirely on your laptop’s hinges.
Durable build quality
Skip the cheap plastic options. Look for aluminium construction or high-quality materials that can withstand daily use, travel, and the occasional accidental bump from curious little hands.
Intuitive button placement
Control buttons should be easily accessible regardless of how cables are connected. You shouldn’t need to contort your setup or unplug cables just to adjust brightness or settings.
Magnetic vs. clamp attachment
While magnetic attachment is convenient, it can create balance problems. Some of the most reliable options use adjustable clamps or stands that properly distribute weight.
Great for parents who can’t afford breaks
With a durable extender, you don’t lose momentum when your work time is fragmented. These extenders remain reliable even when used in short bursts throughout the day and far past the point when others would have given up for the day.
The hidden costs of choosing wrong
When you choose a poorly designed laptop screen extender, the real cost goes beyond the initial purchase price. Consider these hidden expenses:
Laptop repair costs
If the extender damages your laptop hinges or screen, you’re looking at expensive repairs. For many parent entrepreneurs, the laptop is the primary business tool – its failure means lost income.
Lost productivity time
Every minute spent wrestling with cables, adjusting awkward positioning, or dealing with technical issues is time stolen from either work or family. For a problematic device, you’re paying premium prices for premium frustration.
Replacement costs
When a poorly built extender breaks or becomes unusable, you’re back to shopping again. The reviewer of our expensive example concluded: “I’m very annoyed. And I would send it back.”
Creating your ideal work setup as a parent entrepreneur
The key to a successful portable monitor setup for parent entrepreneurs is thinking beyond just the screen itself. Consider your entire workflow:
Location flexibility
Your setup needs to work in multiple locations. The kitchen table for early morning work, the living room for evening catch-up, the bedroom for late-night client calls when kids are sleeping nearby.
Quick setup and teardown
When you need to clear the space for dinner or family time quickly, your setup should pack away easily without multiple cables and components.
Child-proofing considerations
Young children are naturally curious about screens and gadgets. Your setup should be stable enough that accidental bumps don’t cause expensive disasters.
Noise considerations
Some extenders have fans or make electrical sounds that can disturb sleeping children or interfere with client calls.
Laptop screen extender is a long-term companion
A reliable extender is an investment for parent entrepreneurs who plan for the long term. The best option lasts through many years of diverse use cases – from client presentations to late-night project work to mobile office setups during family vacations.
You will notice that their hinges don’t loosen, frames don’t crack, and they even carry the weight of daily work without complaint. This is the kind of endurance that matters in more than one way. Yes, it saves you money by avoiding the need for replacements. It also builds a relationship of trust. So, when a parent entrepreneur starts their work session – whether it’s a 6 AM pre-kid work block or an 11 PM catch-up session – they know their extender will perform as expected.
For parent entrepreneurs, this reliability is crucial. When you have limited time to work, equipment failures aren’t just inconvenient – they can derail entire projects and affect client relationships.
Alternative solutions worth considering
While screen extenders can be valuable, they’re not the only solution for parent entrepreneurs struggling with screen space:
External monitor setup
If you primarily work from a home office, a traditional external monitor might offer better value and reliability than a portable extender. Modern monitors are more affordable than ever, and they don’t put stress on your laptop.
When it’s time to upgrade your laptop, consider models with ultra-wide screens instead of adding an extender. This eliminates compatibility issues and cable management.
Virtual desktop solutions
Software solutions that help organise your workspace might address screen real estate issues without requiring additional hardware.
The parent entrepreneur’s decision framework
Before investing in any portable laptop monitor, ask yourself:
Where will I primarily use this? If it’s mainly at a desk, a traditional monitor might be better.
How often will I move it? More frequent movement means weight and setup complexity matter more.
What’s my backup plan? If the extender fails, how will it affect your work and deadlines?
Can my laptop handle it? Consider both the technical requirements and physical stress.
What’s the total cost of ownership? Include potential laptop damage, replacement costs, and productivity losses.
Final thoughts
Ultimately, you can see that a reliable laptop screen extender can change the way long workdays feel for parent entrepreneurs. They add more space for you to protect your focus during those precious, uninterrupted work hours. With the right screens, you get the comfort and organisation you need. Besides, they become your best partners for productivity when time is your most precious resource.
However, the market is filled with expensive options that promise more than they deliver. The example we discussed shows that a higher price doesn’t always mean better design or reliability. As parent entrepreneurs, we can’t afford to make expensive mistakes with our essential work tools.
Before making any purchase, research thoroughly, read real user reviews, and consider whether the solution actually solves your specific challenges.
The key is finding a balance between functionality, reliability, and cost that makes sense for your unique situation as a parent building a business. Sometimes the best solution isn’t the most expensive one – it’s the one that consistently works when you need it most.
You can also make the switch right away, but make it thoughtfully. Your future self, both as an entrepreneur and as a parent, will thank you for choosing tools that enhance rather than complicate your already complex life.
*Collaborative feature post and gifted product*
Why inner child healing matters for mums
Discover how healing your inner child can help you become the best parent you can be, break generational patterns, and enhance emotional balance for your entire family.
We all carry stories from our childhood, some joyful, others painful. For many mums, these emotional wounds from the past don’t just affect us; they influence how we parent our children. These wounds can manifest as mum guilt, difficulty staying calm during tantrums, anxiety about “getting it right,” or struggling to set healthy boundaries with our little ones. Often, they trace back to unmet needs during our own early development.
That’s where reparenting comes in. Reparenting is giving yourself the care, support, and guidance you may not have received as a child—so you can break generational cycles and parent from a place of healing. It’s a powerful act of self-love, a vital step toward lasting emotional wellness and becoming the mother you want to be. In this article, we’ll explore what reparenting is, why it’s so important for mothers, and how to start this healing journey while raising your children.
What does it mean to re-parent yourself as a mother?
Re-parenting yourself means becoming the nurturing, supportive, and protective figure your younger self needed, while simultaneously nurturing your own children. Instead of unconsciously passing on old patterns, you step in and offer yourself:
Emotional validation
Safety and stability
Boundaries and discipline
Unconditional love and compassion
You’re essentially healing your inner child, which is that part of you still holding onto pain, fear, or unmet emotional needs from the past, so you can parent your children from a place of wholeness rather than wounding.
Why re-parenting is vital for mothers’ mental health
1. It heals unmet childhood needs (so you don’t project them)
Many mums never learned how to self-soothe, trust themselves, or speak up for their needs. When your toddler has a meltdown, your own inner child might feel triggered. Re-parenting fills those gaps.
According to the National Child Traumatic Stress Network, early childhood adversity increases the risk for mental health disorders, including depression and anxiety, later in life, and can affect parenting styles.
Re-parenting helps rewrite those internal narratives: “I’m not a good enough mum,” “I don’t matter compared to my kids,” or “My feelings are too much.”
2. It builds emotional regulation (for you and your children)
When we weren’t taught how to manage emotions healthily, we may find ourselves yelling at our kids or feeling overwhelmed by their big feelings. Through re-parenting, mothers learn how to:
Recognise and name emotions (yours and theirs)
Respond instead of reacting during challenging parenting moments
Self-soothe during stressful times (like bedtime battles or public tantrums)
These skills become the foundation you model for your children.
3. It strengthens your identity beyond “Mum”
If you didn’t receive affirmation or encouragement growing up, your self-worth may depend entirely on being the “perfect mother.” Re-parenting teaches you how to speak kindly to yourself, celebrate your efforts, and affirm your value, both as a mother AND as an individual.
4. It creates healthier family dynamics
Unhealed childhood wounds often play out in how we parent. You may become overprotective, struggle with consistency, or find yourself repeating phrases your parents said. Re-parenting helps you:
Set and honour boundaries with your children (and extended family)
Communicate needs clearly to your partner
Build trust in yourself as a capable parent
When you learn to meet your own emotional needs, you stop expecting your children or partner to fill emotional voids.
Signs you may need re-parenting as a mother
You struggle with mum guilt or feel you’re “never doing enough”
You often criticise or shame yourself about your parenting
You seek validation from other mums or social media
You fear “messing up” your kids
You feel emotionally triggered by your children’s behaviour
You notice yourself repeating patterns from your own childhood
These signs suggest that part of your emotional development may need gentle attention and support for both your sake and your children’s.
How to begin re-parenting yourself while parenting
Re-parenting is a daily practice that can happen alongside raising your children. It’s not about blaming your parents—it’s about taking responsibility for breaking cycles today.
Here are simple steps to start:
1. Connect with your inner child (during quiet moments)
During naptime or after bedtime, visualise yourself as a child. What did you look like? What were you feeling? What were you missing?
Spend time “with” this version of yourself. You can write letters to them, draw pictures, or talk to them gently in your mind.
Example: “I see you. I know you’re scared. I’m here now, and I’ll protect you, just like I protect my baby.”
2. Journal about your needs (not just your kids’)
Ask yourself:
What do I need today as a person, not just as a mum?
What would help me feel safe and supported?
What am I feeling, and why?
Writing helps you become more aware of your emotional world, which enables you to stay regulated when your children need you.
3. Create and respect boundaries (with kids and family)
Boundaries are a key part of re-parenting and healthy parenting. They help you feel safe and respected, and teach your children the same.
Start by saying no to what drains you (like unnecessary playdates) and yes to what nourishes you (like that morning coffee in peace). Remember: setting limits teaches your children self-respect by example.
4. Practice gentle self-talk (especially on hard days)
If your inner voice is harsh or critical about your parenting, it’s time to re-parent that voice. Begin speaking to yourself like you would to a fellow mom who’s trying her best.
Replace “I’m such a terrible mother” with: “I’m learning, and that’s okay.”u “I made a mistake, but I’m still a good mm.”
5. Prioritise consistent self-care (yes, even with little ones)
Re-parenting involves creating a routine that includes rest, nutrition, movement, and play, even in 5-minute increments. It teaches your inner child: “You matter enough to be cared for,” while modelling self-care for your children.
A study in BMC Psychiatry (2020) found that adults with consistent self-care practices had lower levels of anxiety and depression.
Even small acts, such as drinking water or stepping outside for fresh air, build trust in yourself.
6. Try creative expression (with or without your kids)
Drawing, painting, dancing, or singing can help you reconnect with your inner child. Do it alongside your children for double healing – they play, you heal.
You don’t need to be “good” at it – just present.
7. Consider therapy or support groups
Working with a therapist, especially one trained in maternal mental health, inner child work, IFS (Internal Family Systems), or trauma-informed care, can help you explore deeper emotional wounds while navigating motherhood. Many therapists offer virtual sessions, which are perfect for busy moms.
Real-life example: Jasmine’s story
Jasmine, 35, mother of two, spent her life chasing perfection, especially in her parenting. She feared failure and constantly compared herself to other mums. Through therapy, she realised her inner child never felt accepted unless she was achieving something.
She began journaling to her younger self during naptime, practising affirmations, and accepting that “good enough” parenting was actually great parenting.
“I used to think love had to be earned for me and from my kids,” Jasmine said. “Now I know I can give it to myself, and that makes me a calmer, more present mother.”
Final thoughts
Re-parenting yourself as a mother is one of the most healing and empowering journeys you can take for you AND your children. It helps you feel grounded, worthy, and emotionally whole, which naturally flows into your parenting.
You become the safe space you always needed and the safe space your children need. You learn to care for your emotional wounds with gentleness instead of judgment, breaking cycles that may have existed for generations.
Healing doesn’t mean forgetting the past; it means giving yourself what was missing and creating a more compassionate future for your entire family.
“You can’t go back and change your childhood, but you can create the care and love you always deserve – and pass that healing on to your children, starting now.”
References
National Child Traumatic Stress Network. (2021). Effects of Complex Trauma. https://www.nctsn.org
Keles, B., McCrae, N., & Grealish, A. (2020). The impact of self-care on mental health in adults: A review. BMC Psychiatry, 20(1), 1–14.
*Collaborative feature post*
Supporting feeding and oral skills through play
As a parent, you’re constantly seeking ways to support your child’s development. But did you know that those adorable raspberry sounds your toddler makes already help them build awareness and control around the mouth? In this article, we will discuss what helps with feeding and oral comfort through daily play (and what doesn’t help speech), because it’s a lot easier (and more fun) than you might think!
What you’ll learn in this guide
Oral play and feeding-focused activities can support your child’s ability to eat safely, manage saliva effectively, and develop awareness and coordination around the lips, tongue, jaw, and cheeks. From blowing bubbles to babbling, these small mouth and jaw movements are part of everyday life. And the best bit? Progress doesn’t just happen in therapy rooms; you can nurture it naturally through playful moments at home.
If you’re looking for practical ways to encourage your toddler’s development at home, introducing easy oral motor activities for toddlers can be a fun and practical starting point. Simple games, silly faces, and playful challenges can strengthen the muscles your child uses to chew and swallow—without it feeling like work for either of you. For speech clarity, though, children need to practise real speech sounds and words (ideally with guidance from a speech and language therapist).
The content provided here is for informational purposes only and is not intended to diagnose or treat any medical condition. Always consult your healthcare provider before making decisions related to your child’s health.
Why oral motor development matters for your toddler
Understanding the basics every parent should know
Oral motor skills refer to the movements of the lips, tongue, jaw, and cheeks that support critical functions like eating, drinking, and speaking. These muscles need to be strong, coordinated, and well-controlled for clear speech and safe, adequate feeding.
Struggling to make early sounds like “p”, “m”, or “t” (typically emerging by around 2–3 years)
Having difficulty transitioning from purees to solid foods
Showing frustration during meal times
Experiencing challenges with drinking from cups or straws
Drooling usually reduces markedly by around 18–24 months (with normal variation). If heavy drooling persists beyond the age of 2, have a brief discussion with your GP/health visitor. Playful feeding and oral activities can support comfort and coordination. Please note they aren’t shown to improve speech sounds.
The connection between oral motor skills and overall development
What many parents don’t realise is that oral motor development is intricately connected to your child’s overall growth. Strong oral motor skills support:
Communication Participation: More chances to babble, sing, and chat (speech sounds themselves improve by practising real sounds/words with an SLT)
Nutritional Health: Ability to eat a varied diet safely
Social Skills: Confidence in speaking and eating with others
Sensory Processing: Better tolerance for different textures and sensations
Self-Care Skills: Managing saliva, teeth brushing, and facial hygiene
Play-based strategies that really work
Making development fun and natural
The best way to support oral motor growth at home is by making it playful and pressure-free. Think of it as building strength at the playground, but only for the mouth. Here’s an approach that’s worked wonders with countless families:
Encouraging your child to blow bubbles, whistle, or use a straw can go a long way in exercising the mouth muscles. Even making silly faces in the mirror, pretending to be animals, or licking yoghurt off the lips helps build control and awareness.
You don’t need special equipment or complicated exercises. Instead, turn snack time into a skill-building moment—biting into crunchy carrots, chewing on chewy foods, or sipping through a straw are all activities that engage the jaw and tongue. The goal is to blend development into your child’s routine so that progress happens naturally.
Important for speech: activities like blowing bubbles, using straws, and blowing cheek puffs are great for feeding/oral awareness, but they don’t improve speech sounds. For clearer speech, focus on practising real sounds and words in play (an SLT can show you which ones to target and how).
Point to note
ASHA clearly states:
“There is limited high-quality evidence supporting the use of oral motor exercises or sensory techniques in the treatment of paediatric feeding disorder–related sensory deficits and swallowing dysfunction in isolation” Paediatric Feeding and Swallowing.
Focus Activities: Musical instruments, complex food textures, pretend play with sounds
Expert insight and professional guidance
When to consult a specialist
If you’re unsure whether your child’s oral motor skills are on track, it’s always a good idea to speak with a speech-language pathologist. They can assess your child’s muscle tone, coordination, and movement patterns and recommend targeted exercises if needed.
According to the American Speech-Language-Hearing Association (ASHA) guidelines, early intervention can significantly impact the treatment of motor speech challenges and related delays. The earlier you identify a need and introduce the right supports, the better the outcomes tend to be. Search for a speech-language pathologist who uses evidence-based approaches rather than controversial nonspeech oral motor exercises.
However, even without a formal diagnosis, engaging in playful oral motor activities can still benefit your toddler’s overall development. They can also make your daily routine more engaging, silly, and full of bonding moments.
Red flags that warrant professional assessment
While home-based play is beneficial, some children may require additional support to develop their oral motor skills. Contact your paediatrician if your toddler:
Often gags on age-appropriate foods
Struggles to chew or swallow safely
Has persistently unclear speech beyond expected age
Avoids using their mouth during play
Shows extreme food texture aversions
Experiences frequent choking episodes
Demonstrates tongue thrust beyond 4 years
Has difficulty coordinating breathing while eating
They may recommend an evaluation or therapy to support more structured progress.
Creating an oral motor-friendly environment
Setting up for success at home
Your home environment plays a crucial role in supporting oral motor development. Here’s how to create spaces that encourage natural practice:
Kitchen setup:
Keep straws of various sizes accessible
Store crunchy snacks at toddler eye level
Have wipeable surfaces for messy play
Organise utensils for independent exploration
Play area organisation:
Dedicate a bubble station with different wands
Create a music corner with wind instruments
Set up a mirror at child height
Keep sensory bins with safe oral objects
Bathroom modifications:
Install a step stool for mirror access
Use fun toothbrushes with different textures
Keep cup options for rinsing practice
Add waterproof toys for bath bubble play
Incorporating technology and modern tools
Apps and Digital Resources
While hands-on play is irreplaceable, some digital tools can supplement your efforts:
Speech therapy apps with oral motor games
Video modelling for tongue and lip exercises
Timer apps for exercise duration
Progress tracking applications
Remember, screen time should complement, not replace, physical oral motor activities.
Nutrition’s role in oral motor development
Foods that build strength
Strategic food choices can naturally support oral motor development:
Jaw strengthening foods:
Raw vegetables (carrots, celery, bell peppers)
Whole fruits with skin (apples, pears)
Meat strips and jerky (age-appropriate)
Crusty bread and bagels
Tongue exercise foods:
Nut butters (spread thin for licking)
Lollipops and ice pops
Yoghurt and pudding
Sticky foods like raisins
Lip coordination foods:
Foods requiring pursing (noodles, string cheese)
Items needing precise lip closure (crackers)
Drinks through various straw sizes
Common challenges and solutions
Addressing typical concerns
“My toddler refuses to try new textures” Start with familiar flavours in new textures. Mix preferred foods with challenging ones gradually.
“We’re always rushed in the morning” Incorporate exercises during car rides or while waiting. Even 2-3 minutes helps!
“My child gets frustrated with exercises” Make it sillier! Turn exercises into games and let them lead sometimes.
“I’m worried we’re not doing enough” Quality over quantity—consistent daily practice of even 5 minutes is valuable.
Tracking progress and celebrating wins
Monitoring development
Keep a simple log of:
New sounds mastered
Foods successfully tried
Improved clarity in words
Decreased drooling
Better mealtime behaviours
Celebrate small victories – every bit of progress counts!
Looking ahead: long-term benefits
Helping your child build strong oral motor skills doesn’t have to feel like a therapy session. With a little creativity and consistency, everyday moments can turn into powerful opportunities for growth. Whether you’re making silly faces at the dinner table or encouraging your toddler to blow out pretend birthday candles, you’re doing more than just playing—you’re helping lay the foundation for lifelong skills in speech, feeding, and communication.
The investment you make in oral motor development today pays dividends in:
Academic success through clear communication
Social confidence in peer interactions
Healthy eating habits and nutrition
Strong self-advocacy skills
Reduced need for future interventions
Frequently asked questions
What are oral motor exercises for toddlers?
They’re playful activities that build feeding-related awareness and control around the lips, tongue, jaw, and cheeks—think bubbles, silly faces, crunchy foods, straws, and sound play. Note: current research does not support these activities for improving speech sounds; for speech clarity, children need to practice real sounds/words (ideally with guidance from an SLT).
At what age should I start oral motor exercises with my child?
You can begin simple oral motor activities as early as 6-12 months with age-appropriate exercises like offering textured foods and encouraging babbling. More structured exercises typically start around 12-18 months when toddlers can follow simple directions and engage in purposeful play. Always match activities to your child’s developmental level and interests.
How often should my toddler do oral motor exercises?
Ideally, incorporate oral motor activities into your daily routine rather than scheduling separate exercise sessions. Aim for 5-10 minutes of focused activities 2-3 times per day, but remember that many everyday activities like eating, drinking, and playing naturally provide oral motor practice. Consistency matters more than duration.
What are signs my toddler needs oral motor therapy?
Signs include persistent drooling beyond age 2, difficulty transitioning to solid foods, unclear speech beyond typical developmental stages, frequent gagging or choking, extreme aversions to certain food textures, an open-mouth posture at rest, difficulty using straws or cups, and tongue thrust beyond age 4. Consult your paediatrician if you notice multiple concerns. Most children have completely lost the tongue thrust reflex by age 4 or 5″ Tongue Thrust: Signs, Causes & Treatment and “It naturally fades by age 4 or 5” How Can Tongue Thrust Affect Speech? How It Can Be Treated – Atlanta Health Partners Paediatric Referral Directory.
Can oral motor exercises help with picky eating?
Yes! Oral motor exercises can help picky eaters by improving their ability to manage different food textures, increasing oral awareness, reducing sensitivity to new sensations, and building confidence with chewing and swallowing. Start with play-based activities before introducing challenging foods to reduce mealtime pressure.
What’s the difference between oral motor exercises and speech therapy?
Oral motor exercises focus specifically on strengthening and coordinating the physical muscles used for speech and feeding. Speech therapy is a broader field, addressing language development, articulation, communication strategies, and cognitive-linguistic skills. Oral motor exercises are often one component of comprehensive speech therapy.
Are there any risks to doing oral motor exercises at home?
When done appropriately, oral motor exercises are safe. However, avoid forcing exercises if your child is upset, never use items that pose choking hazards, respect your child’s comfort level, and stop if you notice signs of fatigue or frustration. Always consult a professional if you’re unsure about a specific exercise.
How can I make oral motor exercises fun for my resistant toddler?
Turn exercises into games, let your toddler choose activities, use favourite characters or toys as models, incorporate exercises into pretend play, offer rewards and praise, make it a family activity, keep sessions short and positive, and follow your child’s lead. Remember, if it’s not fun, it’s not sustainable!
What everyday activities naturally promote oral motor development?
Many daily activities support oral motor development: singing songs, brushing teeth, eating varied textures, drinking from different cups, blowing nose, giving kisses, making animal sounds, laughing and talking, chewing gum (age-appropriate), and playing wind instruments. These natural opportunities are just as valuable as structured exercises.
When should I see improvements from oral motor exercises?
With consistent and playful practice, you may notice small improvements in feeding comfort and participation within 2–4 weeks. Bigger shifts in feeding confidence usually take longer. For speech clarity, progress depends on practising specific sounds/words, an SLT can guide you on what to target and how.
Remember, you’re not alone in this journey. Every parent questions whether they’re doing enough for their child’s development. The fact that you’re reading this and seeking ways to support your toddler’s oral motor development indicates that you’re already on the right track. Keep it playful, stay consistent, and celebrate those small wins – they add up to big achievements!
*Collaborative feature post*
What to know about lash serum during pregnancy and beyond
Medical Disclaimer: This article is for informational purposes only. Always consult your healthcare provider before using any cosmetic products during pregnancy or breastfeeding. Individual experiences may vary, and what works for one person may not work for another.
As a mother of four, I have navigated the peaks and troughs of hormonal changes both in pregnancy and postpartum. Finding safe beauty products is critical for me, especially now that I am in my 40s. This comprehensive guide addresses everything you need to know about lash serums to help with that inevitable postpartum hair loss because, sadly, it doesn’t just happen on your head!
The unique postpartum hair loss challenges we parents face
Our hair is thickest during the golden (second) trimester, but then after birth, hair falls in clumps. Many women don’t realise that this often happens with our eyelashes too. I lost a lot with number four and have only seen my hair grow back properly after four years. Not to worry, though. Most women replenish their hair naturally within the first year, but this largely depends on your body, genetics and age. But there are ways to help speed up hair growth (watch this space for a full beauty guide coming soon on how I did this!) Additionally, I recommend checking out my article on red light therapy, which has been extremely helpful for replenishing my curly locks.
Trying a lash serum for the first time is exciting, but it’s also essential to consider whether its safe and effective. For pregnant and breastfeeding mothers, these concerns multiply as hormonal changes affect both lash growth and which products you can use safely.
And not every serum works the same way. Results vary depending on the ingredients and each person’s lash growth cycle. During pregnancy and postpartum, hormonal fluctuations can dramatically impact these results. Some notice fuller-looking lashes within weeks, while others see more gradual changes. Paying attention to application instructions and consistency helps maximise results while reducing the chance of side effects.
However, with the right approach, lash serums can become a simple yet effective addition to a daily routine – even during the demanding months of pregnancy and early parenthood.
In this article, we’ll talk about what lash serums are out there and how to use them safely during pregnancy and beyond!
Essential facts to know before using a lash serum during pregnancy and postpartum
How lash serums work and their benefits
Lash serums are formulated to enhance the appearance of eyelashes by promoting growth and increasing thickness. Cosmetic serums usually work by nourishing the hair follicle, while prescription options containing bimatoprost (a prostaglandin analog) actually extend the natural growth phase of lashes and are clinically proven to lengthen them. However, these prescription serums like Latisse are not recommended for pregnant or breastfeeding women due to potential safety concerns.
Cosmetic serums, which are available over the counter, often emphasise conditioning and strengthening rather than medically altering growth cycles. This difference means results can vary, with some formulas focusing more on overall lash health than dramatic length. A lash serum by ForChics, for instance, is typically compared with other cosmetic options that highlight hydration and resilience. Comparing these side by side reveals how ingredients impact shine, softness, and durability. Choosing between them depends on whether the goal is noticeable growth or simply stronger, healthier-looking lashes. Note: Always verify the pregnancy safety of any specific brand with your healthcare provider before use.
Understanding hormonal effects on lashes
During pregnancy, elevated oestrogen levels can significantly impact lash growth patterns. According to recent studies, many women experience enhanced lash growth and thickness, particularly during the second and third trimesters of pregnancy. However, once you give birth, oestrogen levels plummet, signalling hair follicles to enter the telogen (shedding) phase rapidly.
Many new mothers experience unexpected changes in their hair and lashes. It’s not uncommon to notice your lashes thinning or even eyelashes falling out postpartum. This phenomenon, known as telogen effluvium, typically peaks 3 to 6 months after delivery.
Types of lash serums and key ingredients
There are two main categories: prescription serums and cosmetic serums. Cosmetic serums rely on nourishing ingredients. Common ones include:
Peptides: Support lash strength and reduce breakage.
Biotin: Promotes healthier hair growth.
Castor oil: Provides hydration and conditioning.
Plant extracts: Offer antioxidant and soothing effects for sensitive eyes.
Some cosmetic formulas may also contain prostaglandin derivatives, although in lower concentrations than those found in prescription products. Checking the ingredient list is essential, especially for individuals with allergies or sensitivities.
Pregnancy-safe ingredients to look for
Natural ingredients offer a more organic option for those seeking pregnancy-safe alternatives. Consider incorporating the following ingredients into your lash care routine: Castor Oil: Renowned for its moisturising properties, castor oil nourishes and strengthens lashes.
Safe ingredients during pregnancy and breastfeeding include:
Hyaluronic acid
Collagen
Vitamin E (Tocopherol)
Panthenol
Pumpkin seed extract
Biotin (Vitamin B7)
Potential side effects and safety precautions
While many eyelash serums are well tolerated, side effects can occur. Prescription serums with bimatoprost may cause redness, itching, or darkening of the eyelid skin. In rare cases, they can cause an increase in pigmentation of the iris. Cosmetic serums are generally milder but can still irritate, especially in individuals with sensitive eyes. At the same time, many people incorporate medical grade skincare products into their overall routine, as eye care and skin health often go hand in hand.
To reduce risks:
Apply only to the lash line, never inside the eye.
Use a clean applicator to prevent bacterial contamination.
Discontinue use if persistent irritation occurs.
Consulting an eye care professional is recommended before starting a serum, especially for individuals with pre-existing eye conditions or those considering prescription-strength options.
How to use lash serums safely and effectively during pregnancy and breastfeeding
Preparing your lashes for application
Clean lashes absorb serum more effectively. She should always remove makeup with a gentle makeup remover and wash the eye area thoroughly to clear away mascara, eyeliner, or oils. This prevents buildup that can block the serum from reaching the lash line. Those who wear lash extensions or false lashes require extra care. Oil-based removers can weaken the adhesive, so oil-free cleansers are recommended.
Healthy lashes respond better to treatment. Using a mild lash conditioner can help maintain flexibility and reduce breakage, particularly during the natural growth cycle of your lashes. By starting with clean, conditioned lashes, the serum can work without interference from dirt or product buildup.
Step-by-step guide to applying lash serum
Most lash serums, including options from brands like ForChics, come with a thin applicator brush. Apply a small amount directly along the upper lash line, similar to liquid eyeliner. Only one dip per eye is sufficient, as using more does not expedite results but may increase the risk of eye irritation.
Application should be limited to the upper lash line. The lower lashes do not require direct application, as the serum naturally transfers when blinking. Applying too close to the inner corner of the eye should be avoided to reduce discomfort. After applying, she should allow the serum to dry for at least 90 seconds before using other products. This prevents smudging and ensures the serum fully absorbs into the lash line.
Special considerations for nursing mothers
When breastfeeding, additional precautions ensure both yours and baby’s safety:
Apply serum after the last evening feeding
Wash your hands thoroughly after application
Store products safely away from baby’s reach
Choose formulas specifically labelled as breastfeeding-safe
Managing postpartum lash loss: what to expect
Postpartum hair loss is a regular part of pregnancy and childbirth and won’t affect your baby. But hair that falls out can wrap around your baby’s fingers, toes or other body parts. This rare occurrence is called a hair tourniquet.
Timeline of lash changes
While this issue will likely eventually resolve (1-1.5 years postpartum), understanding the timeline helps manage expectations. Studies show that 68-90% of new mothers experience postpartum hair loss:
During Pregnancy: Enhanced growth due to elevated oestrogen
0-3 Months Postpartum: Initial shedding begins
3-6 Months Postpartum: Many women who have recently had a baby will see noticeable hair loss that peaks after a few months
6-12 Months Postpartum: Recovery and regrowth phase
Nutritional support for lash health
Maintaining a balanced diet with adequate levels of essential nutrients is always crucial for your health — and all the more so when you’re eating for two! Lash loss can be linked to hormonal changes, but it is often more commonly associated with a deficiency.
Essential nutrients include:
Iron (prevents anaemia-related lash loss)
Biotin (Vitamin B7)
Vitamin E
Protein
Omega-3 fatty acids
When to seek professional help
Consult your healthcare provider if:
Lash loss continues beyond 12 months postpartum
You experience sudden, patchy lash loss
Irritation persists after using any lash product
You notice other symptoms like fatigue or weight changes (possible thyroid issues)
Frequently asked questions
Can I use lash serum while pregnant?
Because hormone levels change during pregnancy and breastfeeding, you should use any cosmetic products, including EYELASH AWAKENING SERUM, with caution and always consult with your doctor. Choose serums without prostaglandin analogs and stick to natural, nourishing ingredients.
Is GrandeLash safe during pregnancy?
GrandeLash contains prostaglandin analogs and is generally not recommended during pregnancy or breastfeeding. Many mothers report switching to safer alternatives during this time.
What’s the best pregnancy-safe lash serum?
Some mothers have reported positive experiences with serums like DIME Lash Serum, which has been noted for its effectiveness and safety. Users have reported noticeable improvements in lash length and fullness, with no adverse effects. Other potentially safe options include those containing only peptides, biotin, and natural oils.
Important: Individual experiences may vary. Always consult your healthcare provider before using any lash serum during pregnancy or breastfeeding, regardless of brand claims or user testimonials.
Can lash serum pass through breast milk?
Given the similarities between bimatoprost and other prostaglandin-based compounds found in over-the-counter lash serums, healthcare providers often err on the side of caution and advise against their use during breastfeeding.
How long does postpartum lash loss last?
The shedding should last less than six months. Your hair should regain its fullness by the time your child turns one.
Can I use castor oil on my lashes while breastfeeding?
Pure castor oil applied topically to lashes is generally considered safe during breastfeeding when used in small amounts. However, always consult your healthcare provider first.
Will my lashes grow back after postpartum loss?
Hair loss after childbirth is not permanent. New hair will start growing back as soon as the old hair falls out.
Can thyroid issues cause lash loss after pregnancy?
Yes, thyroid changes are usually also temporary symptoms. These changes within the thyroid glands should resolve once the pregnancy is complete and hormones responsible for hyperthyroidism — human chorionic gonadotropin and oestrogen — return to normal levels.
Is it safe to get lash extensions while pregnant?
Eyelash extensions can be a safe alternative to lash serums during pregnancy. Unlike serums, which commonly contain prostaglandin analogues, eyelash extensions are applied externally.
What vitamins help with postpartum lash growth?
Key vitamins include biotin (B7), vitamin E, iron, and vitamin D. A quality postnatal vitamin can help support overall hair and lash health.
Final thoughts
Choosing a lash serum requires attention to ingredients, safety, and application – especially during pregnancy and breastfeeding. Products containing peptides, biotin, or plant extracts may support healthier lashes. Avoiding harsh irritants helps reduce the risk of side effects. Not every formula works the same for everyone. Considering personal sensitivity, reviewing product details, and setting realistic expectations help ensure a better experience with lash serums.
For new and expecting parents, understanding the hormonal changes affecting lash growth and choosing pregnancy-safe options provides peace of mind while supporting lash health. Remember that postpartum lash loss is temporary, and with proper care and patience, your lashes will recover. Always consult with your healthcare provider before starting any new beauty regimen during pregnancy or while breastfeeding.
Disclaimer: This article is for informational purposes only and should not replace professional medical advice. Always consult your healthcare provider before using any new products during pregnancy or breastfeeding.
*Collaborative feature post*
What parents should know raising resilient teenagers in Phoenix
When I held my first baby, I never imagined I’d be writing about teen behavioural support programs. But here’s the thing – as a mum of four, two of whom are teenagers, I’ve learned that the foundations we lay today shape tomorrow’s teenagers. And honestly? Knowing what support exists out there doesn’t mean you’re expecting problems – it means you’re being smart about raising resilient teenagers who can handle whatever life throws at them.
Let me share something personal: My oldest is now 14, and while he’s amazing, the teen years have taught me that even the most prepared parents sometimes need extra support. That’s not failure – it’s wisdom. So today, let’s talk openly about something that might feel far away but is worth understanding now: Phoenix troubled teen programs, their costs, and why knowing about them early can actually help you raise more resilient kids from day one.
Why new parents should think about teenage resilience early
You might be wondering why I’m talking about teen programs when you’re still figuring out nappy changes and sleep schedules. Here’s what I wish someone had told me: the emotional regulation skills you’re teaching your toddler right now? They’re the same ones that’ll help them navigate teenage stress without falling apart.
Research published in the International Journal of Mental Health Systems confirms that half of all mental disorders start by age 14 and are usually preceded by non-specific psychosocial disturbances that can evolve into any major mental disorder1. Studies in Child and Adolescent Psychiatry and Mental Health demonstrate that resilience factors established in early childhood (ages 3-5) significantly predict mental health outcomes in adolescence2. When families that are searching for Phoenix troubled teen programs share their stories, many say the same thing: “I wish we’d started building these skills earlier.”
The typical price for these programs in Phoenix ranges from $2,500 to $10,000 per month, depending on services such as residential care, therapy, and academic support. This price range can feel overwhelming at first, but it reflects the level of care and resources dedicated to each teen. More importantly, understanding these costs now helps you make informed decisions about both prevention and preparation.
Understanding the investment in teen support
Let’s be real – nobody wants to think about their sweet baby needing intensive support as a teenager. But here’s what I’ve learned from connecting with other parents: knowledge is power, and preparation isn’t pessimism.
Different types of programs are available for troubled teens in the Phoenix area, each offering unique treatment plans that can include live-in support, outpatient therapy, and family counselling. According to Arizona Department of Education data, Arizona has multiple state-approved residential treatment centres, including facilities in the Phoenix metro area. Some programs offer multidisciplinary care that is tailored to each teen’s individual needs. Understanding these options now means you can:
Build preventive skills early – The communication patterns you establish with your 3-year-old become the foundation for teenage conversations.
Plan financially – Even if you never need intensive support, having resources set aside gives you options.
Recognise warning signs – knowing what’s normal teenage behaviour versus what needs support helps you act early
Create family systems – Strong family connections built from infancy create protective factors against teen struggles
Key takeaways
Troubled teen programs in Phoenix usually cost $2,500–$10,000 per month
Program choices include residential and outpatient options
Treatment plans are customised based on each teen’s needs
Early intervention and prevention can reduce the likelihood of needing intensive programs
Building resilience from toddlerhood creates stronger teenagers
Typical costs of troubled teen programs in Phoenix
Now, let’s talk numbers – because as parents, we need to be prepared for anything. Costs for troubled teen programs in Phoenix can vary based on program type, services offered, and the needs of the teen. Payment options and the potential for insurance coverage can also affect the out-of-pocket expenses for families.
Average price ranges by program type
I’ve done the research (so you don’t have to), and here’s what families typically invest:
Outpatient therapy in Phoenix usually costs between $80 and $200 per session4. Think of this as the first line of support – regular check-ins that keep small problems from becoming big ones. Many families start here when they notice their teen struggling with anxiety, depression, or behavioural changes.
An Intensive Outpatient Program (IOP) typically ranges from $3,000 to $10,000 per month5. These programs are like a middle ground – your teen lives at home but attends structured therapy several times a week. It’s intensive support while maintaining family connections.
Residential treatment centres can be the most expensive option, with fees typically between $8,000 and $15,000 per month. According to a 2024 NIH study, the average daily cost for residential treatment is $878, with a month’s stay averaging over $26,0006. These provide 24/7 care when a teen needs round-the-clock support for serious behavioural, emotional, or substance use issues.
Therapeutic boarding schools often charge anywhere from $2,000 to $7,000 per month, depending on the length of stay and services provided. These combine education with therapy, helping teens who need both academic and emotional support.
Wilderness therapy programs usually range from $400 to $900 per day, making a 6-8 week stay cost between $15,000 and $40,000 total. While pricey, many parents swear by the transformative power of these nature-based interventions.
Group homes or transitional living services in Phoenix often fall between $4,000 and $8,000 per month, providing structured living environments for teens who need support transitioning to independence.
Factors influencing cost
Several factors influence the total cost for families of troubled teens in Phoenix:
Level of care is often the biggest contributor. Programs offering 24/7 supervision or medical services tend to cost more – but remember, you’re paying for expertise and round-the-clock support when your child needs it most.
Staff qualifications matter enormously. Programs with licensed therapists, psychiatrists, and specialised staff cost more, but the expertise can make all the difference. You wouldn’t skimp on a surgeon, right? The same principle applies here.
Specialised therapies – such as treatment for substance use or dual diagnoses – can also lead to higher fees. But targeted treatment means better outcomes.
The program’s location in or near Phoenix, as well as its reputation, may alter costs. Smaller, more specialised settings or highly accredited centres generally charge more per month than larger, less individualised programs.
Length of stay directly affects total expense since most services are billed monthly. Some teens need just a few weeks of intensive support; others benefit from months of consistent care.
Additional fees for assessment, transportation, or aftercare planning can increase the overall investment beyond base program rates. Always ask for a complete breakdown of costs upfront.
Building resilience foundations from toddlerhood
Here’s where it gets exciting – you have the power RIGHT NOW to build resilience that could prevent the need for intensive support later. As a mum who’s been through the toddler trenches and is now navigating the teen years, let me share what actually works:
Emotional regulation starts early
That meltdown your toddler’s having over the wrong colour cup? It’s actually a golden opportunity. When you help them name their feelings (“You’re frustrated because you wanted the blue cup”), you’re teaching emotional literacy that becomes crucial in teenage years.
I remember thinking I was just surviving my son’s tantrums, but looking back, those moments where I tried to stay calm and help her work through big feelings, that laid the groundwork for how he handles stress as a teenager today.
Communication patterns that last
The way you talk to your 3-year-old shapes how they’ll talk to you at 13. Some strategies I’ve found invaluable:
Active listening – Put down your phone, make eye contact, and really hear them (yes, even when they’re telling you about dinosaurs for the 47th time)
Validating feelings – “That must have been really hard” goes a long way, whether they’re 4 or 14
Problem-solving together – Instead of fixing everything, ask “What do you think we should do?”
Creating safe spaces – Regular one-on-one time where they can share anything without judgment
Building independence gradually
According to the CDC, nearly 1 in 5 children ages 3 to 17 (21%) will be diagnosed with a mental, emotional, or behavioural health condition7. But here’s the hopeful part: children with more positive childhood experiences are significantly less likely to develop mental health conditions.
Helicopter parenting might feel protective, but it actually creates anxious teenagers who don’t trust their own judgment. Start small:
Let your preschooler choose their clothes (even if they look ridiculous)
Allow age-appropriate risks (climbing that slightly too-high playground equipment)
Encourage problem-solving (“Your toy is stuck. How can we get it out?”)
Celebrate effort over outcome
When families might need extra support
Let’s be honest – even with the best foundations, some families need additional help. And that’s okay! Recognising when you need support is actually a sign of strength, not weakness.
Warning signs to watch for
While every teen goes through moody phases, certain behaviours warrant professional attention:
Dramatic personality changes lasting more than two weeks
Self-harm or talk of suicide
Substance use beyond experimentation
Violent behaviour or extreme aggression
Complete social withdrawal
Significant academic decline
Eating disorders or extreme body image issues
The power of early intervention
Here’s something I learned from a friend whose son went through an IOP: catching problems early often means shorter, less intensive (and less expensive) interventions. According to research published in the Early Intervention Foundation, early intervention programs show strong evidence of reducing symptoms of depression and anxiety in adolescents8. A few months of outpatient therapy at $150 per session is far more manageable than a year in residential treatment.
Studies also demonstrate that early intervention proves to be highly accessible and acceptable to young people, resulting in outcomes that are both positive and cost-effective9.
Insurance coverage and payment options
Arizona’s AHCCCS (Arizona Health Care Cost Containment System) provides comprehensive mental health coverage for eligible families10. Even if you’re not currently eligible for AHCCCS medical assistance, you may qualify for behavioural health services through Regional Behavioural Health Authorities (RBHA)11.
Some insurance providers in Arizona cover part of the treatment for eligible troubled teens, especially if the program is deemed medically necessary and is licensed. Let me break down what you need to know:
Outpatient therapy and some intensive outpatient services are more likely to receive insurance reimbursement. Most insurance plans cover mental health services, though you’ll likely have copays.
Residential treatment and therapeutic boarding schools are less often fully covered but might receive partial coverage for therapy or medical services only.
Before enrolling, families should:
Contact both the program and its insurance provider to verify covered services
Understand co-pays and out-of-pocket maximums
Check for in-network providers
Understand pre-authorisation requirements
Many programs in Phoenix offer payment plans, sliding scale fees, or limited scholarships. Some organisations also assist with insurance appeals or financial consultation.
Smart financial planning tips
Start a “Future Support Fund” now – even $50 per month adds up over 15 years. Consider it insurance you hope never to use. If your teen thrives without needing intensive support, you’ve got a nice college fund bonus!
Program types and key considerations
Understanding the full spectrum of support available helps you make informed decisions if the time comes. Let’s dive deeper into what each program type really offers:
Residential treatment and therapeutic boarding schools
Residential treatment centres provide 24/7 care in a structured environment. These programs are designed for teens with severe behavioural challenges, substance abuse problems, or victimisation histories. Licensed clinicians and support staff supervise youth, deliver therapy, and monitor medication if needed.
Therapeutic boarding schools combine academics with therapy. These schools serve teens needing ongoing emotional or behavioural support. Stays average from 9 to 12 months. Many focus on life skills, accountability, and self-awareness, helping teens transition back home or to less restrictive environments.
The cost of residential programs and therapeutic boarding schools can range from $6,000 to $12,000 per month. Local facilities like Avery’s House and other Phoenix-area programs offer specialised plans tailored to each family’s needs12. Insurance may cover part of the costs, but out-of-pocket expenses can be significant.
What parents say: “It was the hardest decision we ever made, but our daughter came back to us,” one Phoenix mum shared with me. “The structure and intensive therapy gave her tools we couldn’t provide at home.”
Intensive outpatient program and day treatment
An Intensive Outpatient Program (IOP) is a flexible therapeutic option. Teens return home at night but attend structured group and individual therapy several days a week. IOPs are effective for moderate behavioural issues or substance use disorders that do not require round-the-clock supervision.
Day treatment programs, sometimes called partial hospitalisation, are more intensive than IOP but less restrictive than residential care. Treatment occurs during the day, with a focus on therapy, skill-building, and relapse prevention.
Costs for IOPs typically range from $3,000 to $7,000 per month. Day treatment is usually priced higher due to longer daily hours. Insurance coverage for these programs can vary, depending on factors such as medical necessity and documentation.
Real-world tip: Many families find IOPs work well when combined with family therapy. You’re all learning and growing together.
Creating your family’s resilience roadmap
Let’s get practical. Here’s how to create a plan that grows with your child:
You don’t have to wait until a crisis hits to build connections:
Find your tribe – Connect with other parents who share your values
Know your resources – Research therapists, programs, and support groups in Phoenix
Build professional relationships – Establish care with a paediatrician who knows your family
Create emergency plans – Have a crisis plan before you need one
The bottom line: preparation meets prevention
Families in Phoenix should expect to pay between $2,500 and $10,000 per month for troubled teen programs, depending on the type and intensity of care required. But here’s what I really want you to remember: the work you’re doing right now with your little one – teaching them to name feelings, solve problems, and trust you – is the best investment you can make in their future mental health.
Insurance coverage may help with some programs, so it’s important to check with each provider. Each family’s choice will depend on individual needs, professional recommendations, and available financial resources. But knowing your options gives you power when you need it most.
Frequently Asked Questions
Should I start saving now for potential teen support programs?
Absolutely consider setting aside even small amounts monthly. Think of it as emotional health insurance. If you never need intensive programs, you’ve built a fund for college or other opportunities. Win-win!
How can I distinguish between normal teen behaviour and situations that require intervention?
Duration and intensity are key. Mood swings are normal; complete personality changes lasting weeks aren’t. When in doubt, consult a professional – many offer free consultations.
What if we can’t afford the programs if we need them?
Many programs offer sliding scales, payment plans, or scholarships. Some insurance covers portions of treatment. Community resources and support groups can also provide help. Never let cost prevent you from seeking initial consultations.
Can building resilience really prevent the need for these programs?
While no parenting approach guarantees a smooth teenage experience, research consistently shows that children with strong emotional foundations, secure attachments, and good coping skills are significantly less likely to need intensive interventions.
When should I start talking to my child about mental health?
Now! Age-appropriate mental health conversations can start as early as toddlerhood. “Everyone feels sad sometimes” or “It’s okay to be angry, but we need to be safe with our bodies” lay important groundwork.
What’s the most important thing I can do now to prepare?
Build a strong, trusting relationship with your child. Kids who feel connected to their parents and comfortable talking about problems are more likely to seek help early when struggling, preventing larger crises.
Resources for Phoenix Families
Crisis Hotline: 988 (Suicide & Crisis Lifeline)
Arizona Department of Child Safety: 1-888-767-2445
NAMI Arizona (National Alliance on Mental Illness): Support groups and resources
Phoenix Children’s Hospital: Behavioural health services
AHCCCS (Arizona Health Care Cost Containment System): azahcccs.gov – Insurance options
Regional Behavioral Health Authorities:
Central Arizona: 800-564-5465
Northern Arizona: 800-322-8670
Southern Arizona: 866-495-6738
Final thoughts
As I write this, my teenagers are upstairs probably rolling their eyes at something I said earlier (the joys of parenting!). But you know what? We talk. We connect. We’ve built a foundation that helps us weather the storms together.
You’re already doing the most important work by thinking ahead, seeking information, and preparing to support your child through whatever comes. That tiny human you’re raising? They’re lucky to have a parent who cares enough to prepare for their future wellbeing.
Remember: knowing about teen support programs isn’t planning for failure – it’s planning for success. It’s saying, “I will do whatever it takes to help my child thrive.” And that is what raising resilient teenagers is all about.
Stay strong, trust your instincts, and remember – we’re all in this together.
Have questions or want to share your experience? Leave a comment below.
Disclaimer: This article is for informational purposes only and should not replace professional medical or psychological advice. If you’re concerned about your child’s mental health or behaviour, please consult with qualified healthcare providers.
Note: Prices and information are accurate as of August 2025. Programs and costs may vary.
Collaborative feature post
References
Colizzi, M., Lasalvia, A., & Ruggeri, M. (2020). Prevention and early intervention in youth mental health: is it time for a multidisciplinary and trans-diagnostic model for care? International Journal of Mental Health Systems, 14(23). https://ijmhs.biomedcentral.com/articles/10.1186/s13033-020-00356-9↩
Miller-Lewis, L. R., et al. (2013). Resource factors for mental health resilience in early childhood: An analysis with multiple methodologies. Child and Adolescent Psychiatry and Mental Health, 7(6). https://capmh.biomedcentral.com/articles/10.1186/1753-2000-7-6↩
Arizona Department of Education. (2025). Residential Treatment Center Placement. https://www.azed.gov/specialeducation/rtc-placement ↩
Based on current market rates for Phoenix area therapy services as of 2025. Prices may vary by provider and insurance coverage. ↩
King, C., et al. (2024). Adolescent Residential Addiction Treatment In The US: Uneven Access, Wait Lists, And High Costs. Health Affairs. DOI: 10.1377/hlthaff.2023.00777 ↩
McGorry, P. D., & Mei, C. (2018). Early intervention in youth mental health: progress and future directions. Evidence-Based Mental Health, 21(4), 182-184. https://pmc.ncbi.nlm.nih.gov/articles/PMC10270418/↩
How to keep toddlers busy when you’re stuck inside
When the summer sun is blazing and outdoor play isn’t an option, parents everywhere face the challenge of keeping energetic toddlers entertained indoors. As a mother of four who founded 365 Days of No Screens, I understand the struggle of maintaining sanity while keeping little ones engaged and happy without relying on screen time.
But hot days stuck inside can be just as fun and enriching with a bit of creativity—and a few clever tricks up your sleeve. According to the American Academy of Paediatrics, play is not frivolous: it enhances brain structure and function and promotes executive function, which allows us to pursue goals and ignore distractions. Whether you’re looking to foster imaginative play, encourage sensory exploration, or simply create a cosy environment for your little one, these cool ideas will help you make the most of those long, hot afternoons.
Through my work at 365 Days of No Screens, I’ve helped thousands of families discover that screen-free activities aren’t just possible—they’re often more engaging and developmentally beneficial than digital alternatives. These indoor activities have been tested by real families and proven to keep toddlers happily occupied while supporting their growth and development.
Creating the perfect indoor play environment
Safety First: Essential Considerations
Before diving into activities, ensure your play space is toddler-proofed. Remove small objects that pose choking hazards, secure furniture to walls, and keep cleaning supplies out of reach. Check your space at toddler eye-level to identify potential dangers.
Start by setting the stage for indoor adventures. A perfect braided rug isn’t just a stylish addition to your living room or play area—it’s also a soft, safe surface for crawling, tumbling, and all sorts of toddler antics. The tactile texture of a braided rug invites little hands and feet to explore, while its durability withstands spills, snacks, and endless play sessions.
Pro Tip from Experience: Choose a rug in cheerful colours or playful patterns to brighten up your space and create a designated play zone that feels special and inviting. After testing numerous rugs with my own children, I recommend selecting ones with low pile height to prevent tripping and make cleanup easier.
Sensory play: endless sensory fun for development
Sensory bins are a parent’s secret weapon for indoor entertainment, and the possibilities are nearly endless when it comes to bin fillers. Research shows that sensory play supports brain development, enhances memory, calms anxiety, and improves fine motor skills—making these activities both fun and educational. These bins encourage exploration, creativity, and fine motor skills—all while keeping messes contained (mostly!).
Kinetic sand: Moldable and mess-contained sensory experience
Safety Warning: Always supervise sensory play, especially with children under 3. Remove any items that could pose choking hazards, and clean up spills immediately to prevent slipping.
Add cups, spoons, or small toys to extend the play. For a themed experience, try creating a “beach day” bin with kinetic sand, seashells, and plastic sea creatures, or a “construction site” with dried beans and toy trucks. If you enjoy themed sensory play setups, these bins can be easily adapted to match your toddler’s current interests.
Expert-recommended sensory activities
Through my years of creating screen-free activities, I’ve found these sensory experiences to be particularly engaging:
Water Play Station Set up a shallow bin with warm water, cups, and floating toys. This activity supports hand-eye coordination and provides natural temperature regulation during hot days.
Texture Exploration Boards Create boards with different textures: sandpaper, velvet, bubble wrap, and corrugated cardboard. This supports tactile discrimination skills, which are crucial for later learning.
Imaginative play stations: building creativity and social skills
Indoor days are the perfect opportunity to encourage pretend play, which child development experts recognise as fundamental for emotional and social development. Peter Gray’s research in “Free to Learn” shows that imaginative play helps children process experiences, develop empathy, and build problem-solving skills.
Evidence-Based Play Ideas:
Set up a mini “grocery store” with empty food containers, a play cash register, and a shopping bag. This activity teaches:
Basic math concepts (counting, money)
Social interaction skills
Real-world connection and understanding
Or, create a cosy reading nook with a stack of picture books and a few plush pillows. Reading together supports language development and emotional bonding. The American Academy of Pediatrics emphasises that reading and play support the formation of safe, stable, and nurturing relationships with caregivers that children need to thrive.
You can even transform a cardboard box into a rocket ship, puppet theatre, or playhouse—let your child’s imagination lead the way. Research indicates that open-ended materials, such as cardboard boxes, foster more creative thinking than structured toys.
DIY play kitchen benefits
Creating a play kitchen area supports:
Fine motor skill development through pouring and stirring
Math skills through measuring and counting
Language development through descriptive play
Independence and confidence building
Creative art projects: supporting fine motor development
Bring out the art supplies and let your toddler experiment with crayons, finger paints, or washable markers. Art activities support hand strength, pincer grasp development, and creativity—all crucial for later writing skills.
Age-Appropriate Art Activities:
12-18 months:
Large crayons and paper taped to the highchair tray
Finger painting with edible paints (recipe below)
Water painting on construction paper
18-24 months:
Stamping with sponges and washable paint
Sticker collages on contact paper
Playdough exploration (supervised)
2-3 years:
Simple cutting with safety scissors
Painting with brushes of various sizes
Creating patterns with stamps
Tape a large piece of paper to the floor or table to create a mural, or use sponges and stamps for mess-free fun. For a sensory twist, try painting with brushes dipped in water on construction paper, or make homemade playdough using flour, salt, and water.
Safe, edible paint recipe
Perfect for toddlers who still explore with their mouths
1 cup flour
1 cup water
Food coloring
1 tablespoon salt (preservative)
Mix ingredients until smooth. Store in refrigerator for up to one week.
Movement and music: supporting gross motor development
Physical activity is crucial for toddler development, supporting not just physical health but also cognitive function and emotional regulation. The CDC recommends that preschoolers (3-5 years) should be physically active throughout the day, while the WHO recommends that toddlers (1-2 years) get at least 180 minutes of physical activity daily.
Burn off energy with a toddler dance party! Play your child’s favourite songs and encourage them to move, jump, and wiggle. Research shows that music and movement activities support:
Coordination and balance
Rhythm and timing skills
Emotional expression and regulation
Language development through song lyrics
Set up a simple obstacle course using pillows, chairs, and floor coverings as a landing pad. You can also play classic games like “Simon Says” or “Freeze Dance” to keep things lively while building listening skills and body awareness.
Indoor movement ideas by age
12-18 months:
Crawling through tunnels (made from sheets)
Walking along tape lines on the floor
Dancing with scarves or ribbons
18-24 months:
Simple jumping on safe surfaces
Marching to music
Throwing soft balls into baskets
2-3 years:
Balancing on low, stable surfaces
Hopping on one foot
Following multi-step movement commands
DIY indoor obstacle course: building confidence and skills
Arrange cushions, tunnels, and low furniture to create a safe obstacle course. This type of play is endorsed by pediatric physical therapists for developing gross motor skills and providing a healthy outlet for pent-up energy.
Safety Checklist for Indoor Obstacles:
Ensure all furniture is stable and won’t tip
Use only soft materials for landing areas
Clear pathways of hard or sharp objects
Supervise all climbing activities
Start simple and gradually increase difficulty
Use painter’s tape to mark “balance beams” or “hopscotch” squares on the floor for extra fun. This type of floor marking is safe for most surfaces and easily removable.
Developmental Benefits:
Improves balance and coordination
Builds confidence in physical abilities
Supports spatial awareness
Provides proprioceptive input (body awareness)
Quiet time activities: The importance of rest and regulation
Even the busiest toddlers need downtime, and research shows that quiet activities support emotional regulation and prepare children for better sleep. Child development experts recommend incorporating 15-30 minutes of quiet time into daily routines.
Build a blanket fort together, snuggle up with a favourite stuffed animal, or listen to a calming audiobook. These activities support:
Emotional bonding between parent and child
Language development through story exposure
Imagination and creativity
Stress reduction and calming
Sensory bottles filled with glitter, water, and small trinkets can provide a mesmerising focal point for quiet moments. These bottles support visual tracking skills and provide self-soothing opportunities.
DIY calm-down kit
Create a special box containing:
Soft textures (velvet squares, stress balls)
Calming scents (lavender sachets)
Quiet activities (books, puzzles)
Comfort items (small stuffed animals)
Screen-free success: my experience and resources
As the founder of 365 Days of No Screens, I’ve dedicated my work to proving that children thrive without constant screen entertainment. My website offers daily screen-free activity ideas and resources to help families reduce screen dependence while increasing meaningful play and connection.
The activities I share aren’t just theoretical—real families test them in real situations. My four children have been my primary test subjects, and every activity recommendation comes from hands-on experience of what actually works to keep children engaged, learning, and happy.
Troubleshooting common indoor day challenges
“My toddler gets bored quickly” Rotate activities every 15-20 minutes. Toddlers have short attention spans, and variety helps maintain high engagement. I recommend preparing 3-4 activities in advance and switching between them as needed.
“The mess is overwhelming” Set up designated play areas with easy-to-clean surfaces. Involve your toddler in cleanup as part of the activity—this teaches responsibility and life skills. Consider using a large sheet or tarp under messy activities for easy cleanup.
“I’m running out of ideas” Create an activity jar with written ideas. When inspiration strikes, add new ideas to pull from during challenging moments. Visit 365daysofnoscreens.com for fresh inspiration and daily activity suggestions.
“My child is still restless” Ensure adequate physical activity is included. Many behavioural challenges stem from unmet movement needs. Try incorporating more gross motor activities into your daily routine.
Frequently asked questions
Q: How long should indoor activities last for toddlers? A: Most toddlers can focus for 10-20 minutes on structured activities. Follow your child’s cues and switch activities when interest wanes.
Q: Are these activities safe for children with allergies? A: Always check ingredients in sensory materials and art supplies. Substitute known allergens with safe alternatives, such as using oat flour instead of wheat flour for playdough.
Q: How can I make indoor time educational? A: Incorporate counting, colours, shapes, and letters naturally into play. Comment on what your child is doing to build language skills. Remember that the play itself is a learning experience for toddlers.
Q: What if I don’t have many supplies? A: Many activities use common household items. Empty containers, kitchen utensils, and cardboard can provide hours of entertainment. Check my website for DIY activity ideas using everyday items.
The long-term benefits of quality indoor play
Research consistently shows that high-quality play experiences during toddlerhood support:
School readiness skills
Social-emotional development
Problem-solving abilities
Creativity and innovation
Stress management skills
Hot days indoors don’t have to mean boredom or chaos. With some imagination and understanding of child development principles, you can transform your home into a haven of fun, learning, and connection. Embrace the opportunity to slow down, get creative, and make lasting summer memories—no sunscreen required.
Remember, the most important ingredients in any activity are your presence and engagement. Children learn best through interaction with caring adults, so take advantage of these precious moments of connection and discovery together.
From my experience helping thousands of families create screen-free environments, I can confidently say that the investment in creative indoor play pays dividends in children’s development, behaviour, and family bonding. These activities aren’t just time-fillers—they’re building blocks for your child’s future success and happiness.
About the Author: Leyla Preston is the founder of 365 Days of No Screens, a resource dedicated to helping families create meaningful, screen-free experiences for children. As a mother of four, she has firsthand experience in keeping children engaged and learning without relying on digital entertainment. Her website provides daily activity ideas, free resources, and community support for parents seeking to reduce screen time while enriching their children’s development.
Medical Disclaimer: This content is for informational purposes only and should not replace professional medical or developmental advice. Always consult with your paediatrician regarding your child’s specific needs and development.
Sources and References:
Yogman, M., Garner, A., Hutchinson, J., et al. (2018). The Power of Play: A Pediatric Role in Enhancing Development in Young Children. Pediatrics, 142(3).
Gray, P. (2013). Free to Learn: Why Unleashing the Instinct to Play Will Make Our Children Happier, More Self-Reliant, and Better Students for Life. Basic Books.
Centers for Disease Control and Prevention. (2024). Physical Activity Guidelines for Children and Adolescents.
World Health Organization. (2019). Guidelines on Physical Activity, Sedentary Behaviour and Sleep for Children Under 5 Years of Age.
*Collaborative feature post*
5 essential resources for teaching your family Icelandic
A comprehensive guide for parents interested in teaching Icelandic to their children
Why these resources matter for your child’s language journey
Learning Icelandic opens doors to understanding one of the world’s most unique languages, spoken by just over 350,000 people in Iceland. For parents raising bilingual children or those with Icelandic heritage, teaching this language creates a precious connection to culture and family. The language has remained largely unchanged for over 1,000 years, allowing modern Icelanders to read ancient sagas written centuries ago. This linguistic stability creates both opportunities and challenges for new learners – especially young children whose developing brains are primed for language acquisition.
The right resources can transform the journey from overwhelming to manageable, helping students build confidence through structured learning paths that provide a clear direction. Many parents struggle to find quality materials since Icelandic receives less attention than major world languages. However, several outstanding tools offer engaging lessons of Icelandic language that make the process both effective and enjoyable for young learners.
The key lies in choosing resources that work together to cover all aspects of language learning while being age-appropriate and engaging for children. From interactive online platforms to audio programs and grammar guides, the best approach combines multiple tools that support different learning styles and developmental stages. Research on multilingual language acquisition shows that children benefit from exposure to varied language learning resources and multimodal input.
Key takeaways for parents
Five carefully selected resources provide a complete foundation for mastering Icelandic at any age
Combining different types of learning tools creates the most effective study approach for your child’s developing brain
Quality resources make learning this ancient language accessible to modern students – even toddlers
Consistent daily exposure, even in short sessions, supports language development
The Essential five resources for Icelandic learners: parent & child edition
These five resources cater to different learning styles and needs, ranging from gamified vocabulary apps to structured textbooks and personalised tutoring. Each tool offers unique benefits for building Icelandic language skills in children, with specific adaptations for different age groups.
1. italki and Preply: Finding Icelandic tutors and language exchange for your family
Professional tutoring provides personalised instruction that adapts to individual learning needs. Online Icelandic tutors offer one-on-one lessons through video calls, with many specialising in teaching young children through play-based methods.
What Parents Should Know:
Both platforms offer Icelandic tutors, though the selection may be limited compared to major languages
Sessions can be scheduled flexibly to fit family routines
Tutors can focus on specific challenges like pronunciation or grammar. They provide immediate feedback and correction during conversation practice
Many tutors use interactive methods suitable for children
Preply offers similar tutoring services with flexible scheduling options. Students can book lessons at their convenience and select instructors based on their teaching style. When searching for tutors, look for those with experience teaching children or a background in early childhood education.
Both platforms include community features for language exchange. Learners can practice with native speakers who want to learn their language. This can be an opportunity for families to connect with Icelandic-speaking families who have children of similar ages.
Practical Considerations:
Trial lessons help determine if a tutor is a good fit for your child
Regular sessions provide consistent language exposure
Conversation practice accelerates speaking development. Regular sessions with tutors build confidence and fluency faster than self-study alone
Video lessons work well for children comfortable with screen-based learning
Tutors often provide cultural insights alongside language instruction. Students learn about Icelandic customs and social norms through natural conversation – valuable for children developing cultural connections.
2. Drops: gamifying your Icelandic vocabulary
Drops transforms vocabulary learning into an interactive game experience. The app uses visual associations and short daily sessions to help learners memorise Icelandic words effectively. The platform offers a version designed for younger users.
Child-Friendly Features:
Visual learning through colourful illustrations
Short 5-minute sessions suit young attention spans
The app focuses on practical vocabulary categories. Users learn words for food, travel, family, and daily activities through colourful illustrations and simple games
Each session lasts only 5-10 minutes. This approach prevents mental fatigue while building consistent study habits
Learning Approach: The visual learning method works well for beginners. Students associate pictures with Icelandic words instead of translating through their native language. Visual learning can be particularly effective for children who haven’t yet developed strong reading skills.
Audio Features: Drops includes audio pronunciation for each word. Users can hear native speakers pronounce vocabulary correctly from the start – important for developing accurate pronunciation in young learners.
The app tracks progress through streaks and achievements. This gamification keeps learners motivated during the early stages of language acquisition. Parents can use streaks as a gentle motivation tool for consistent practice.
Practical Tips:
Supervise younger children to ensure appropriate use
Use learned words in daily conversation to reinforce retention
3. Pimsleur and OptiLingo: Audio-based approaches for family learning
Pimsleur offers 30 audio lessons specifically designed for Icelandic learners. The program uses spaced repetition and graduated interval recall to build speaking confidence. While designed for adult learners, creative parents can adapt it for family use.
Program Structure:
Each lesson runs about 30 minutes. Learners practice pronunciation and basic conversations without reading any text
Lessons can be paused and resumed, allowing flexibility
The method emphasises speaking from day one. Students repeat phrases and respond to prompts, developing natural speech patterns
Family Adaptation Ideas: OptiLingo provides a similar audio-focused approach with shorter lessons. The program includes cultural context alongside language instruction.
Listen during car rides or quiet time
Turn repetition exercises into family games
Act out phrases while learning them
Both programs work well for commuters or busy learners. Students can practice while driving, walking, or doing other activities – useful for busy parents to learn alongside their children.
Considerations for Young Learners:
Adult-paced lessons may need breaking into shorter segments
Parents can preview content for age-appropriateness
Background listening provides passive language exposure
The audio format helps develop proper pronunciation early. Learners avoid common mistakes that come from reading without hearing correct sounds – particularly important for young children.
4. Clozemaster and Memrise: Vocabulary in context
Clozemaster presents vocabulary through fill-in-the-blank sentences. Students learn words within natural sentence structures rather than isolated word lists. This approach is most suitable for older children or parent learning.
How It Works:
Sentences demonstrate real language use
The platform includes thousands of Icelandic sentences. Each sentence teaches vocabulary while demonstrating grammar patterns and word usage
Learners see how words function in real contexts. This approach builds understanding of word relationships and sentence construction
Memrise Features: Memrise combines spaced repetition with user-generated content. The platform includes courses created by native speakers and language experts.
Video clips show native speakers using vocabulary in natural settings. Students observe facial expressions and mouth movements for better pronunciation
Multiple course options for different learning goals
Community-created content provides variety
Progress Tracking: Both platforms track learning progress through statistics. Users can identify weak areas and focus study time on challenging vocabulary.
Visual progress indicators can motivate learners
The context-based learning helps with retention. Students remember words better when they understand how to use them in sentences
Age Considerations:
These platforms work best for children who can read
Parents can use the content to create offline activities
Screen time should be balanced with other learning methods
5. Complete Icelandic and colloquial Icelandic: Grammar and structured learning for the whole family
Complete Icelandic provides a systematic approach to grammar and language structure. The textbook includes detailed explanations of Icelandic grammar rules and patterns. This resource primarily serves as a guide for parents.
Book Features:
Comprehensive grammar explanations
Each chapter builds upon previous knowledge. Students progress from basic sentence structure to complex grammatical concepts gradually
The book includes exercises and practice activities. Learners can test their understanding and apply new concepts through written practice
Cultural notes provide context
Colloquial Icelandic Approach: Colloquial Icelandic focuses on practical communication skills. The textbook emphasises everyday conversations and useful phrases.
Dialogue-based lessons
Focus on spoken language
Real-life situations and vocabulary
Audio Support: Audio recordings accompany both textbooks. Students can hear proper pronunciation as they read along with the text.
Native speaker recordings
Can be used for family listening practice
Using These Resources with Children: These structured resources work well for self-directed learners. Students can work through lessons at their own pace while following a clear curriculum.
Parents can adapt content for children
Extract simple phrases and vocabulary for young learners
Use dialogues for family role-play activities
The grammar explanations help students understand why Icelandic works as it does. This knowledge supports long-term language development beyond memorised phrases. Parents can simplify concepts to help children understand at their level.
Foundational knowledge and extra tools for mastering Icelandic as a family
Learning Icelandic requires understanding its unique alphabet and pronunciation system, exploring its rich literary traditions connected to Old Norse, and engaging with Iceland’s vibrant cultural community. These foundational elements provide learners with the tools needed to build fluency in this West Nordic language.
Understanding the Icelandic alphabet and pronunciation: A parent’s guide
The Icelandic alphabet consists of 32 letters, including special characters that are not found in the English alphabet. These unique letters are þ (thorn), ð (eth), æ (ash), and ö (o-umlaut).
Learning Special Sounds:
The thorn (þ) makes a “th” sound like in “think.” The eth (ð) creates a softer “th” sound like in “that.” These letters appear frequently in everyday Icelandic words
These sounds exist in English but use different letters
Children often find these special letters exciting to learn
Icelandic pronunciation follows consistent rules once you have learned them. Each letter typically makes the same sound regardless of its position in a word. This makes reading aloud easier than in English once the rules are understood.
Key pronunciation tips:
R is always rolled
LL sounds like “tl”
NN sounds like “tn”
Stress usually falls on the first syllable
Practice Methods: Practice with audio resources helps learners master these sounds. Many online tools provide pronunciation guides specifically for the Icelandic alphabet.
Listen to native speakers
Practice with rhymes and songs
Use online pronunciation guides like Forvo
The Icelandic language retains pronunciation patterns from centuries past. This consistency helps learners once they understand the basic rules.
Exploring Icelandic literature and old norse connections
Icelandic literature offers a direct path to understanding the language’s roots. The sagas, written in the 13th century, use language remarkably similar to modern Icelandic. This unique characteristic allows modern Icelanders to read ancient texts with relative ease.
Old Norse serves as the foundation for the Icelandic language. Modern speakers can read medieval texts with minimal difficulty. This connection makes Iceland unique among modern languages and can be fascinating for older children interested in history.
Reading Options for Different Ages: Popular literature for learners:
Children’s books for basic vocabulary
News articles for current language use
Classic sagas for historical context (in adapted versions for young readers)
Modern novels for contemporary expressions
Starting Your Family’s Reading Journey: Reading helps build vocabulary and understanding of grammar. Start with simple texts and progress to more complex materials.
Picture books for young children
Graded readers for developing readers
Online children’s content from Icelandic publishers
Many Icelandic authors write in accessible language. Their works provide insight into how natives use the language naturally.
The West Nordic language family includes Icelandic, Faroese, and Norwegian. Understanding these connections helps learners recognise patterns and similarities – an interesting topic for curious children.
Getting involved in Icelandic culture and community
Icelandic culture influences how the language is used on a daily basis. Understanding cultural context helps learners communicate more effectively and motivates continued learning.
Bringing Icelandic Culture Home: Online Communities Connect Learners with Native Speakers. These groups provide practice opportunities and cultural insights that textbooks cannot offer.
Cultural activities that support learning:
Icelandic music and radio stations (RÚV offers children’s programming)
Learning about Icelandic history through age-appropriate resources
Making Connections: Language exchange programs pair learners with native speakers. These partnerships provide real conversation practice and cultural exchange.
Online language exchange platforms
Virtual cultural events
Icelandic cultural centres in major cities
Modern Icelandic Culture: Icelandic culture values storytelling and poetry. Participating in these traditions helps learners understand the language’s expressive nature.
Contemporary Icelandic music
Children’s television programs
Online resources from Iceland
Modern Icelandic culture blends traditional elements with contemporary life. Following current events in Iceland provides relevant vocabulary and cultural knowledge through accessible sources.
Building Community: Social media groups and forums provide daily opportunities for interaction. Regular participation helps learners stay motivated and connected to the language community.
Online forums for language practice
Virtual meetups with other learners
Practical tips for parents
Creating a Supportive Environment:
Consistency matters more than perfection
Short daily exposure is more effective than long weekly sessions
Connect language learning to positive experiences
Celebrate small victories and progress
Age-Appropriate Approaches:
Toddlers: Songs, rhymes, and simple words during daily routines
Preschoolers: Picture books, games, and interactive apps
School-age: Structured lessons combined with fun activities
Tweens: Cultural connections and practical communication
Managing Expectations:
Language learning is a long-term process
Progress may seem slow, but it is cumulative
Mistakes are part of learning
Every family’s journey is unique
Conclusion
Learning Icelandic requires the right tools and resources to succeed. These five resources offer various ways to build vocabulary, practice grammar, and hear the language spoken naturally, all of which can be adapted for use by young learners and families.
Each resource serves a specific purpose:
Apps help with daily practice and vocabulary building
Online tutors provide personalised instruction and conversation practice
Audio programs improve listening skills and pronunciation
Context-based platforms show real language use
Textbooks offer structured learning and grammar understanding
Using multiple resources together is more effective than relying on a single method. Learners should pick tools that match their current level and learning style, keeping in mind that children learn differently from adults.
The key is consistent practice with varied materials. Starting with basic vocabulary and gradually adding grammar study creates a strong foundation for fluency. Remember that language learning is a journey, not a destination, and every small step forward is progress worth celebrating.