
How to straighten, wave and curl your hair in a rush with Straighteners
- UPDATE at 29/03/2017 – Nava Hair Straighteners seemed to have disappeared off the face of UK, so where I make references to the Nava Hair Straightener below, please note that you may not be able to purchase this product anymore. My next favourite straighteners are the GHD Platinum Stylers, which you can purchase from Amazon here:
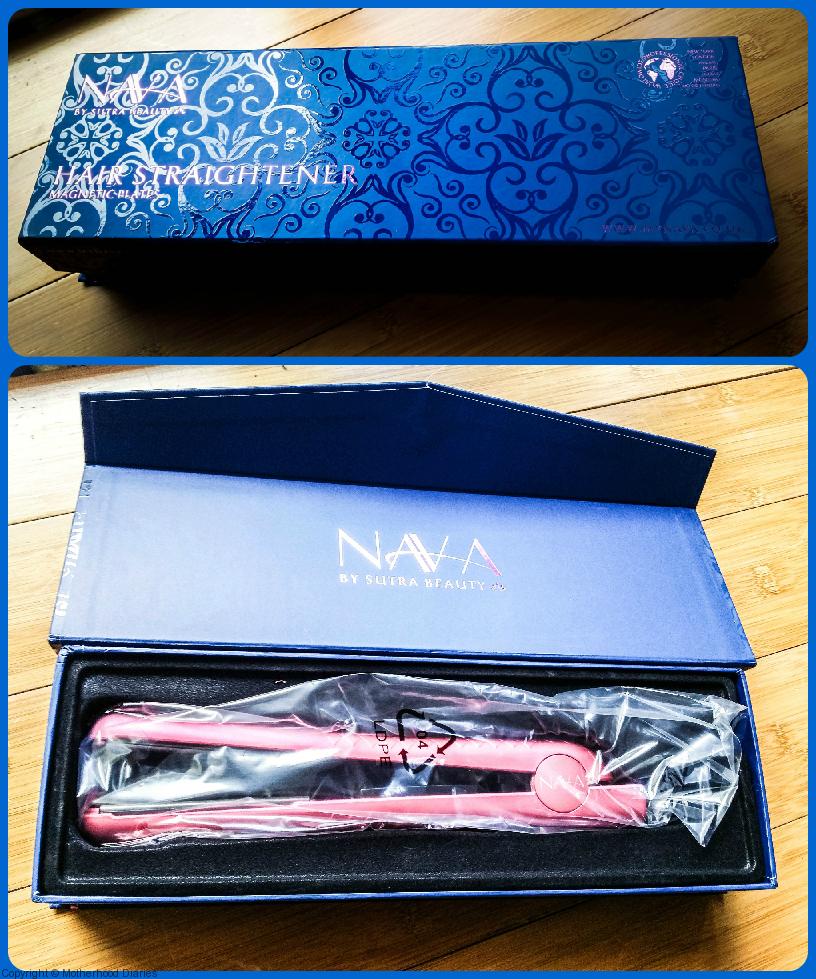
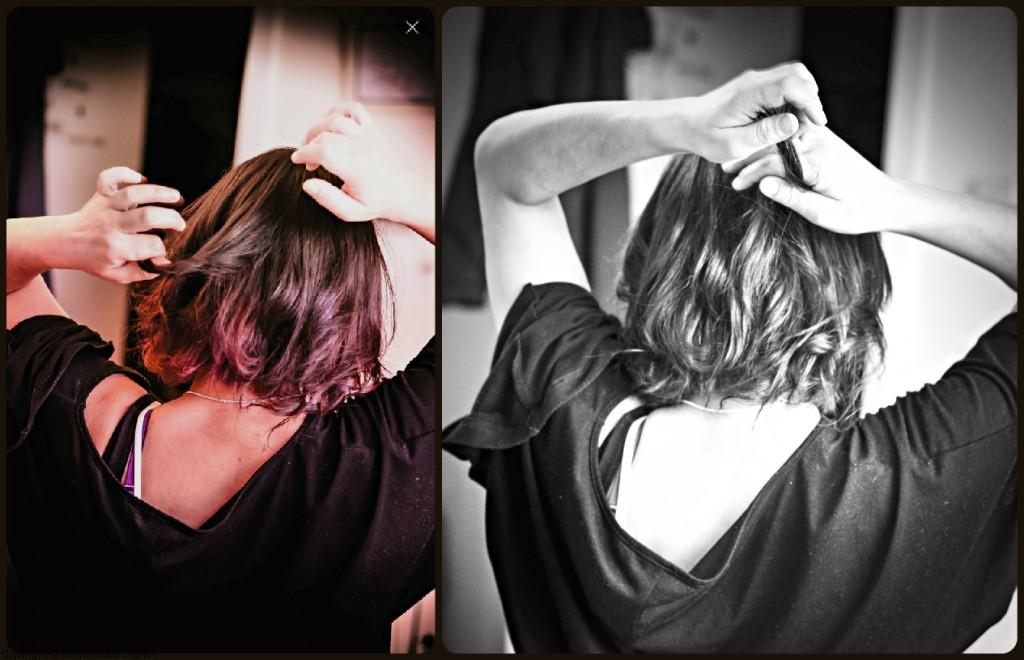
Being a regular ol’ ‘Curly Sue’, I welcomed the chance to review a pair of hair straighteners from a brand I’d never heard of before – Nava. My old straighteners had broken down quite a few months ago and I had a hair transformation just a couple of months after that, going from long curly hair to very short curly hair. So, I was given the chance to trial these new hair straighteners on relatively virgin hair.
I have very curly hair and, to make it worse, I’ve chopped it all off too. Sometimes, as a busy mum of 2 boys, I don’t have time to style my hair, so I just want to put it all up and hide it away. But, there’s no chance of that happening now because it’s so short…

Yep, that’s natural…
My original hair straighteners had broken down almost 6 months ago, so my newly chopped hair has been free from any heating tools for a while. As I’ve always been partial to GHDs because I believed they were the only brand that could straighten my curly hair, I was a bit sceptical of Nava at first. I didn’t know anything about the hair straighteners except that they were a pretty pink.
I was so eager to try them out, but the boys were in bed and it was late in the evening, so I couldn’t wash and blow dry my hair. Therefore, I decided to do something quite controversial – I was going to straighten my curly locks without washing and blow-drying them first (I had washed my hair earlier that day though).
Straightening in a rush
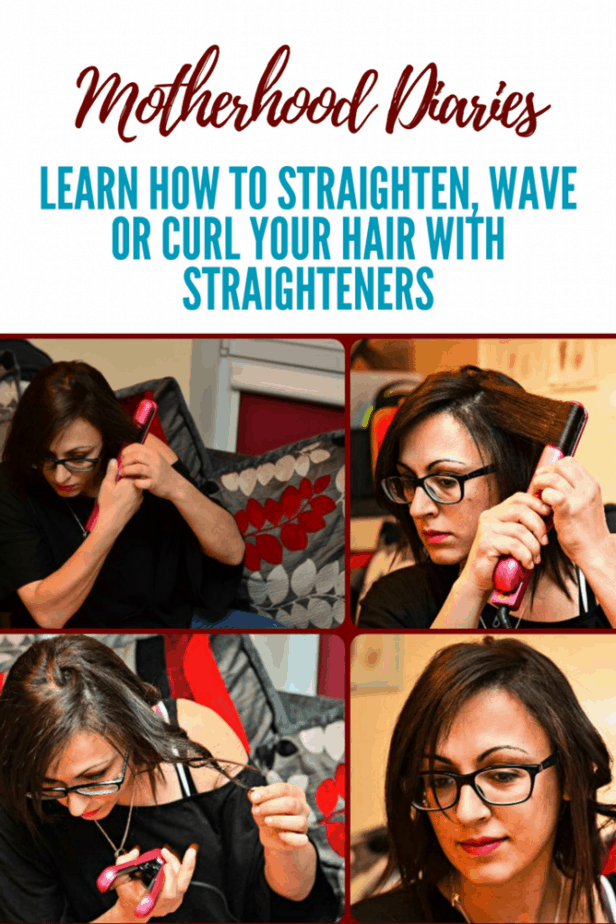
Haven’t got time to wash and dry your hair? No worries, follow my step-by-step instructions below for silky smooth hair in under 15 minutes. Make sure you haven’t got any other chemicals in your hair and you don’t get used to straightening without washing and drying first! These instructions are only for when you have less than 15 minutes to straighten your hair.
1. Spritz your hair with a heat protection spray
(a) This is a very important step because you need to protect the hair follicles from breaking apart.
(b) I used the classic TRESemmé Heat Defense Styling Spray, which I still believe is one of the best sprays for protecting your hair from the heat. And, don’t worry, you can use the spray on dry hair and straighten afterwards, it still protects the hair.
(c) Just spray liberally, about 6 – 8 inches away from the hair and use a brush to evenly coat the spray.
2. Divide hair into even sections
(d) Use your thumbs as a guide.
(e) Start at the top of your head and place your thumbs on your temples. Guide the thumbs up to the top of your head to where they meet in the middle. That’s your fringe section, which you can divide again in half and clip away if desired.
(f) Place your thumbs at the bottom of your ears. Follow behind your ears and up to where your thumbs meet in the middle, at the top. That’s your middle section. Divide that section in half and clip both parts in place.
(g) Place your thumbs at the top of your ears and follow the thumbs back (and parallel to the nape of your neck), to behind your head until they meet in the middle. That’s your lower middle section. Clip away.
(h) Leave the bottom free, as that’s the section you’re going to start with.
3. Brush all the knots out gently with a comb
(i) Use a comb to ensure the protection spray has coated your hair evenly, but also to ensure that all the knots have been brushed out. You don’t want to straighten knots because it’ll make them that much harder to brush out afterwards!
4. Grab your Straighteners – it’s time to get started!
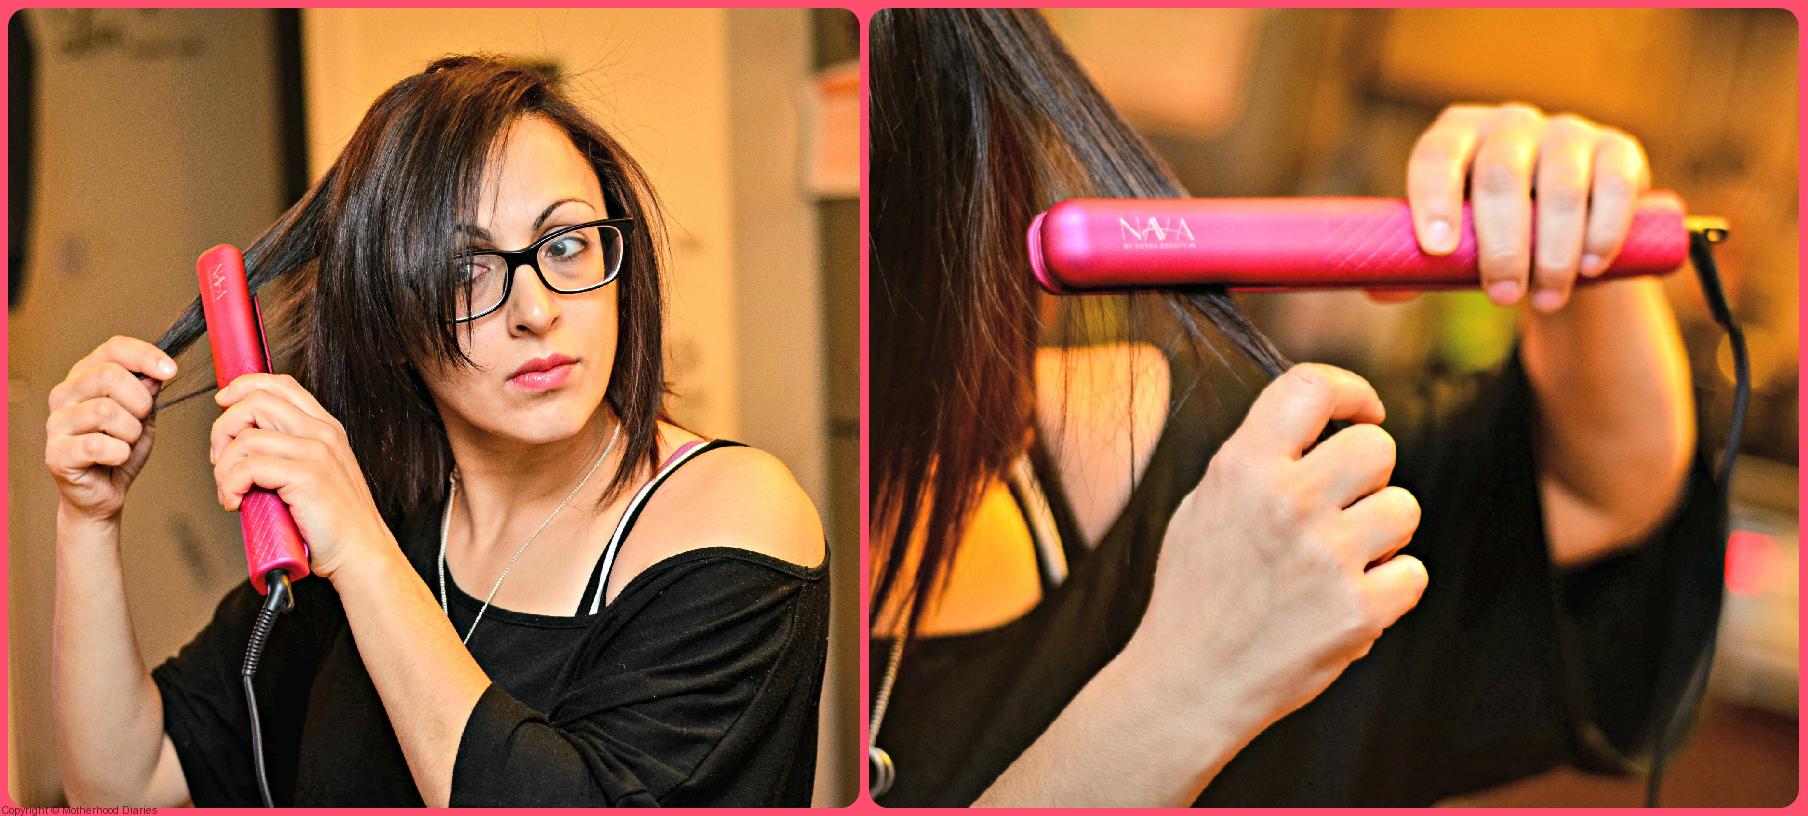
(j) Start with the bottom free section. Take a section of hair 2 to 3 inches wide and brush again with the comb.
(k) As you comb the section down, hold the hair taut and glide the hair straightener down once at a normal pace. Try not to leave the iron on your hair for too long.
(l) Now, here comes the magical part! Immediately brush the straightened and heated hair with your comb again and hold taut for a few seconds until the hair cools down. Heated hair stays in the shape that it cools down in, so this part is important.
(m) If you have seriously curly hair, like mine, you may benefit from another glide down the section with the hair straightener. But, be sure to follow step (l) of brushing the heated section with the comb immediately afterwards and holding the section taut until your hair cools down.
(n) Repeat through all sections of the hair, keeping the sections at around 2 to 3 inches wide, so that the straightening iron glides through the whole of the hair in that section.
(o) Once you’re done, grab a mirror and check for any kinks, brushing through the hair with a comb at the same time. If you find any, follow the above steps (j) to (l).
(p) If you want a bit of volume, instead of brushing through the heated section with your comb, use a large roller and clip in place whilst you’re straightening another section. Then, you can remove the roller and roll the newly heated section of hair. This creates a lot of volume and bounce, but it’s too poofy for my very short hair. For shorter hair, use smaller rollers. (I only had large rollers to hand.)
(q) Use hairspray to hold the look.
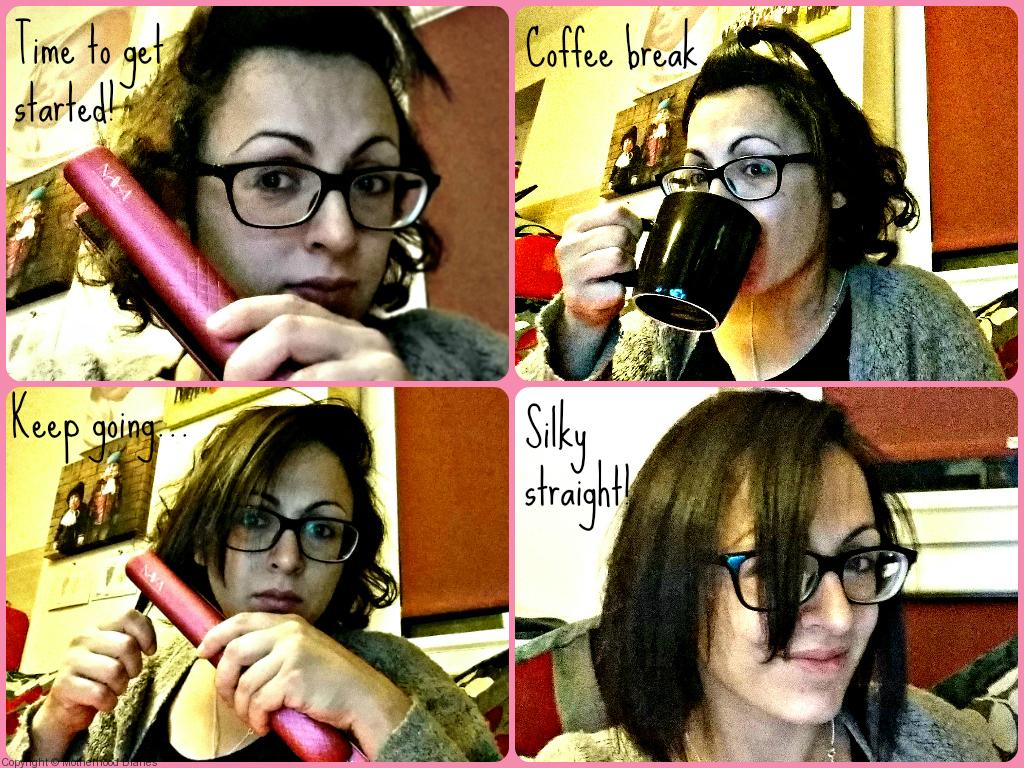
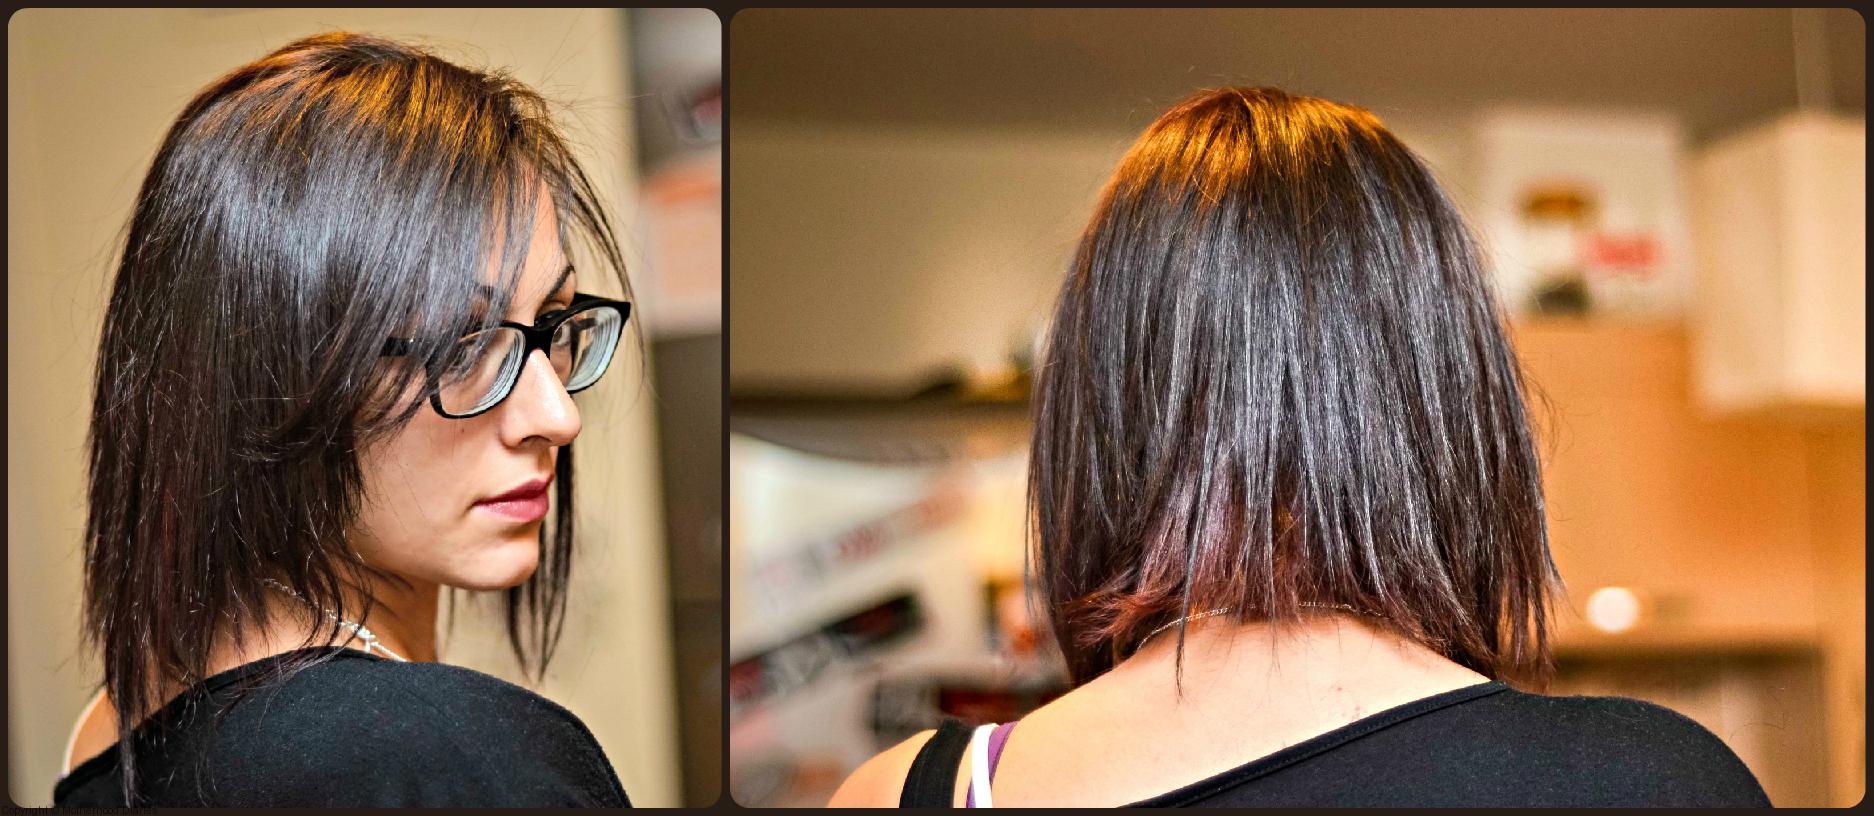
As you can see from the above picture, my hair is very straight and super silky! I’m so impressed with the results and my hair feels a lot healthier and shinier than when I use my regular burning GHDs.
If you don’t have a brush or comb to hand because you’re in a rush, just use your fingers. I did!
Look how straight my hair is!
The Nava Hair Straightener doesn’t just straighten hair – oh no! It waves and curls hair too! But how? I’ll show you:
Nice wavy hair
Ok, so not many people like poker straight hair because they feel like there isn’t much shape to the whole look. So, with a little spin of the Straightener, you can create some loose waves that give the hairstyle a lovely bounce and great texture – and it’s so easy to do!
- Create your sections as normal, using steps 2 (d) to 4 (j) (above) and, instead of gliding the hair straightener down, simply turn the straightener towards you in a half turn, so that the unstraightened hair is pointing towards you. Like this:

- For great waves, always turn the straighteners away from you and not towards you. So, on the left-hand side of your head, turn the straightener half to the left, and vice versa on the right-hand side of your head.
- Trick number 1: start halfway down the section of your hair, so the top is still straight, but the ends have a little bounce and wave to them.
- Trick number 2: don’t wave your fringe. For a nice side-swept fringe, straighten the hair on the opposite side of where you want the fringe to be and then flick back to the opposite side.
- Once you have created some lovely waves for your hair, go back and twist the waves loosely with your finger.
- Spray with hairspray to lock the waves in.
The result is a lovely textured look, which replicates the look of salon hair!

You want great curly hair, but not your normal frizzy curls!
Simple, simple, simple! Really!
- You follow all the rules of when you wave your hair but turn the straightener all the way around until the hair is pointing back in the right direction – away from your head. So, you’re turning one whole spin. But, be careful not to hold the straightener too tight, otherwise you won’t be able to glide the iron down through the hair.
- As you let go, let the curl fall and immediately twist with your fingers to lock the curl in.
- Again, start from just above halfway down the section, so that the top of the hair is straighter – it gives the whole look a more groomed finish.
- Finish with some hairspray and then brush the curls out lightly, either with your fingers or a wide-toothed comb. Or, you can just leave as is!

All the above works on longer hair too, of course. You can achieve longer-looking hair by investing in some (heatable) hair extensions and following the above steps for a straight, wavy or curly finished look.
If you want me to create a video on how to straighten, wave and curl your hair with the Straighteners, please leave a comment below this post. If I get enough interest, I’ll create a very extensive step-by-step process for you.
What did I like most about the Nava Hair Straighteners?
The Nava Hair Straightener heats up almost instantly and the temperature gauge allows you to control how hot you want the iron to be. The result is a very silky, smooth and straight hair – a far cry from my frizzy curls!
What to watch out for:
230C is hot, hot, hot! So, keep those fingers away when you’re waving or curling, you might just get burned.
Rating:
5 out of 5 – A sleek styling tool and a worthy contender to the GHDs. The Nava Hair Straightener has everything, from an aesthetically pleasing pink style to precision formula to protect hair from damage through heating.
*Collaborative featured post*


Nava Hair Straightener will help me lessen my visits to salon,saving my time and money.
With these straighteners, definitely! #It looks like you’ve stepped out of a salonnnn!# hehe. Best of luck x
I loved your photos of your curly, straight and wavy hair. It looks very simple and maybe I could even do it lol Thanks
Thank you and, yes, it’s so simple! I’m in the process of making a video, so hopefully that will help. Best of luck x
I love your photos! it’s amazing how this flat iron can straighten your curly hair!
Thank you! It’s really up there with GHDs to be honest. Best of luck! x
I love your photos and your hair ! it looks amazing wavy ^^
Thank you so much, Silver, that’s really kind. The waves really make the hair have more texture – and it’s so easy to do! Good luck x
Nice tutorial , thanks , and yes, I would love a video!
Thanks Ana, a video is on the cards. Best of luck! x
Great tutorial but a video would be ever better!
Thanks Holly! Ok, consider the video on the cards hehe 🙂 Good luck! x
This straightener looks like it can work wonders, and I would love to have one! It would be awesome if you could do an instructional video on how to make the waves!
Hi Inge, thank you so much! It really did work wonders. Good luck with the giveaway and I’d love to create an instructional video on making the waves. I’m on it! 🙂 x
Nice tutorial , thanks
Thank you Arianne, hope it helped! Best of luck with the giveaway 🙂 x
Beautiful tutorial
Thanks Andreea, good luck! x
What a difference it made! I can’t believe such curly hair is now so smooth and straight. What a great product!
Thank you, Wendy, I know! I wasn’t expecting it to be honest as I was quite sceptical, but I think the Nava Hair Straightener is up there with the best of them tbh! Good luck with the giveaway! x
loved your tutorial and this hair straightener looks lovely and effective
Thanks Karin 🙂 I couldn’t believe how easy it is to straighten hair with the Nava Straightener! Best of luck with the giveaway x
lovely tutorial, thanks! 🙂
Thank you, Cogito. Wishing you the very best of luck with the giveaway 🙂 x
loved your tutorials, thank you!!
Thanks Nikolina, best of luck with the giveaway. The straightener is awesome! x
wonderful tutorials, great giveaway
Thanks Kristen, good luck! 🙂 x
Don’t forget guys, you can grab the straighteners for just £49.99 here! https://www.mynava.co.uk/go/motherhood-diaries-bn.
Type the code ‘md_supersaver’ in the payment cart for your £30 discount. Best of luck! xx
P.S – I’ve replied to you all, but it’s not showing up for some reason. Just wanted to say thank you so much for commenting and reading my post. I wish you the very best of luck with the giveaway. They are such awesome straighteners that I know they will bring joy to whoever wins. Fingers crossed! xx
Nice tutorial, but a video would be a good idea too! 😉
Great Tutorial! Keep it up! A video next time 🙂
Thanks for the giveaway 🙂 nice tutorial nd styling..and yeah staright hairs luking more goregous so would like to have video on straight hairs
Great tutorial! Thanks for sharing this!
DIY can be great
Sounds great 🙂
Wow! Great tutorial as well as the giveaway 🙂
Great tutorial! Thanks
Really good tutorial, this straightener looks very effective! Thanks for this lovely giveaway 🙂
Cross my fingers here in Sweden! Thank’s for a great blog.
its really fantastic <3
Great tutorial with images! But i would like to watch a video, anyway, your tutorial it’s very simple and enlightening! And about the Nava Hair Straightener, i think it is very good, makes a great job with hair and it is fantastic! Thanks :3